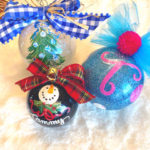
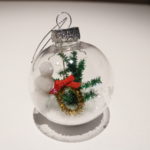
Welcome to my first DIY Challenge hosted by Terrie @Decorate and More with Tip! I'm so excited to be here! On the first Wednesday of the month, Terrie hosts a DIY Challenge with a group of talented bloggers who love to create budget friendly décor for their homes. For December's challenge we were tasked with turning a clear, plain ornament into something beautiful! If you're coming over from Decorate and More with Tip, isn't Terrie's keepsake snowmen ornament adorable? I'm sure her grandaughter will cherish it forever!  Disclosure I am a participant
in the Amazon Services LLC Associates Program, an affiliate advertising program
designed to provide a means for us to earn fees by linking to Amazon.com and affiliated
sites, this post may contain links. I may receive a very small commission at no
cost to you! The affiliate money I earn helps pay my crafting expenses. Thanks
so much for your support!
Disclosure I am a participant
in the Amazon Services LLC Associates Program, an affiliate advertising program
designed to provide a means for us to earn fees by linking to Amazon.com and affiliated
sites, this post may contain links. I may receive a very small commission at no
cost to you! The affiliate money I earn helps pay my crafting expenses. Thanks
so much for your support!
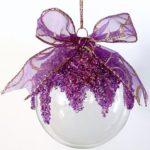
Embellishing plain, clear ornaments is a fun craft with unlimited decorative possibilities! And it's right up my alley, too! I love handcrafted ornaments and over the years I've decorated clear ornaments into some lovely pieces you can see here, here, and here. But this time I wanted to do something a bit more daring but easy, too! So I'm going to turn a clear plain ornament into a magical work of art using clear seed beads, alcohol ink and glue. It's a great way to customize a clear ornament with my favorite color, purple! I think you will be amazed at the end results! It kooks quite stunning, I must say!
Materials Used:
Let's start with gathering some of those old glass seed beads from my stash! AC Moore was famous for bins of seed beads on sale! I loved shopping there and I miss the sixty percent coupons they were famous for, too! Next, on the list is the alcohol inks - of course in my favorite shades of purple. Plus a container to mix the beads and alcohol in, and something to stir with - like a skewer stick you can throw away afterwards!
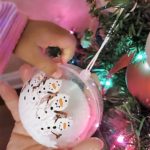
Now let me show you how to make this adorable ornament! First, pour the seed beads into a clean jar - I used an empty yogurt jar that I cleaned with alcohol to remove any oils and residue. Then add a few drops of alcohol ink to the beads. Alcohol inks can be used to change the color on a variety of surfaces including plastics and glass. It's also fast drying and fade resistant! But you don't want to add too much at one time - a little bit goes a long way to color objects!Once you've added a few drops, blend in the ink by stirring with a skewer stick to see how the color looks. Add more ink . . .if needed, stirring the ink and beads together.Have fun adding different inks until . . .you have the shade you like!Then dump the dyed beads on a sheet of parchment paper to dry thoroughly. Remember that the alcohol ink will stain so be careful until the beads dry.While the beads are drying, wipe the clear ornament with alcohol to remove any oils or residue and let dry.Next, using the tip of the Quick Hold glue as an applicator, begin spreading the glue on the ornament in a decorative design from just below where the bottom of the cap is to midway.I wanted the seed beads to look like they are dripping from a bead covered area on the ornament.Once the glue is applied, generously sprinkle the beads on the glue while holding the ornament over a bowl to catch the loose ones.Once you've sprinkle all the beads onto the glue, pour the loose ones back into the jar to continue adding more beads to the design.Use your fingers or the back of an old spoon to lightly push the beads down into the glue for extra adhesion and uniformity.When finished adding the beads, sprinkle a bit of glitter on for added glitz! Prop the ornament on top of a cup to dry.
Once the glue is dry, seal the beads with a layer of Mod Podge and let dry.
Replace the ornament cap - (I rubbed a bit of gold Rub n Buff on the cap to match the gold in the ribbon) then cut a piece of wire edge from a strip of ribbon to make a hanging loop and . . . small bow with tails to glue onto the top.
How pretty is this!
This challenge was so much fun! Next up is Cindy @
Cloches and Lavender sharing a fabulous way of using silver leaf on ornaments!
Be sure to click on each of the creative bloggers listed below to see how they transformed their clear ornaments for this challenge


WOW! Your ornament is beautiful and something we all would love hanging from our tree. Something so beautiful and special you can't find in a department store. Love the details. Thanks for sharing. Never new to use ink to dye beads good to know!
ReplyDeleteThanks, Terrie! I enjoyed making it! This was such a fun challenge! Thank you for inviting me to join this group of very talented ladies!
DeleteGail I've never used Alcohol Ink or Quick hold glue before, but now I'm thinking of how and where I can use them. Beautiful ornament!
ReplyDeleteThanks so much, Tammy! It's a great way to color lots of craft items!
DeleteWhat a beautiful ornament! It reminds me of an ice cream cone-- I didn't know you could dye things like that. I pinned it.
ReplyDeleteThanks Liberty! Come to think of it, it does look like an ice cream cone, lol!
DeleteYour ornament is just stunning, Gail! I love the deep rich purple and gold together and the addition of the ribbon is perfection! Awesome job!
ReplyDeleteThanks so much, CD! Yes, I love the purple and gold combination, too!
DeleteYour ornament turned out beautifully!!! I love the rich hues of the purple and gold together!!
ReplyDeleteThanks, M! I love how the colors show up so vibrant and rich, as you say. Better than I expected!
DeleteThis came out so pretty!!! Love these.
ReplyDeleteThank you so much, Jodi!
DeleteThis so beautiful and I never heard of dye ink, thanks for the info.
ReplyDeleteDon't you just love Rub N Buff? Pinning.
Such great inspiration!
Cindy
Thanks, Cindy! I know, Rub n Buff really comes in handy! And I think you might like alcohol inks, too!
DeleteTodos tus trabajos son preciosos y siempre los acompañas de grandes tutoriales. Tu creatividad es asombrosa .
ReplyDeleteBesos
Thanks so much, Lola! I try my friend!
DeleteThis is absolutely beautiful!!! I love it and will give it a try!
ReplyDeleteIt's gorgeous, Gail!
ReplyDeletenice post
ReplyDeleteweight loss exercise at home
I love these - very clever!
ReplyDeleteThat ornament is beautiful! Purple is my favorite, too. The beads reminded me of my lilacs or wisteria cascading. Have never tried alcohol inks or Quik Hold. My household is held together with E6000! Great tutorial!
ReplyDeleteStunning, I love how sparkly it is.
ReplyDeleteStunning ornament!! And an awesome tutorial for other makers to follow. I've picked this as one of my features at this week's Snickerdoodle Create Bake Make Link Party :)
ReplyDeleteAlexandra
EyeLoveKnots.com
Your ornament is outstandingly gorgeous! And your directions are wonderful! I'm visiting from the Snickerdoodle Create Bake Make Link Party. Smiles, Linda at Paper Seedlings
ReplyDeleteFantastic!! you are doing good job! I impressed. Many bodies are follow to you and try to some new.. After read your comments I feel; Its very interesting and every guys sahre with you own works. Great!!
ReplyDeleteve may bay di trung quoc
vé máy bay từ sài gòn đi thượng hải
vé máy bay từ hà nội đi quảng châu
vé máy bay từ việt nam đi đài loan
ve may bay di dai bac
I definitely enjoying every little bit of it and I have you bookmarked to check out new stuff you post.
ReplyDeleteOrnaments
Felicidades por un trabajo fantástico... lleva tu sello y tu color,
ReplyDeletedesde que he visto la imagen en Handmade Monday sabía que era tuyo.
Gracias por el tutorial ... aunque me cuesta seguir todo bien con el traductor de Google.
BESOS
Seed beads design ornaments are intricate and beautifully crafted items made from tiny, uniform beads that are strung together to create decorative designs. These beads are often used in jewelry-making, embroidery, and other crafts to add texture and color. The attention to detail in creating seed bead designs mirrors the precision found in products like elfliq e-liquid, which offers a well-balanced and enjoyable vaping experience, designed with care and creativity for a seamless result. Both celebrate the artistry of crafting with fine materials
ReplyDelete