Thursday, June 16, 2022

Bumblebee Wall Decor DIY


There's something about bumblebee crafts that offers a refreshing feel of nature for spring and summer- and who doesn't love the look of those adorable handmade bees! Celebrate your love of bumblebees with this whimsical bumblebee wall decor diy! I know you've seen quite a few ready-made bumblebees just waiting to adorn a wreath, but how about instead of buying one - which can be somewhat costly - why not make your own! My adorable DIY bumblebee is made of corrugated cardboard covered in paper vinyl from the Dollar Tree and trimmed in grapevine garland. It's an adorable upcycle craft!

Monday, June 13, 2022

Floral Hoops Decor DIY


I've fallen in love with floral hoops decor!  Hoop crafts are quite trendy these days! But I was into it way back in 2012 when I first started blogging! Back then, I created a Ballard Design Knock-Off using embroidery hoops that I still have on my bedroom wall today. And you won't believe the item that I knocked off is still available from the store today! I never would have thought that! And then I made a Macrame Mail Stand recently out of 12" wood hoops that comes in real handy for incoming mail!

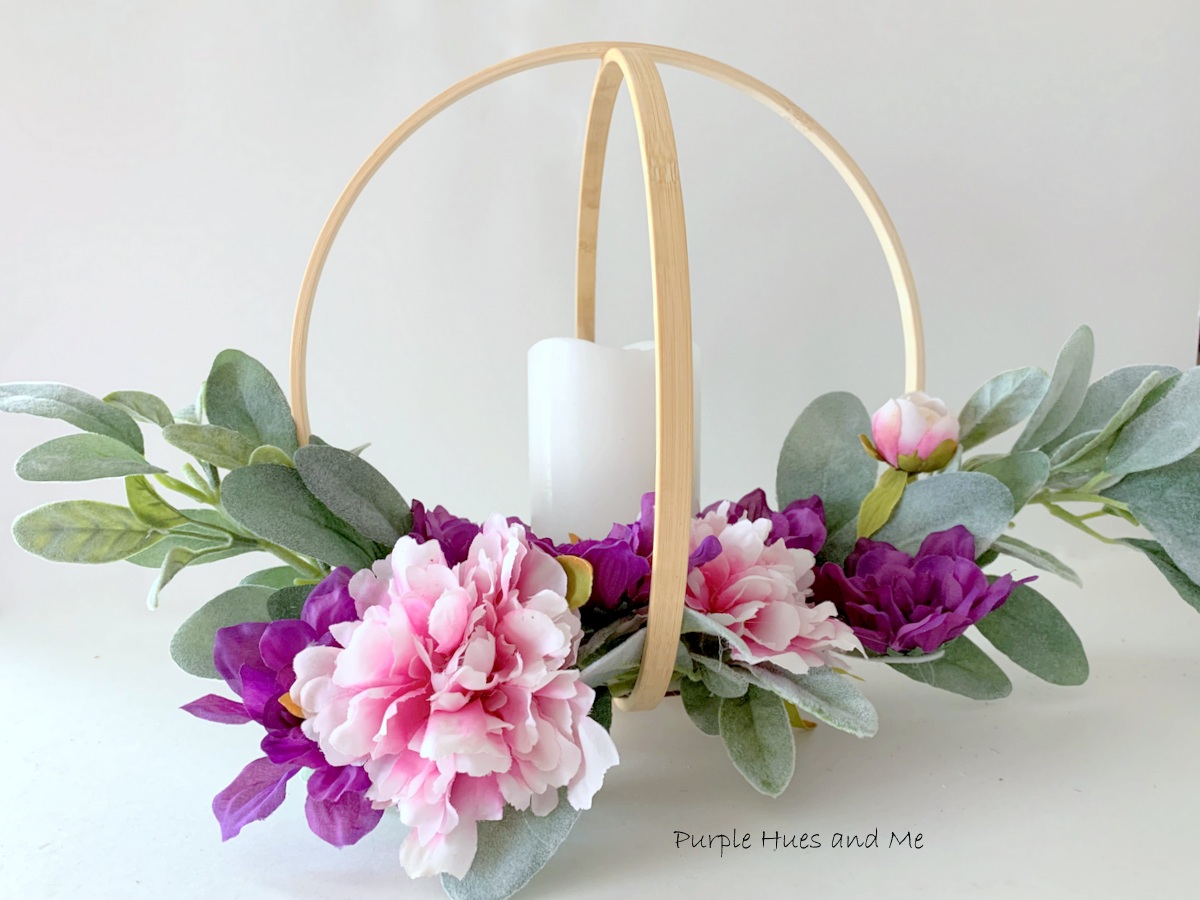
Floral hoops decor is the perfect addition to your summer decor! They are pretty, trendy and quite budget friendly! And are also very popular to use in decorating celebrations like weddings, anniversaries and birthdays!

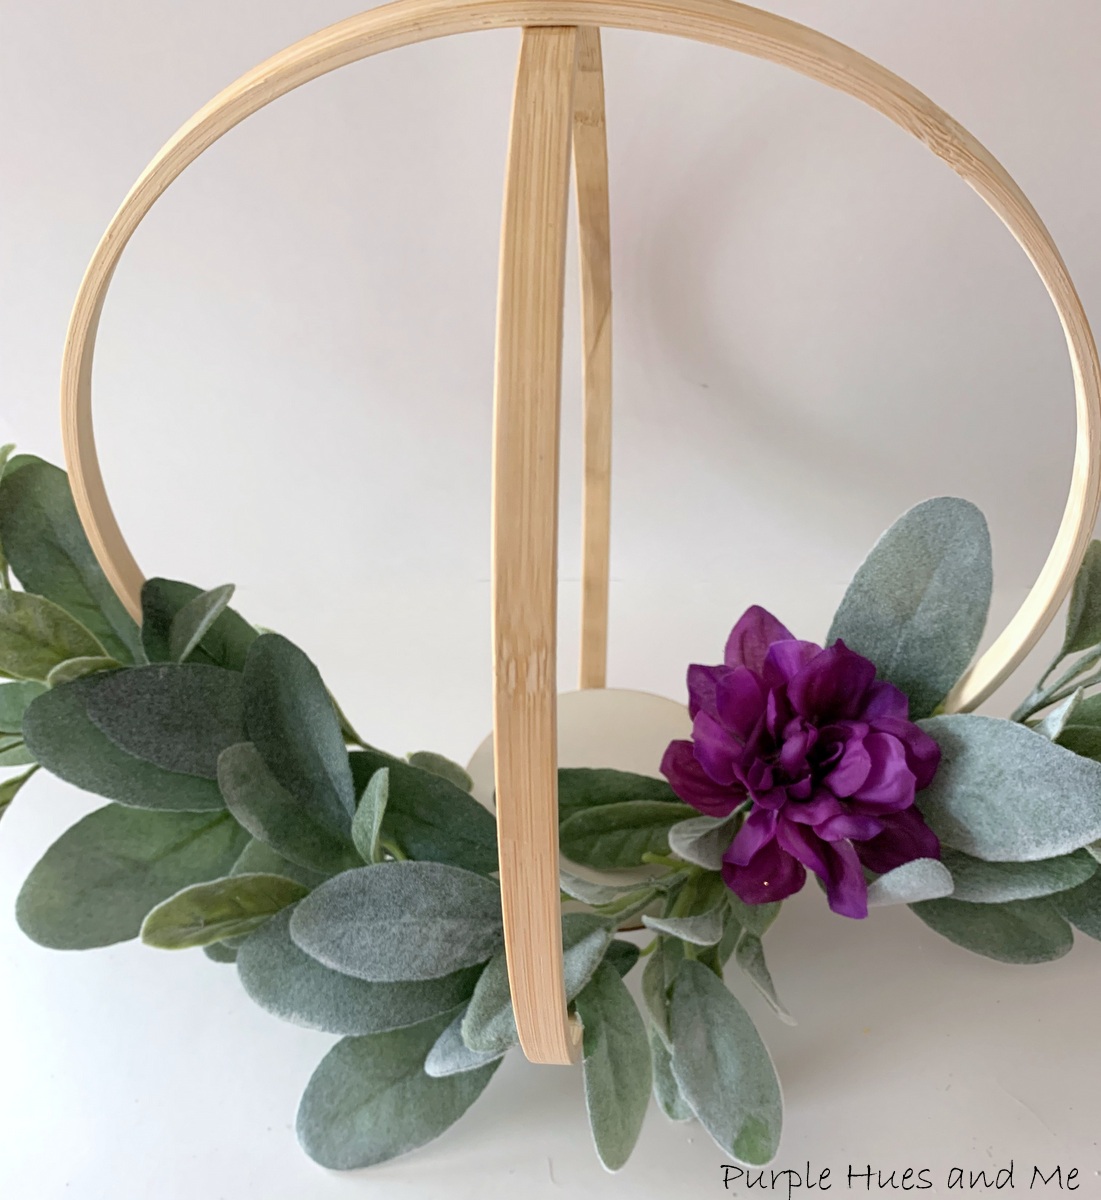
There are quite a few ways to decorate and customize hoops - choosing flowers and colors that suit your taste and style and even the size with all the different hoop sizes available - including the hula hoop! Lol! And the best part, this easy to make decorative piece can be used as a centerpiece or hung anywhere in your surroundings - indoor or out!

Materials:

  • Wood hoops - (2 of the same size)
  • Tape measure/pencil
  • Rapid-Fuse Glue - (quick grab permanent glue)
  • Clamps
  • Wood circle - 4"
  • Asst. Florals and greenery
  • Hot glue
  • LED candle


How To:
Insert one hoop into the other in a criss-cross or intersect pattern. Use a tape measure to make sure the hoops are evenly spaced and centered. Mark spots where they intersect with a pencil at the top and bottom of the hoops. Add a permanent, quick drying glue like Rapid-Fuse to the spots to secure the hoops together.


Then add a 'shelf' to hold a candle or small planter by placing a wooden circle on the bottom of the hoops and securing with permanent glue. Use clamps to hold in place until dry. 


Once the glue is dry on the hoops and wood circle, begin attaching the lambs ear greenery to the hoops. At first, I used wire to secure the lambs ear but didn't like the look of the exposed wire, so I switched to using hot glue.

I decided to let the lambs ear fan out naturally along the base of the hoops - then gluing in place.
Adding a bit more!
And of course I had to add florals in my favorite color, purple .  .  .
using the heads of the flowers to make a bold statement, gluing them along the lambs ear foliage.
And then adding a few pink peony-like florals to the mix! I didn't want to crowd the base with all the florals and greenery I had selected earlier so I kept things at a minimum. It certainly looks lovely, as is .  .  .

but adding an LED candle to the center completes the look!

Now it's perfect!
Although, it can be customized to suit the occasion! Like adding remote control twinkle lights, and a hook to hang from above! Have fun creating your own!
A super simple DIY that will surely leave a lasting impression!

 I hope you enjoyed my tutorial on making an adorable Floral Hoops decorative piece created especially for this month's Summer Crafts Blog Hop, hosted by Beverly @Across the Blvd. Joined with a group of creative bloggers to bring you a themed monthly challenge blog hop on the 2nd Monday of each month! 


Meet this month's co-hosts:

Beverly | Across the Blvd
T’onna | Sew Crafty Crochet


Tuesday, June 7, 2022

Decoupage Napkin Lampshade Makeover


Welcome to our Sustainable Pinterest Challenge Blog Hop hosted by Julie  @Sum of Their StoriesThis month the theme is "Thrift Store Find" which includes items from garage, yard, and moving sales - even items found by the side of the road!

I got this lamp from a friend's moving sale several years ago. As you can see, the shade has yellowed and doesn't look too good right now. The lamp desperately needs a new lampshade, don't you think! I was inspired by this pin to do something with decoupage - "the art of decorating an object by gluing paper onto it in combination with special paint effects, gold leaf or other decorative elements." 
I want to keep the base as is. I think it's still lovely with little pink flowers and gold swirls all over in a ceramic finish.
Sometime ago, I found a lampshade at the thrift store for $1.50! But, it too just sat on the shelf - until now! I love to decoupage just about anything. It's such a fun way to decorate items - especially when you have cool looking napkins .  .  .
like this one!
A perfect design to decoupage the lampshade!

Materials used:
Decorative napkins
Scissors
Mod Podge
Paint brush
Parchment paper
Travel iron
How to:
First, cut out the flowers from the napkin carefully following the lines of the flower pattern .  .  .
keeping them grouped together.

Then separate the napkin paper layers by lightly dipping your forefinger in Mod Podge and taping your thumb and forefingers together to get them sticky. Then tap  the edge of the napkin to peel the printed layer from the plain layers. 
Next, brush a layer of Mod Podge on the lampshade where you want the napkin flower design to go. I started at the back seam of the lampshade. Then gently smooth the napkin flower design down. 
Using the brush to smooth the flowers out. I usually use a clear plastic ziplock bag to help smooth the wrinkles out. But .  .  .

this time, that didn't work on the lampshade. When I laid the plastic over the napkin and smooth it out, then tried to remove the plastic, the flower napkin stuck to the plastic instead of the lampshade and I couldn't separate them without tearing the napkin. Imagine my disappointment! 

So I had to start over - applying Mod Podge and then the napkin - smoothing it out with the brush, adding more napkin designs around the lampshade. Then I let it dry overnight.
Once the napkin flowers were completely dry, I laid parchment paper over the design and used a small travel iron to smooth the wrinkles out. 
There are so many variables involved when decoupaging. The quality of the napkins - the ones used here were quite flimsy and the material of what you're trying to decoupage - in this case, the fabric of the lampshade. I think it soaked up the Mod Podge, so there wasn't very much adhesion at first. Anyway, the second time worked! Thank goodness! And the lampshade looks adorable!


Now, it's time to meet the other participants and their projects!

Julie | Sum of their Stories
Gail | Purple Hues and Me
Julie | Treasures Made From Yarn
Allyson | Southern Sunflowers
Mel | Decor Craft Design
Niki | Life as a LEO Wife
Ann | The Apple Street Cottage

You are invited to the Inlinkz link party!

Click here to enter