Friday, October 26, 2018

Sweet Inspiration Party #130

 Welcome to our Sweet Inspiration Link Party #130

Fall has finally arrived with cooler temperatures and beautiful autumnal colors! Hope you had a great week and are looking forward to joining our party today! Thank you so much for taking the time to be a part of this wonderful party and share your awesome projects, ideas and inspirations! 

The party starts on Fridays @7am EST or 11am GMT and runs through the following Tuesday. Plenty of time to link up your creative ideas! By joining us every week you will be able to grow your blog, meet new blogging friends and have your ideas and inspirations seen and shared by all of us who link up!

The hosts will be visiting everyone who join to share your inspirations, ideas and creativity! And of course enjoy the possibility of being featured by one of the party hosts! We truly appreciate and thank you dearly for joining us each week!


On to our Features:


I just love the way that Laura from Not a Trophy wife styled her oh so gorgeous "Girly Pumpkin". Those faux furry leaves are just the best and look so good against the navy. https://notatrophywife.com/2018/10/girly-pumpkins/


If you like the perfect velvet pumpkins you see but you cannot afford the price there is a great tutorial so you can make them all by yourself. Julie from My Wee Abode gives us so many details and tips to make these beauties https://myweeabode.com/diy-velvet-pumpkins-just-like-the-pros/

I love this post from Kari at A Grace-Full Life. In today's fast paced, and social media obsessed, society, we are often putting self-care on the back burner, and suffering the consequences of it. Kari tells us why it's so important to take care of ourselves, and gives some great suggestions on just how to relax. https://www.agracefull-life.com/2018/10/repeat-after-me-self-care-isnt-selfish.html

I look forward to Christmas each year like a little kid. And I'm always on the lookout for things to repurpose or upcycle into Christmas decor. So when I saw this adorable vintage horse painted all up for Christmas by Leanna of Faeries and Fauna you know I was smitten! https://faeriesandfauna.com/2018/10/how-to-makeover-a-vintage-toy-horse-for-under-the-christmas-tree/


My hubby loves everything raisins and I'm always on the lookout for different kinds of raisin recipes! This one from Stacie @Simply Stacie looks delicious and filled with lots and lots of raisins! I might surprise hubby by making these yummy looking Sour Cream Raisin Bars! https://www.simplystacie.net/2018/10/sour-cream-raisin-bars/


Our Most Popular post is from Laura @Decor To Adore! We all love the Target Dollar Spot for inexpensive decorative items! Laura easily transformed basic wooden houses into adorable Hansel & Gretel Halloween Houses! Love the transformation, and you will, too - be sure to stop by to check them out!
https://www.decortoadore.net/2018/10/hansel-and-gretel-halloween-houses.html


If you were featured, proudly display this button on your site! Congratulations!

Let's Get this Party Started!
Party Rules

  • It would be appreciated if you follow us on at least one social media.
  • You can link up to 3 posts, DIYs, Home Decor, Crafts, Recipes anything family     friendly goes!
  • Yes, you can link up posts with affiliate links. 
  • Please link up your own work, no ads. And please no link parties.
  • Linking gives us permission to share a credited photo on our social media accounts. Please keep in mind that linking up with stock photography or using photos without express permission by the photo owner is not allowed. Links of stock photography or photos that are not owned by you will be removed without notification. 
  • If you wish to pin the features please do so by going to the original post.​


Disclosure: By submitting a link to the Sweet Inspiration Link Party you are giving the party hosts permission to feature your link/post on our blogs, social media and future round up posts. This includes images from the linked post as well as linking to your social media accounts. Purple Hues and Me and all Sweet Inspiration Link Party co-hosts respect you and your work. Everything will be properly linked back to you and given credit


Please Note:   Linking up with stock photography or using photos without express permission by the photo owner is not allowed. Links of stock photography or photos that are not owned by you will be removed without notification


An InLinkz Link-up

Thursday, October 25, 2018

Transform Thrift Store Candlesticks for Fall


It's that time again for The Thrift Store Upcycle Challenge on the fourth Thursday of the month, where a group of creative bloggers come together to share their lovely transformations of a thrift store item. Who doesn't love thrift store upcycle projects - whether it's actually creating one or admiring how an item from a thrift store was transformed!


The Rules:

  • Upcycle an item(s) from a thrift store, resale store, or garage sale into a new piece of decor.
  • There's no monthly theme.
  • There's no budget to stick to.

Meet the Hosts


 Marie | The Inspiration Vault  Michelle | Our Crafty Mom 


  Habiba | Craftify My Love

 Lynne | My Family Thyme   Debra | Shoppe No. 5

Make sure you follow our board on Pinterest for more upcycled decor inspiration!

Usually, there are lots and lots of candlesticks and candleholders at the Goodwill Thrift Store and most of the time, I just walk on by! But not this time - I couldn't pass these up because of their height and price! You know the type that stands on the floor - a whopping 24 and 22 inches tall! Oh my! And for three dollars each! Wowee! Worth every penny and more once you see what I did with them! The taller one had a dent in the base, but I doubt anyone will notice - not unless you go looking! Lol!

Anyhoo,  the candlesticks were originally a drab, dark looking brass, so I touched them up with a metallic copper multi-surface craft paint, and then wiped it all off and let dry - just to tone down the brass for a more coppery look.
Next, I took two mini pumpkins and transformed them into luminaries using two LED votives (Dollar Tree). Simply by cutting a ditch in the pumpkins around the votives so they can easily be lifted up to turn on and off.

And then decorate the base by gluing on fall foilage and an assortment of colorful leaves and feathers  .  .  .

for a custom decorative Fall look for lovely thrift store candlesticks!
So simple!


And now for more thrifty goodness!

Check out what my fellow upcyclers created below!


Tuesday, October 23, 2018

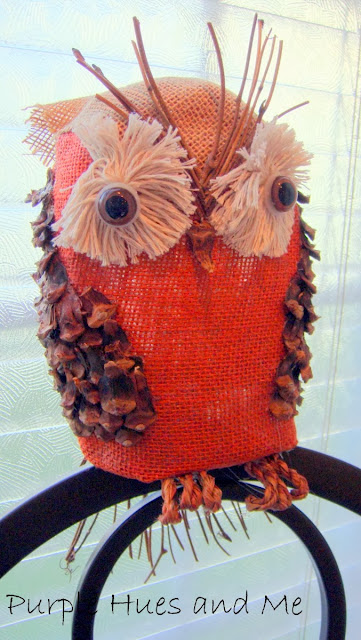
Upcycle a Soap Bottle Into An Owl

Have I got a fun project to share with you from a few years ago! Handcrafted owls continue to be very popular and I still love making them! I plan on making a few for Christmas and was revisiting some of the ones I made a number of years ago. For this owl, I was inspired from one I saw at World Market which is no longer available.  I love recycling bottles and  thought this would be a fun project to do featuring an owl made out of a recycled liquid soap bottle. 

To make, you will need:

  • Liquid soap bottle - empty and clean
  • Burlap
  • Aileen's Extra Tacky Glue
  • Cotton twine
  • Pinecone scales and twigs
  • Floral twine wrapped wire


1.  Using an empty liquid soap bottle (shaped somewhat like an owl), I removed the labels and cut off the screw top with a hot knife. I used the large refill size but the smaller size is the same shape.

2.  Glued burlap onto the bottle with Aileen's Extra Tacky Glue.

3.  For the eyes I used cotton twine from the dollar store and made them like I did here.

4.  To cover the hole in the top of the bottle I cut out a square piece of burlap and glued it on with the pointed edge between the eyes. Then glue twigs into the shape of a "v" between and above the eyes.

5.  Make sure the pointed edge of the burlap is centered before gluing on the back and  gently creased the two edges that are to the left and right of the owl's head.

6.  Use a glue gun to add pinecone scales to the sides of the owl.

7.   Overlap the pinecone scales from the bottom to the top sides. 

8.  Add twigs (for tail) to the back bottom of the owl.  I used more scales here to cover the top of the twigs. If you want, you can completely cover any remaining areas of the owl with twigs or with any natural fibersThe options are endless.

9.  Use three pieces of floral twine wrapped wire glued together to make each of the owl's feet.

 10.  Add a large pinecone scale between the lower portion of the eyes for the beak.


And it's done!  Quite simple and easy to make!  


Now, for my inspiration:

                                     Theirs                                                 Mine

An adorable owl perched on a leaf filled grapevine hung with jute twine! 


This precious owl vine swag can be hung on the wall or tied to a front door.  What a great fall accessory and a wonderful way to greet friends and family for the holidays.

Take a little time to enjoy!