
I fell in love with fringing burlap to make flowers here. But then I discovered these awesome bendable burlap flowers at Craftionary and knew I had to combine the two to make a fringed burlap and bendable flower wreath. How awesome is that?

I'll take you through my process, but make sure you check out Hani at Craftionary first and the awesome job she did in making her burlap bendable flowers.
To begin, I used the following:

Remove the tape and let dry.

After drying, on the unglued edge end, find the center thread and begin pulling the thread out. The fabric will bunch up as you are pulling the thread, and I found it easier to grab the opposite end of the burlap and pull that end too - the thread comes out easier. Continue pulling all the threads out, one by one, until you reach the glued borders.
 Add glue to the edge and fold, lining up the edges evenly. (forgot to take a picture of it with the orchid burlap)


After the glue dries, I cut the frays to even the edges. Repeat the process for the second piece of burlap.
For the wreath, I used a flat 18" MDF wreath form. It's cheap, but I found it too narrow, so I cut out a piece of heavy duty cardboard and glued it to the back of the wreath form.

I then painted the wreath. Hmm, I know some of you are not fans of purple, but I wanted a wreath made out of a different shade of the usual brown/tan burlap. There are so many shades and prints in burlap now to choose from, so take your pick . . .
 While the wreath dried, I started on the flowers. I used another color of burlap in lavender which was a little lighter. I followed the tutorial from Craftionary, but I could not make my flowers like she made her beauties. I coated my burlap with mod podge to make the fabric stiff. While that dried, I twisted fabric coated floral stems into the shape of flowers using three different sizes of cardboard tubes.
 Craftionary says to use "white glue or mod podge to firmly press the petals on the burlap, and then place books or something heavy on the top. Let it dry! After 4 to 5 hours see if it's all completely dry."
Well, I tried this way and it didn't work for me. After pressing the petals onto the burlap, I placed books on top and let dry overnight - at least 8 hours or more. The next morning the mod podge still wasn't completely dry and all of the petals did not stick to the burlap, either. Maybe it was because the stem wire was 18 gauge which is rather heavy and hard to adhere, but that was the only size I could find in green. I was so disappointed. What was I gonna do now? I had fallen in love with the look of the bendable burlap flowers so I was determine to find a way that worked for me.
Since I had a hot glue gun with a fine nozzle for detail work, I tried gluing cut out pieces of burlap to the petals. This looked messy and sometimes the glue would dry faster than I could press it together.
Then I thought about using something I had on hand called Fabri-Tac Adhesive the same way as with mod podge.
 DING, DING, DING! I found a winner! I put fabri-tac all around the wire petals and pressed firmly on the burlap. After placing a book or heavy object on them, they were ready in a FEW minutes! When I cut out the petals, if the area around where the wire is twisted didn't stick, all I had to do was press it firmly in place, and the glue just gripped it together.
 I used two packs of floral wire stems (24) to make the petals. I could make 4-5 petals per stem, depending upon the size of the petal.
 To assemble everything, I glued the fringe around the edge of the MDF wreath. Next, I glued the second fringe along the edge of the cardboard piece, pressing firmly along the lower ridge for a slightly raised look. With both pieces, you will have more than enough to wrap the wreath. I cut off the excess fringe.
 Then I began gluing the petals in place - bending and forming flowers and adding a few glass gems here and there.

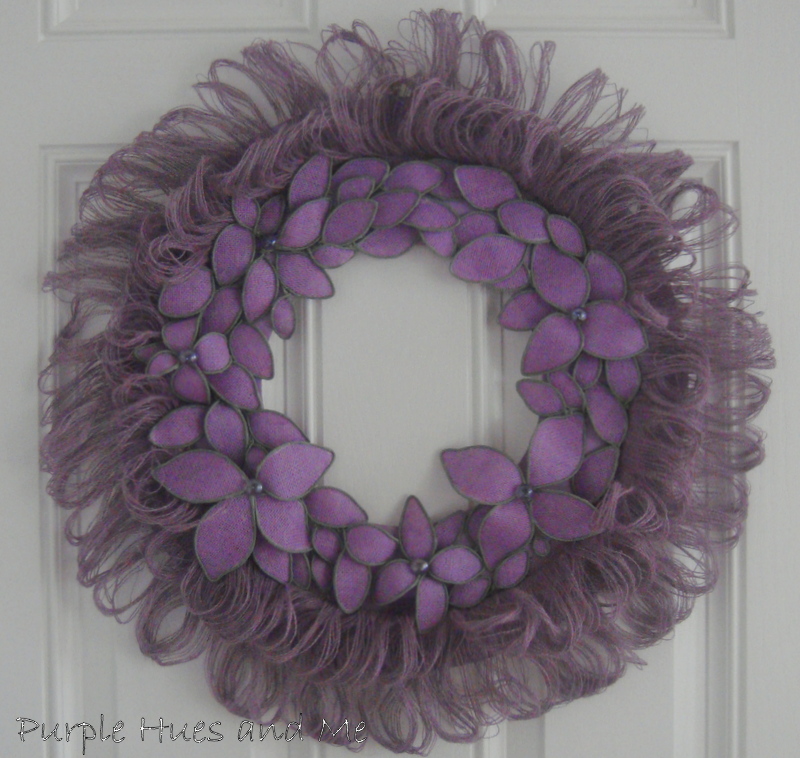
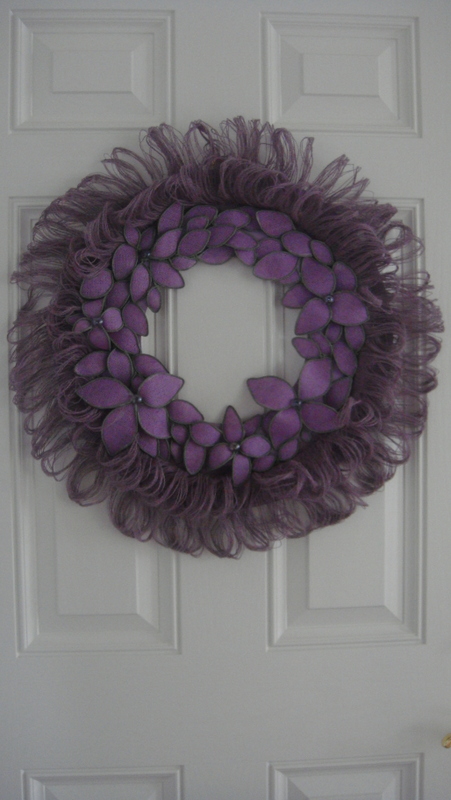
 Don't you just love how this is looking?


I had plan on spraying the fringed burlap with clear acrylic paint to make it stiff. That way the fringe could be "fluffed," but the weather has been too cold and snowy to go outdoors, so I had to skip that part.

I love the way this wreath turned out. It's exactly how I had envisioned it, and that's kinda good for me.

Take a little time to enjoy,

I'll take you through my process, but make sure you check out Hani at Craftionary first and the awesome job she did in making her burlap bendable flowers.
To begin, I used the following:
- Burlap - Two colors in Ochid and Lavender
- Floral Cloth Wire - 18 gauge, green
- Mod Podge
- Fabri-Tac Adhesive - Grabs fast & dries clear
- 18" MDF Floral & Craft Wreath Ring
- Heavy duty Cardboard
- Acrylic Paint
- Cardboard tubes - Used to shape the petals
- Glass Gems


After drying, on the unglued edge end, find the center thread and begin pulling the thread out. The fabric will bunch up as you are pulling the thread, and I found it easier to grab the opposite end of the burlap and pull that end too - the thread comes out easier. Continue pulling all the threads out, one by one, until you reach the glued borders.


After the glue dries, I cut the frays to even the edges. Repeat the process for the second piece of burlap.
For the wreath, I used a flat 18" MDF wreath form. It's cheap, but I found it too narrow, so I cut out a piece of heavy duty cardboard and glued it to the back of the wreath form.

I then painted the wreath. Hmm, I know some of you are not fans of purple, but I wanted a wreath made out of a different shade of the usual brown/tan burlap. There are so many shades and prints in burlap now to choose from, so take your pick . . .


Well, I tried this way and it didn't work for me. After pressing the petals onto the burlap, I placed books on top and let dry overnight - at least 8 hours or more. The next morning the mod podge still wasn't completely dry and all of the petals did not stick to the burlap, either. Maybe it was because the stem wire was 18 gauge which is rather heavy and hard to adhere, but that was the only size I could find in green. I was so disappointed. What was I gonna do now? I had fallen in love with the look of the bendable burlap flowers so I was determine to find a way that worked for me.
Since I had a hot glue gun with a fine nozzle for detail work, I tried gluing cut out pieces of burlap to the petals. This looked messy and sometimes the glue would dry faster than I could press it together.
Then I thought about using something I had on hand called Fabri-Tac Adhesive the same way as with mod podge.


I had plan on spraying the fringed burlap with clear acrylic paint to make it stiff. That way the fringe could be "fluffed," but the weather has been too cold and snowy to go outdoors, so I had to skip that part.

Take a little time to enjoy,
.


