Monday, June 27, 2016

Mickey Mouse Coaster - Handmade Christmas Craft


Have you been thinking about Christmas? July will be here in a few days and you know what that means?  Christmas in July! But before we get to that,
I'm part of a group of twelve creative bloggers who have joined together for a 12 Month Christmas Blog Hop where one of us will be making a fabulous handcrafted Christmas gift for us to be inspired and re-create each month!  Our goal is to make one handmade gift a month for 2016 and by christmastime we'll really be ahead of our holiday gift making!  

Making coasters for gift giving is real popular among our group! Millie was inspired by Stella's Crochet Cat Coasters to crochet a Mickey Mouse coaster. I love Disney and was inspired by Millie's Mickey Mouse Crochet Coaster!  But since I don't crochet, I came up with the idea of using string beads that I got during a Christmas clearance sale a few years ago and made a beaded Mickey Mouse coaster! How cool is that!

 The beaded coaster was easy peasy to make! I used a Styrofoam cup to trace the head on a foam sheet and a smaller plastic one for the ears.  Other supplies included Fabri-Tac fabric glue, scissors and the string beads.


Cut out Mickey's head after tracing a head on the foam sheet using cups the cups.


Apply glue to the center and begin coiling the beads around in a circle. Continue adding glue and coiling the beads.


Once the head is coiled, continue to the left ear, this time applying glue on the edge first, coiling the beads toward the center - making sure to add glue before coiling the beads.


Cut off excess beads once reaching the center of the ear.


Add glue to the area between the ears and on to the right ear. Run the beads along the glue, coiling from the outside, into the center.  Cut off excess beads.

Straighten and press down beads, if necessary, while the glue is still wet and then allow to dry.


Enjoy your Mickey Mouse Coaster and be sure to make several for gift giving!


Please check out our Handmade Christmas items below that we've made so far!


An InLinkz Link-up


And don't forget to join us for Christmas In July, starting
Wednesday, July 6!


Take a little time to enjoy

and

Happy Christmas Crafting!


Saturday, June 25, 2016

Everything Looks Better With a Bow! - The Bowdabra Design Team


Yes! Everything  does looks better with a bow!

Hello friends!  It's finally official -

The new Bowdabra Design Team is here and ready for their debut.


Please make sure you stop by Bowdabrablog.com on Mondays & Tuesdays to check out our awesome creations using the Bowdabra Bow Tool!


This is a talented group of ladies and I can't be more excited about being part of this new creative group!


Just look at this beautiful bow I made using my Bowdabra:


Before I had a Bowdabra I could never make a bow like this!

See how easy it is to make this Fold and Twist Bow:

Fold an 18" piece of Bowdabra bow wire in half and lay it into the Bowdabra tucking ends under.
Using the entire spool of ribbon (25ft) with the pattern on one side, fold the ribbon in half to find the center and make a crease.  Place the creased ribbon down into the center of the Bowdabra, pattern down.


Decide how large you want your loops to be then make your first loop and fold and twist the ribbon and press into the Bowdabra

Next, fold and twist the other side at the same width.  Ribbon tails should be right side down above your loops.
Continue to fold and twist the ribbon one at a time down through the center of the Bowdabra, making creases into each tail.
Fold and twist as many loops into the Bowdabra .  .  .


until reaching the end.

Scrunch down the loops with the Bowdabra wand.


While the bow is still in, thread the two loose ends of the bow wire through the loop at the other end, pulling the wire tightly.

Gently pull the bow out of the Bowdabra.  Separate the two loose ends of the wire and take around to the back of the bow and knot.
Have fun fluffy your beautiful bow!

Dovetail the ends by folding the ribbon end edges together and cut folded edges at a 45 degree angle.


Simply Gorgeous!


Be sure to check out Bowdabrablog.com to meet our new team!

Happy Bow Crafting!


Monday, June 20, 2016

Recycled Soda/Beer Cans Candle Holder


This post was featured in "10 Recycling Craft Blogs to Follow" 

I love recycling items to create craft projects!  Right now, I'm expanding my soda/beer can recycling undertakings. I recently attended a community cookout and managed to collect lots and lots of empty beer and soda cans. It's a great way to repurpose discarded or unwanted items into creating some of my crafting ideas.  I had fun making this and this using soda cans.  Recently, I've had a couple of projects swirling around in my thoughts - one of which is a candleholder.  Yes, an adorable candle holder that looks chic and modern but so easy to make! And you can use it indoors or out!  Here's how to make one: 

Gather the following materials -
Beer or soda cans
Paper/cardboard template
X-acto/utility knife
Scissors
Pencil/paintbrush
Metallic spray paint
Loctite super gel glue
Cork sheet or felt for backing
LED candle/jar


Begin by washing out the cans to remove any sticky residue and let dry.  Using an x-acto knife on  the edge of can make a slice big enough for a scissor blade and then cut the tops and bottoms off with scissors.  Next, cut through the length of the can to open and cut off any metal slivers or jagged edges.  *CAUTION:  Be very careful with the sharp edges of cut cans.


Roll the cut aluminum piece in the opposite direction - and smoothing out over something like a counter edge to help remove the curl of the can.    

Freehand cut out a petal pattern from paper and trace on cardboard for a sturdy template.


Lay the cardboard pattern on the aluminum and trace outline or just freehand cut out petals without tracing like I ended up doing. It's much quicker to do since you need a lot of petals.  


For the candle holder base, cutout a 4inch circle from the aluminum can and glue onto a cork sheet. Cut out the cork and attached aluminum.


Repeat steps for cutting cans and petals  You will need at least 32 petals.
Spray paint the petals and let dry.


To add dimension to the petals, roll the edges using the stem of a paint brush or pencil .  .  .


and glue onto the edge of the circle, creating the first layer, all the way around using super glue gel.


Begin gluing on the second layer, overlapping and between the first row around.

This is how the underside looks.

Continue adding layers, alternating between petals until satisfied with the fullness. It should look like a lovely rose petal shape.  Add the last layer of petals to enhance the candle, leaving an opening to accommodate a candle or jar. 


Pretty!


Enhances any décor!


Place a LED votive candle in the center, turn a colorful jar upside down  and have fun outdoors with this cool effect!

What a lovely way to repurpose those unwanted cans!

Take a little time to enjoy
and
Happy Crafting!


Linking to:  The Pin Junkie         Sweet Inspiration

Monday, June 13, 2016

Father's Day Bow Tie Gift Wrapped Wine Bottle


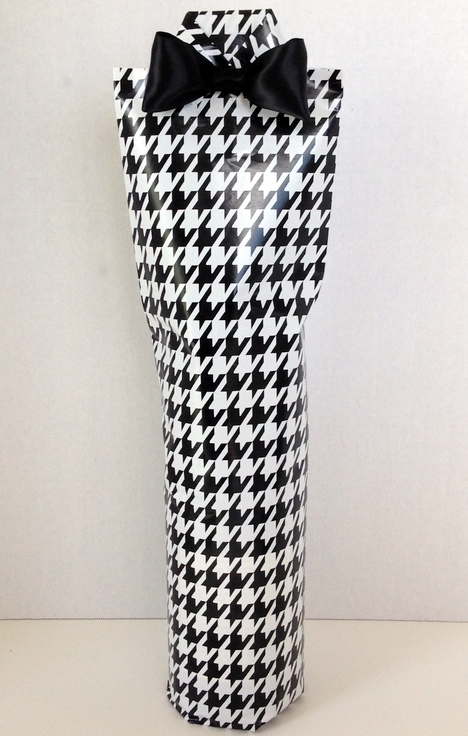
Does your Dad love a good bottle of wine?  Then he'll certainly get a kick out of receiving this adorable Father's Day wrapped package!  It's a fun and festive way to decorate wine bottles with wrapping paper and an awesome Bowdabra Bow Tie.  This post first appeared on Bowdabrablog where I'm part of the design team.

Here's how to make! 

Gather the following materials:
Wrapping Paper
Ribbon
Double Sided Tape/Hot glue
Scissors
Wine Bottle
Mini Bowdabra and Ruler
Bowdabra Wire/Wand

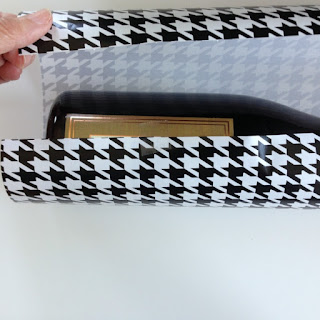
Begin by cutting the wrapping paper large enough to wrap around the wine bottle, leaving a few inches on the bottom to close and on top to fold down into a collar.

Apply double sided tape along the edge of the wrapping paper and then wrapping the paper around bottle to seal.


Fold in the bottom paper, applying double sided tape to center.


Crease and smooth outside edges the length of the bottle neck.


Make a  1/2" fold at the top .  .  .

and fold over again.

Next, just at the edge of the fold, make a 1/2" horizontal cut from the outside edge on the right and another on the left through the paper and not the folded portion.


Make a vertical fold on both left and right sides into a "V" for the collar.


Unfold the collar and place a strip of ribbon on the fold line and fold over again with ribbon - as if tying a bow.


Crossover the ribbon tails just under the collar .  .  .


and secure with a dab of double sided tape.
Cut off excess ribbon close to collar.


To make the Bowdabra Bow Tie:

Cut a 12" piece of Bowdabra bow wire and fold in half.  You will have a loop at one end and two loose pieces at the other end. Place folded wire into the Mini Bowdabra.

Cut a 7" piece of ribbon, crease end and insert into the Mini Bowdabra.


Crease the other end of ribbon and loop above the tower and insert into the Mini Bowdabra.


Each end is gathered and centered in the Mini Bowdabra.


Using the bow tool and ruler as a guide, position the loops evenly.
Pinch the side of the ribbon and press center down into the Mini Bowdabra.


Scrunch down ribbon with the Mini Bowdabra wand.


While the bow is still in the Mini Bowdabra, thread the two loose ends of the Mini Bowdabra bow wire through the loop at the other end, pulling the wire tightly.


Gently pull the bow out, separating the two loose ends around to the back, tying in a knot.  Cut off excess wire.


To finish the bow, cut a small piece of finishing ribbon 2" long.


Run double sided tape along the wire and attach the finishing ribbon, starting and ending at the back, heat sealing ends.  Fluff bow.


Adhere Bowdabra bow tie to center of wrapping paper collar with glue.


A super cute, fun and festive Father's Day gift wrapped bottle of wine!


Take a little time to enjoy
and
Happy Crafting!