Saturday, September 29, 2012

ELLE DECOR Inspired


You know how we are flipping through beautiful magazines getting inspired, tearing out the pages and hoping maybe one day  .   .   .

I love looking through the magazine ELLE DECOR.  I have had a subscription for a number of years, loving what I see and read, but never able to afford any of the items.  Back in August I saw a picture of this wall sculpture.

     Beautiful, isn't it?  Looking at it, you'd think it is worth hundreds or maybe thousands of dollars, right?  Wrong!  After reading the caption in the upper left hand corner of the article, it says that the designer, Carol Fertig, created the sculpture from gold painted plastic leaves.  Hot damn!!! (Excuse me, please) So the wheels in my brain started turning wondering if I could find artificial leaves like that and how would I recreate it.
http://www.elledecor.com/home-remodeling/carol-fertig-new-york-apartment-design#slide-1
 The living area of Carol Fertig's Manhattan apartment. Fertig, a product and graphic designer, created the wall sculpture from gold-painted plastic leaves; the vintage Edward Wormley sofa is covered with an Indian textile, the 1960s cocktail table is by Paul Mayen, and the chair is by Bruno Mathsson.


 After looking high and low through many craft stores, and figuring out the cheapest way to make this, I settled on some bunches of leaves I found at the dollar store. 

To make this, I gathered:
16 bunches of leaves
gold paint
wood board
glue
staples
hanging clip

I initially got 12 bunches (5 leaves in a bunch), but had to get four more to completely cover the 24"w x 8"h board I found at a house construction site across the street.


I spray painted the board outside with brilliant gold paint. Next, I started to glue the bunches of leaves to the board first, but, then decided it would be easier to 


paint all the leaves before attaching to the board. That way I could make sure every leaf is covered with paint.


After painting the leaves I attached the dried leaves to the board with glue and reinforcing with staples.


My "sculpture" is not as wide as the original one as seen in the picture. But the overall dimensions of the finished product is 44 inches wide, tip to tip and 27 inches high, tip to tip. Depending on how many leaves you are willing to add, and the size of the backing, the final sculpture size is limitless.


When I come across some thinner leaves like in the Elle Decor magazine, and a longer board, I might try this again.  But for now, not bad, not bad at all!

Enjoy,


Linking To:


DIY Show Off


Thursday, September 27, 2012

Weathered Wood Plaque

Where would we be without re-creating something that we love and want (in most cases)   .   .   .  something that we don't want to pay that outrageous price attached to it?  Or better yet,  looking at the item and saying, oh, I can make that! 

Weathered Wood Plaque
Ballard Designs Weathered Wood Plaque

 I saw this plaque in the Ballard Designs Catalog that I recently received.  I am always looking for wall decor to help fill up some of the blank wall space that I have.  I thought it looked interesting and I thought I could  easily copycat that  .   .   .


And I wasn't wrong! 

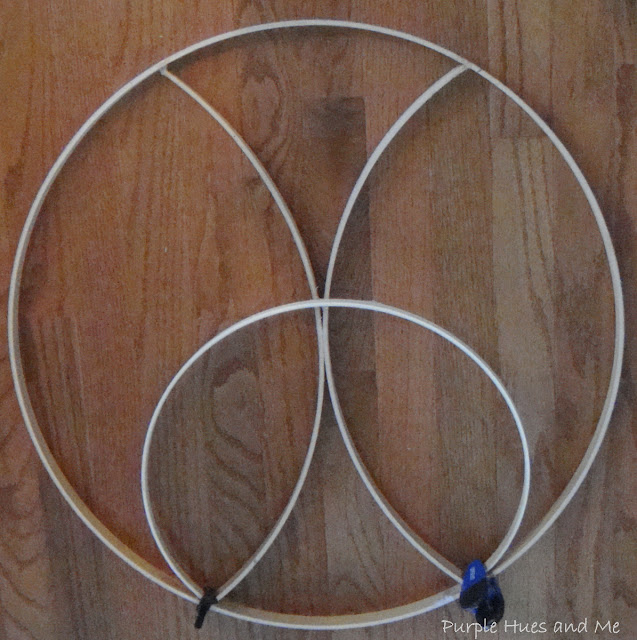
I got the largest embroidery hoop I could find (Jo-Ann Fabric, 23")  for the outer rim. A smaller 15 inch version. Hand saw, tape measure and clamps.  E6000 glue and Martha Stewart gray paint.
     I removed (cut evenly) the wooden fastener from one of the hoops  .   .   .

and cut the hoop after measuring where the center of the "whole" hoop would be, gluing the two pieces, back to back together. 

After cutting the fastener off the smaller hoop .  .  .
I measured the hoop evenly at the position pictured .   .   .
I glued and clamped the ends for both pieces .   .   . 
slightly closer than the Ballard Designs pattern.

Painted gray  .   .   .

and hung.


What do you think about this knock-off?

Thanks for stopping by

and take a little time to enjoy,

Happy Crafting!


Wednesday, September 26, 2012

Decorating the Mantel for Fall

There's no getting around it.  We have a big 55 inch TV over the mantel.  Everyone is decorating their mantels for fall and there are some gorgeous pictures out there in blogland.  I am quite envious. My hubby, the commodore, is proud that he was able to mount this monstrosity over the fireplace. Actually, there is no where else it could go in our open spaced great room. At least not that size. So I'm stuck with having to place objects beside, under and on the floor in order to achieve some decor. 


                           I hope everything doesn't look too crowded on top.

Enjoy!


LINKING TO:


Share Your Creations
Chic on a Shoestring Decorating
DIY Show Off Fall Festival Party


Fox Hollow Cottage


Tuesday, September 25, 2012

Spider Ring DIY


"Be bejeweled in high Halloween style with this fabulously flashy Spider ring. Spindly legs of wired beads emanate from a large Silver crystal body to form the glamorous arachnid, and an elasticized band fits all fingers. Sport this for the spooky occasion"


Since being an empty nester for a number of years now, Halloween has not been my thing. We lived in our former neighborhood for over thirty-five years and all the children who lived there during those formative years moved away. Thus, in later years, we had no trick or treaters. And now, living in a +55 community, I don't expect to get any here. And, I don't have any grandchildren so I had no need to decorate for Halloween.  But, since blogging, one can't help but get in the spirit and go along with the atmosphere created. That leads me to my challenge of making something for Halloween. I spotted this picture here  at "The Great Glitzy Hack-Off.

I gathered my materials and set about making this cute little ring.


It was fairly easy to do.  String some beads on eight pieces of cut silver wire. Glue the "legs" onto the jeweled body, add the jeweled head and you have a SPIDER!!!

Please forgive the look of my dishpan hands.  I regret not wearing rubber gloves years ago!


Thought I'd add some leaves.  You always see spiders scurrying through them!

  Enjoy!


Linking To:


New House
A Diamond in the Stuff
RomanceOnADime.comThe DIY Dreamer