Thursday, July 23, 2020

Decoupage Air Dry Clay Scalloped Edge Dish

This is my story and I'm sticking to it! Lol! I wanted to make a large air dry clay dish that I could paint and decoupage inspired by something I saw on Mackenzie-Childs' retail site - this time using a purple checkered pattern on plain white napkins that I created myself! Things didn't exactly go the way I wanted them to. It was a comedy of errors but I ended up loving the challenge! 
It started with making the air dry clay dish!
This is the air dry clay that I had on hand - porcelain air dry clay and it looks great here .  .  .
but it was wrapped tightly in a flimsy cling plastic that was hard to remove.
Once I got the clay out of the plastic, I kneaded it until soft, and began to roll it out on a self healing cutting mat, to about a 1/4 of an inch thick.
 Then I tried sizing the almost 12 inch dish I would use to mimic the scallop edges on the clay.  I had a time trying to roll the clay out to fit the dish - so I got a smaller one that was 8 1/2" wide instead. 
Still, I had to cut out an area of clay to fit in the area I needed more of since I had to overlap the clay on the dish. I used water to help pressed the clay down with my fingers to seal the cut out piece of clay to the larger one. 
Then I smoothed it out again with the rolling pin. This time the dish fit. But unfortunately, when I went to remove the clay from the cutting mat, it was stuck to the mat. Getting it apart ruined the smooth finish. Are you asking why didn't I use parchment paper, since that doesn't stick? I tried that too, but it kept getting twisted when rolling, making marks and folds in the clay and I had a hard time getting the marks out!
 So I started again, this time using a silicone baking mat and adding a little bit of cornstarch to the surface. The clay barely fit on the baking mat, but worked none the less.  

I was able to remove the silicone mat from the clay by flipping it upside down and pulling it off onto the dish. 
 Next, I cut off the excess clay around the dish, but had difficulty shaping the clay to the scallop edges of the dish. There wasn't much of any clay scallops showing! They seemed too shallow!
I needed to use something to enhance the scallops and to hold the shape of the clay while drying.  So I grabbed some plastic spoons - ding, ding ding! What a terrific idea! It was easy to lift the clay up with the spoons and to prop each spoon (scallop) using small paint bottles while the clay dried. Little did I know that it would take at least five days for the clay to dry.  And for a couple of days, I placed the contraption outside in nearly 100 degree temps to help with drying. I thought, "I should have used oven baked clay - but then, how would I prop up the scallops in the oven?"  

 While the clay was drying, I was finally able to make my own decorative paper napkin to use on the clay dish. This part was really cool! To do this, I found a checkered pattern online that mimic the famous MacKenzie-Childs design, but in purple! How cool is that! I taped a plain white paper napkin to all sides of a sheet of printer paper using painter's tape .  .  .
 and printed out the design - it was that easy! I didn't separate the napkin layers before taping and printing like I should have according to a couple of tutorials I read. But I'm quite pleased how easy the process worked!


Once the clay dish was dry - at least, I thought it was dry, I sanded some of the rough spots and edges and then painted it using white chalk paint. But when the paint dried, I could see tiny cracks all over it. What was I going to do? I decided the cracked paint would be part of the dish's charm.💜

Next, I made a paper template the size of the middle area of the clay dish and cut it out. Then I separated the white layers of the napkin from the checkered design .  .  .
applying Matte Mod Podge to the area. Then I gently laid the design over the area, smoothing it out with a plastic baggy. 
Once dry, I sealed the dish with more Mod Podge and let dry.
The dish needed something more, so I decoupage a cut-out border from a decorative paper napkin to the edges of the checkered pattern. I liked the way the colors in the border complimented the checkered napkin.
Then I added a mishmash of painted dots around the scalloped edges using the end of a dowel rod dipped in paint .  .  .
and finishing the look by painting the edge of the dish metallic gold. 
Once the dish was completely dry, I applied a few coats of a gloss varnish - drying between each coat .  .  .  
to achieve this lovely design - exactly what I was going for!
Disclosure I am a participant in the Amazon Services LLC Associates Program, an affiliate advertising program designed to provide a means for us to earn fees by linking to Amazon.com and affiliated sites, this post may contain links. I may receive a very small commission at no cost to you! The affiliate money I earn helps pay my crafting expenses. Thanks so much for your support!


Welcome to another Creative Craft Blog Hop created by 
Chloe @ Celebrate & Decorate and Andrea @ Design Morsels!  I've teamed up with a talented group of creative bloggers to bring you lots of wonderful ideas and inspirations! Be sure to check out all of our awesome projects by clicking on the links below!
If you're hopping along this blog hop, your next stop is Sustain My Craft Habit with sisters, Jane & Sonja, sharing their adorable kids' apron pattern! 


Thanks for stopping by!


Tuesday, July 21, 2020

Boho Macrame Feather DIY

It's time for the July Pinterest Challenge Blog Hop, hosted by Erlene @My Pinterventures! The purpose of the Pinterest Challenge is to motivate us to not just pin, but to make it happen! This month's challenge is a choice of our own project! 

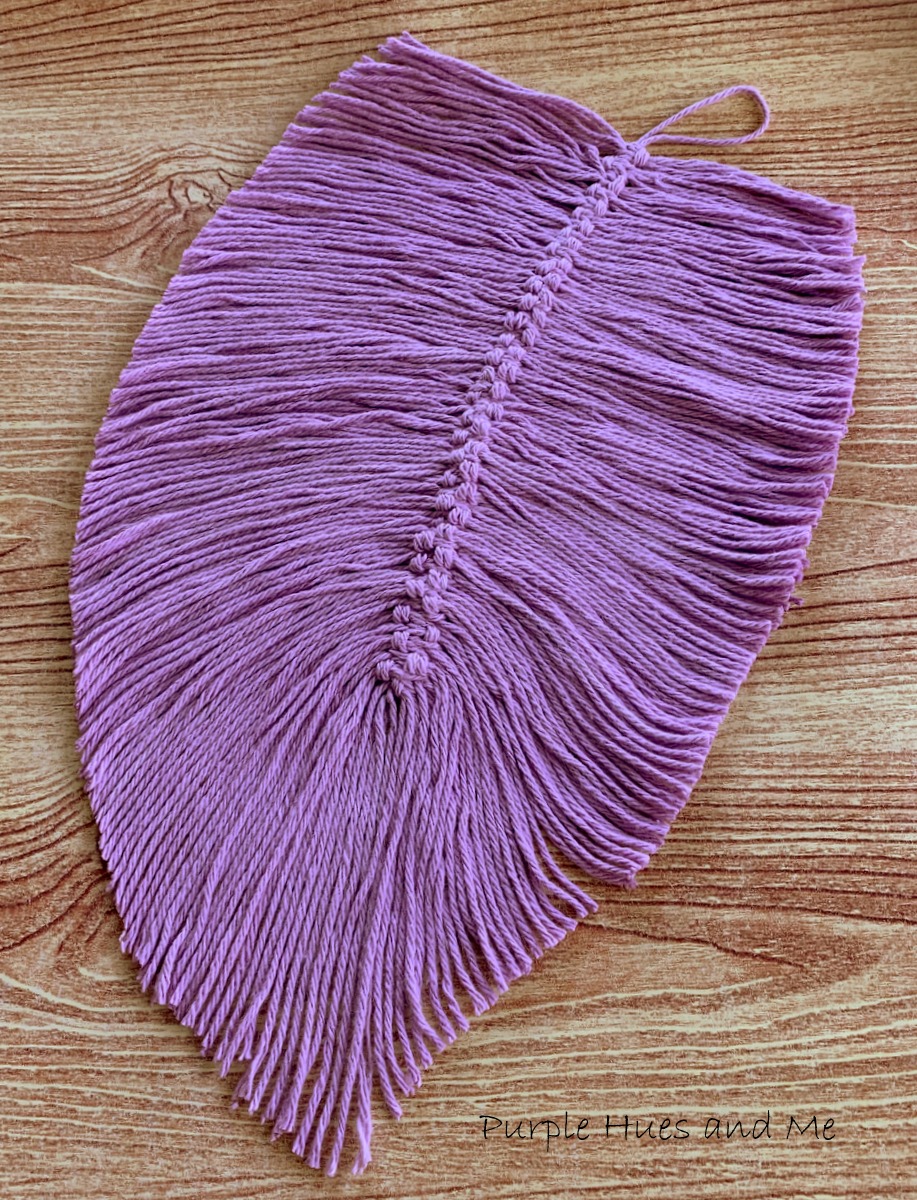
I don't know about you, but I love the boho look of macrame feathers! The knot tying technique is one that you can apply to lots of decorative items like wall hangings, pendants, earrings, key chains, garlands and even wreaths! All giving off cool boho vibes! There are lots of tutorials on how to make macrame feathers on Pinterest, but I was quite intrigued to make one with the very first macrame feather diy I found here.

To start, cut a 36" length of yarn for the feather stem .  .  . there are a variety of yarns, cords and ropes in different sizes and widths that can be used to make this type of macrame feather - mostly in natural or off white colors. I wanted to make a colorful one, so I'm using a yarn that I already had on hand.


Fold the strand in half together and place on your work surface with the loop at the top. Then take a seat in front of a good movie on tv or listen to music and start cutting about 102 shorter pieces of yarn, 15" long. This project is quite time consuming!
Once all the strands of yarn are cut, take two 15" strands together and fold in half evenly and place under the stem - with the loops facing to the right. Since the yarn is rather thin, I'm using two strands together each time for a fuller look.
Next, take two more strands, fold together and insert the loops through the first loops, pulling it through and over the stem.
Then lift up the ends of the first strands pulling them through the loops of the second strands .  .  .
 pulling the ends in opposite directions to form your first slip knot. Looking at the knot, the loop is on the right side. 
Next, repeat the steps for making the knot, only the strands will be alternated with the first loop under the stem facing to the left. In other words, take two strands together, fold and place under the stem with the loops facing to the left.  Then fold strands evenly together and insert through the left loops .  .  .
pulling strands together .  .  .
to create the second slip knot.  This time, the loop in the knot is on the left.
Continue alternating the direction of the loops - right, left, right, etc. to make the knotted strands. 


Continue adding two strands together, alternating the direction of the loops and pulling the strands together .  .  .
to create a knotted decorative stem along the center.
Once all the strands are knotted, tie a knot with the stem strands at the bottom to finish the rows of knots.
Next, brush out the strands using a wire pet brush (which I didn't have). You have to hold down the stem area while brushing so you won't pull any of the knots out. And be especially careful around the bottom end. That area is easy to pull the knotted strands off the stem. I'm sure the type of yarn or cords you use will affect how it brushes out. I tried different brushes including a detangler paddle brush with bristle pins on the yarn and that didn't work either. At one point, I tried unraveling each strand which was unbelievably slow and unproductive and soon gave up on that! Then I remembered a small stiff brush I received with my air fryer oven and used that to brush the yarn out - but really, it just helped to smooth the yarn out but not any actual fluffing like a feather looks! 
After brushing the front and back, time to trim the strands for a feather shape. Make sure you use a sharp pair of craft scissors. I started with a few different scissors and had problems cutting the yarn so I had to switch to a more heavy duty type to finish the look.

After my initial cut, I thought the feather still looked too wide .  .  . 


So I cut a bit more off after the first cut for a much better look!
And finally, apply Mod Podge Fabric Stiffener to help keep its' shape. 
So cool!
For more Pinterest inspired projects from this month's Pinterest Challenge hosts, check out the links below ↓


Pinterest Challenge Blog Hop Image

Now, let's see what the other hosts have created ⇓⇓
You are invited to the Inlinkz link party!
Click here to enter

Sunday, July 19, 2020

Toilet Paper Flower Blooms DIY


Got toilet paper? I know you do! That's something we can't live without! But have you ever thought about making something decorative with it? I know there are lots of crafts out made with toilet paper cardboard tubes! But this is the paper! Why not craft your time away making adorable toilet paper flower blooms! Great for home decor, party decorations or even gift toppers! It's so simple and easy! And the best part, you only need four items to make:


Toilet paper sections - 5 per bloom
Tacky glue
Scissors
Floral stem wire

Lets begin by tearing off five toilet paper sections from the roll.

 Square each section by folding diagonally in half, cutting off the excess paper.
Then fold again, creating another triangle .  .  .
and fold one more time, making sure to line up the edges evenly, and smoothing the paper at the fold.
Now it's time to make the eight petal bloom to cut out! Here's a drawn-on line that shows you where to cut. But it's best to actually do this cut freehand - you don't want to put any marks on the paper. 
Start cutting at the side open edges, just below the middle section, around the next open edges and ending slightly lower at the middle folded area. The cut area should begin and end evenly across the same point.
Here's how the petals look open:
Next, fold the petals closed, staggering in-between and not evenly lined up. Add tacky glue along the bottom edge .  .  .

and gather the edge, twisting together .  .  .

forming a small center stem. Then make four more blooms the same way and let dry.
Next, fold a square toilet paper section into 4 sections and cut out. You will need five, so cut out an extra one from another section. Then take one section and add a large dab of glue to center and along edges. Place a floral stem wire in the middle cupping paper around it  .  .  .
to form a bud shape. Let dry.
Once the bud is dry, glue on the five flower blooms, one at a time, around the bud .  .  .
adjusting, curving and fluffing petals to form a larger flower. 
Would you believe these lovely flower blooms are made from toilet paper? 
You bet! How cool is this!

Thanks for stopping by

and take a little time to enjoy,
Happy Crafting!