It's time for the July Pinterest Challenge Blog Hop, hosted by Erlene @My Pinterventures! The purpose of the Pinterest Challenge is to motivate us to not just pin, but to make it happen! This month's challenge is a choice of our own project!
I don't know about you, but I love the boho look of macrame feathers! The knot tying technique is one that you can apply to lots of decorative items like wall hangings, pendants, earrings, key chains, garlands and even wreaths! All giving off cool boho vibes! There are lots of tutorials on how to make macrame feathers on Pinterest, but I was quite intrigued to make one with the very first macrame feather diy I found here.
To start, cut a 36" length of yarn for the feather stem . . . there are a variety of yarns, cords and ropes in different sizes and widths that can be used to make this type of macrame feather - mostly in natural or off white colors. I wanted to make a colorful one, so I'm using a yarn that I already had on hand.
Fold the strand in half together and place on your work surface with the loop at the top. Then take a seat in front of a good movie on tv or listen to music and start cutting about 102 shorter pieces of yarn, 15" long. This project is quite time consuming!
Once all the strands of yarn are cut, take two 15" strands together and fold in half evenly and place under the stem - with the loops facing to the right. Since the yarn is rather thin, I'm using two strands together each time for a fuller look.
Next, take two more strands, fold together and insert the loops through the first loops, pulling it through and over the stem.
Then lift up the ends of the first strands pulling them through the loops of the second strands . . .
 pulling the ends in opposite directions to form your first slip knot. Looking at the knot, the loop is on the right side.
Next, repeat the steps for making the knot, only the strands will be alternated with the first loop under the stem facing to the left. In other words, take two strands together, fold and place under the stem with the loops facing to the left. Then fold strands evenly together and insert through the left loops . . .
pulling strands together . . .
to create the second slip knot. This time, the loop in the knot is on the left.
Continue alternating the direction of the loops - right, left, right, etc. to make the knotted strands.
Continue adding two strands together, alternating the direction of the loops and pulling the strands together . . .
to create a knotted decorative stem along the center.
Once all the strands are knotted, tie a knot with the stem strands at the bottom to finish the rows of knots.
Next, brush out the strands using a wire pet brush (which I didn't have). You have to hold down the stem area while brushing so you won't pull any of the knots out. And be especially careful around the bottom end. That area is easy to pull the knotted strands off the stem. I'm sure the type of yarn or cords you use will affect how it brushes out. I tried different brushes including a detangler paddle brush with bristle pins on the yarn and that didn't work either. At one point, I tried unraveling each strand which was unbelievably slow and unproductive and soon gave up on that! Then I remembered a small stiff brush I received with my air fryer oven and used that to brush the yarn out - but really, it just helped to smooth the yarn out but not any actual fluffing like a feather looks!

After brushing the front and back, time to trim the strands for a feather shape. Make sure you use a sharp pair of craft scissors. I started with a few different scissors and had problems cutting the yarn so I had to switch to a more heavy duty type to finish the look.
After my initial cut, I thought the feather still looked too wide . . .
So I cut a bit more off after the first cut for a much better look!
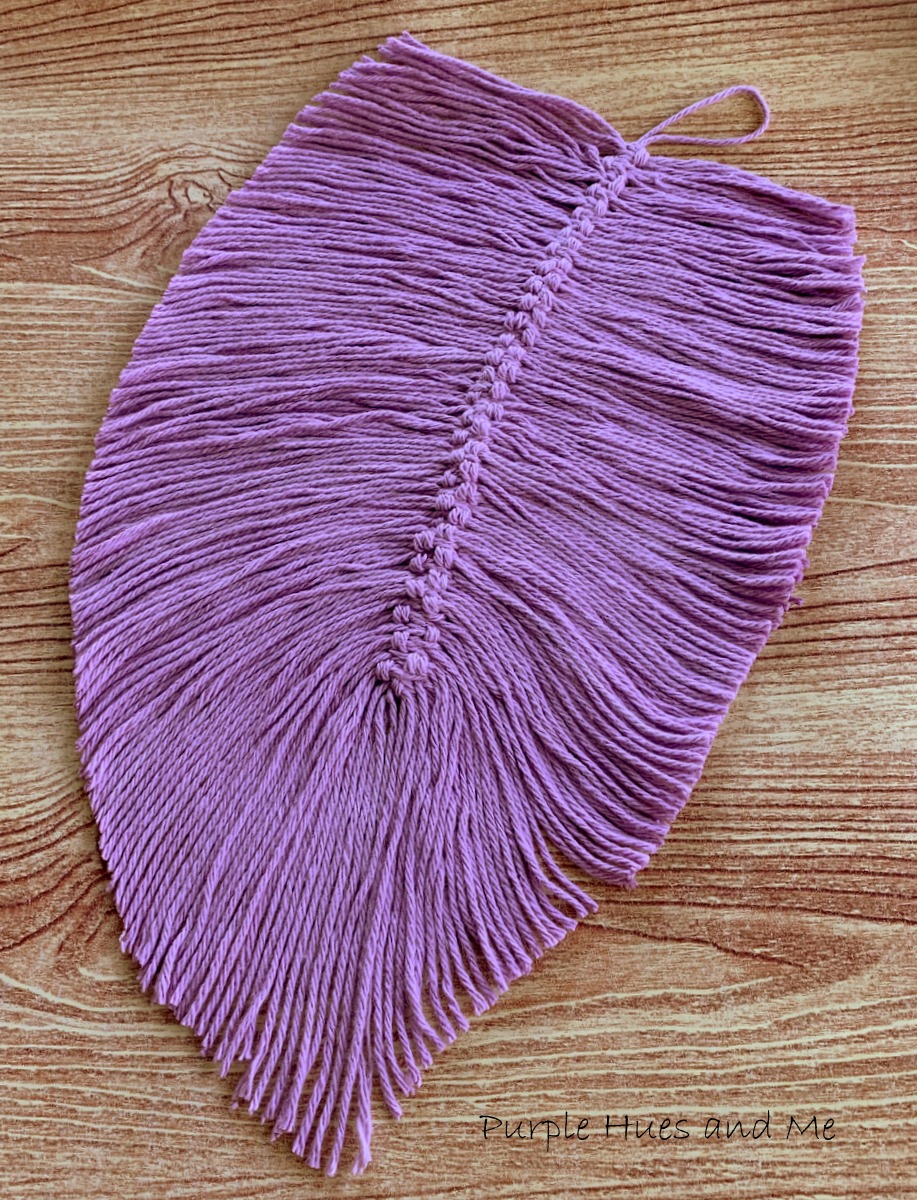
And finally, apply Mod Podge Fabric Stiffener to help keep its' shape.
So cool!
For more Pinterest inspired projects from this month's Pinterest Challenge hosts, check out the links below ↓
Now, let's see what the other hosts have created ⇓⇓


 pulling the ends in opposite directions to form your first slip knot. Looking at the knot, the loop is on the right side.


This looks like a perfect TV watching craft! Time consuming but good because when you are multitasking it makes a TV binge watch ok!! I love your purple feather, very boho chic.
ReplyDeleteThanks, Julie! You're right about it being time consuming - I binged watched making it the entire time!
DeleteWhat a pretty feather. It has such a tropical boho vibe. Your tutorials are always easy to follow. Super cute!
ReplyDeleteThanks, Jenny! I'm really enjoying the boho vibe this brings!
DeleteI'm loving the look of this. It would be cool to make them super large like ostrich feathers. I wonder if the mod podge could handle the weight?
ReplyDeleteThanks, Lydia! That sounds like a wonderful idea! You know I saw where someone made huge feathers into a lamp shade and they used wrapped stem wire in the middle to support the weight. Can't remember if they used mod podge or a fabric stiffener, though.
DeleteAmazing Gail. Your patience is admirable. The boho look is quite lovely.
ReplyDeleteThanks, Linda! Oh, you don't know how I almost gave up - if it wasn't for the movies I watched, lol!
DeleteI have always wondered how the feather was made. Thanks for sharing the simple tutorial. You made it so easy to follow. Thank you!!!
ReplyDeleteYou are quite welcome, Terrie! I had been wondering how they were made, too, and have been on my to-do list for quite awhile!
DeletePreciosa pluma de macramé ,me encanta !!! gracias por compartir.
ReplyDeleteBesos
You are quite welcome, Montse! And thanks for your sweet comments!
ReplyDeleteVery unique! Good tutorial!
ReplyDeleteThanks, Liz! It was fun, but time consuming to make!
DeleteThat is so neat. Thanks for the tutorial. Pinned.
ReplyDeleteThanks Roseann! Your sons will probably like tying all those knots!
DeleteOoo, I've seent these feather projects and have always wanted to try it. I can see a bunch of these hanging on the wall for some boho decor.
ReplyDeleteI know Erlene, that's a great idea for a wall hanging!
DeletePretty! I have to try macrame sometime.
ReplyDeleteThanks, Ginger! It's a great way to keep busy! Lol!
DeleteYour feather is really pretty. I love macrame, especially macrame feathers. I want to give macrame a try soon!
ReplyDeleteThanks, T'onna! I like the look too and will probably make a few more!
DeleteThis is really pretty Gail, not to mention incredibly clever! Well done!
ReplyDeleteThanks so much, Jenna! I enjoyed making it although quite time consuming! But what else is there to do except make crafts, lol!
DeleteWhat a pretty feather! Now that I have a basic idea of how to macrame, I will have to try one!
ReplyDeleteGirl, you are so clever. I have begun following you on Pinterest. Love all of the pretties you make.
ReplyDelete