Showing posts with label Foam Flowers. Show all posts

Monday, February 14, 2022

Foamiran Pansies On Wire Frame


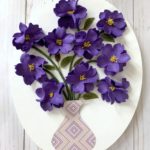
It's always fun shopping my craft room. Sometimes I come across items I've forgotten about or had no idea what I would do with them. Like this wire frame. I don't remember where I got it or what I had planned on doing with it. It must have been a great price especially since it's not quite my style, either. We crafters can never pass up a great price! Lol!

However, the wire frame makes for a great creative base with its' shabby chic character. And offers a uniquely shaped piece for home decorating projects, too!

Anyway, besides the wire frame, I found a few sheets of foamiran I had gotten sometime ago to make flowers. You know I love making flowers out of foam sheets - as seen here, here, here and here to point out a few, lol! So I decided to dress up this wire frame with pansies - a flower I've always wanted to make in foam! 

Pansies are a winter flower! They look so cheerful and most importantly for me, can be found in a lovely array of purple hues, too! So let's get started on how to make foamiran pansies to decorate the wire frame which I'm leaving in its' natural finish.

Materials:

  • Thin sheets of foam - 1mm or less
  • Cardstock pansy petal template
  • Scissors
  • Oil Pastels
  • Iron/skewer stick
  • Silicone textured mold (optional),ball stylus
  • Sponge/paper towels
  • Hot glue gun/glue sticks
  • Acrylic paint - yellow/black
  • Narrow tip paint brushes
  • Small balls (center stamen/stigma)


First, I looked online for free pansy templates. There were lots with drawings of the different parts of a pansy, but I wanted to use a simple petal that I could combine five separate pieces to create a single pansy. Nothing intricate. So I made a pansy petal - roughly a triangle with rounded corners .  .  .

and measured it on a folded sheet of foamiran for size. And cut off the folded piece and folded it as many times as the petal shape would allow. Then cut out the petals .  .  .
and placed them in stacks of five to make a pansy.
Next, place a petal on a iron for a few seconds to soften and curl the edges, using a bamboo stick to hold in place and remove. 
Then quickly placed petal on a silicone mold, pressing down to imprint texture and veins. If you don't have a mold, an easier method uses a small ball stylus to add texture and veins by stroking along the inside of the foam petals.
Use oil pastels and a damp sponge or paper towel to color petals and .  .  .
shading with different colors, as desired.
Then gently shape petals by twisting and squeezing and lightly pulling foam into scalloped edges, as if tearing. 
Begin assembling pansy first with two petals, gluing tip to tip, left, right and  .  .  .
and in the center. Then add the two remaining in back, left .  . .
and right.
Next glue on a small ball for center stigma/stamen. I used a faux pearl and .  .  .

 painted it yellow and .  .  .
 

around the middle of the flower.
Let the yellow paint dry and then paint on black lines radiating from the center -
for a completed pansy look!
 And time to make lots more!
Placing them along the frame
adding more and more
until satisfied with the look!
Time to add a few green leaves by cutting out leaf shapes .  .  . 
which have mild serrated edges warmed with an iron and twisted into shape and glued in place.

I'm loving how this looks!
I found a poem online by Amelia Brown that is quite appropriate for this time of year.  I created a portion of it and placed on a handmade cardstock scroll glued onto cardboard and cut out .  .  .
and placed on the wire frame for a awesome look!
It certainly was fun shopping my craft room and finding items to make these lovely pansies on a wire frame. Just in time for this month's Challenge Blog Hop!  Where I've joined a group of creative bloggers to bring you a themed monthly challenge blog hop on the 2nd Monday of each month, hosted by Beverly @Across the Blvd! This month, it’s our Craft Room DeStash Challenge Blog Hop. And for this challenge we're to create a project using only items currently found in our craft stash! 

Wednesday, September 1, 2021

DIY Foam Flowers On Canvas


Have you been looking for that special type of wall art to create for your home?  Why not try making foam flowers on canvas! All you need is a blank canvas and some foam sheets! Foam flowers give off an amazing realistic effect - a perfect alternative to the real thing! You can also get creative with just about any color, too - like using my favorite color, purple! Lol! And you won't believe how easy it is to incorporate pretty foam flowers into canvas wall art - perfect for this month's DIY Challenge which is all about anything pertaining to canvas! If you coming over from Carol @Bluesky At Home, welcome! Wasn't her fall leaf art fabulous!

So let's get started with showing you how to make foam flowers:

Materials Needed:

Disclosure I am a participant in the Amazon Services LLC Associates Program, an affiliate advertising program designed to provide a means for us to earn fees by linking to Amazon.com and affiliated sites, this post may contain links. I may receive a very small commission at no cost to you! The affiliate money I earn helps pay my crafting expenses. Thanks so much for your support!

For this project we will be using foamiran (foam) sheets. These are not the usual craft foam sheets you find in craft stores. Those are too thick to make realistic looking flowers. You will need thin sheets between 1mm-0.6mm thick. The thinner, the better. Unfortunately, this type of foam sheets need to be ordered online. I can't find them in craft stores anymore - Dollar Tree use to sell packs of the thin foam sheets a couple of years ago and I loved them for making flowers, but they're no longer available. 

Next, is using a flower puncher to make the petals. If you're making a lot of flowers, it's so much easier to punch them out then to draw and cut out individually.  And the best way to do this is by sandwiching a sheet of printer paper together with the foam sheet in order to get nice, sharp edges on the flower petals. For this, I punched out twenty or more petals. But you can always make the petals by hand as I did here
Next, set an iron on medium hot temperature with no steam. Then place the petal on the iron, holding in place with the end of a skewer stick until the edges curl.
Once the petal curls (after a few seconds), let the foam petal fall off the iron, quickly picking it up and rolling it between your  fingers.  Unroll the petal and shape each petal, stretching with thumbs and fingers while it is still warm.
Then place the petal on a soft sponge and use the round end of a utensil to add curvature and shape.
For the center, fold a piece of floral wire (6") in half, then group lots of stamen together .  .  .
wrapping the wire loop around the center of the stamens - folding them together while twisting the wire. Then insert the wire ends into the center of one flower petal pulling the stamen threads down  . . 

through the center until just the stamen tops are showing.
Next, get another flower petal and pull the stamen thread through the same way. Then add multi-purpose glue to the stamen threads near the foam and bottom of the flower petal to seal in place. Let dry and cut off excess stamen threads so the flower bottom center will be somewhat flat. 
Then create nine more flowers the same way as before.
Now it's time to arrange the flowers on the canvas. I already had an oval canvas left over from a previous project and I decided to use it for this. But perhaps you might like a rectangular shape canvas instead. It's up to you!
Anyway, I drew a vase shape on decorative cardstock and cut it out. Then glued it on the bottom center of the canvas. The top of the vase was left open to place  the stems inside. 
Next, I cut off paper rush pieces from a roll that I had and painted them green. Once the stems were dry, I arranged and glued them on the canvas.
And then began gluing on the flowers!
Don't the flowers look fabulous on canvas!
And finally, added a few small faux leaves to complete the look!
What a strikingly beautiful dimensional foam flowers on canvas project! 
 
Welcome to our monthly DIY Challenge hosted by Terrie @Decorate and More with Tip! On the first Wednesday of the month, Terrie hosts a DIY Challenge with a group of talented bloggers who love to create budget friendly décor for their homes. For the month of August we were tasked with making anything pertaining to Canvas! 

I hope you enjoyed my tutorial on making foam flowers onto canvas wall art! Next up is Tammy @Patina and Paint, sharing her gorgeous canvas rug! 
To see more canvas project ideas, click on the blog titles below to checkout their awesome creations: 

                                     
DECORATE AND MORE WITH TIP                                            BLUESKY AT HOME 


                                        PURPLE HUES AND ME                                                           PATINA AND PAINT


    The House House                                              Paula's Homemade Space


       K's Olympic Nest