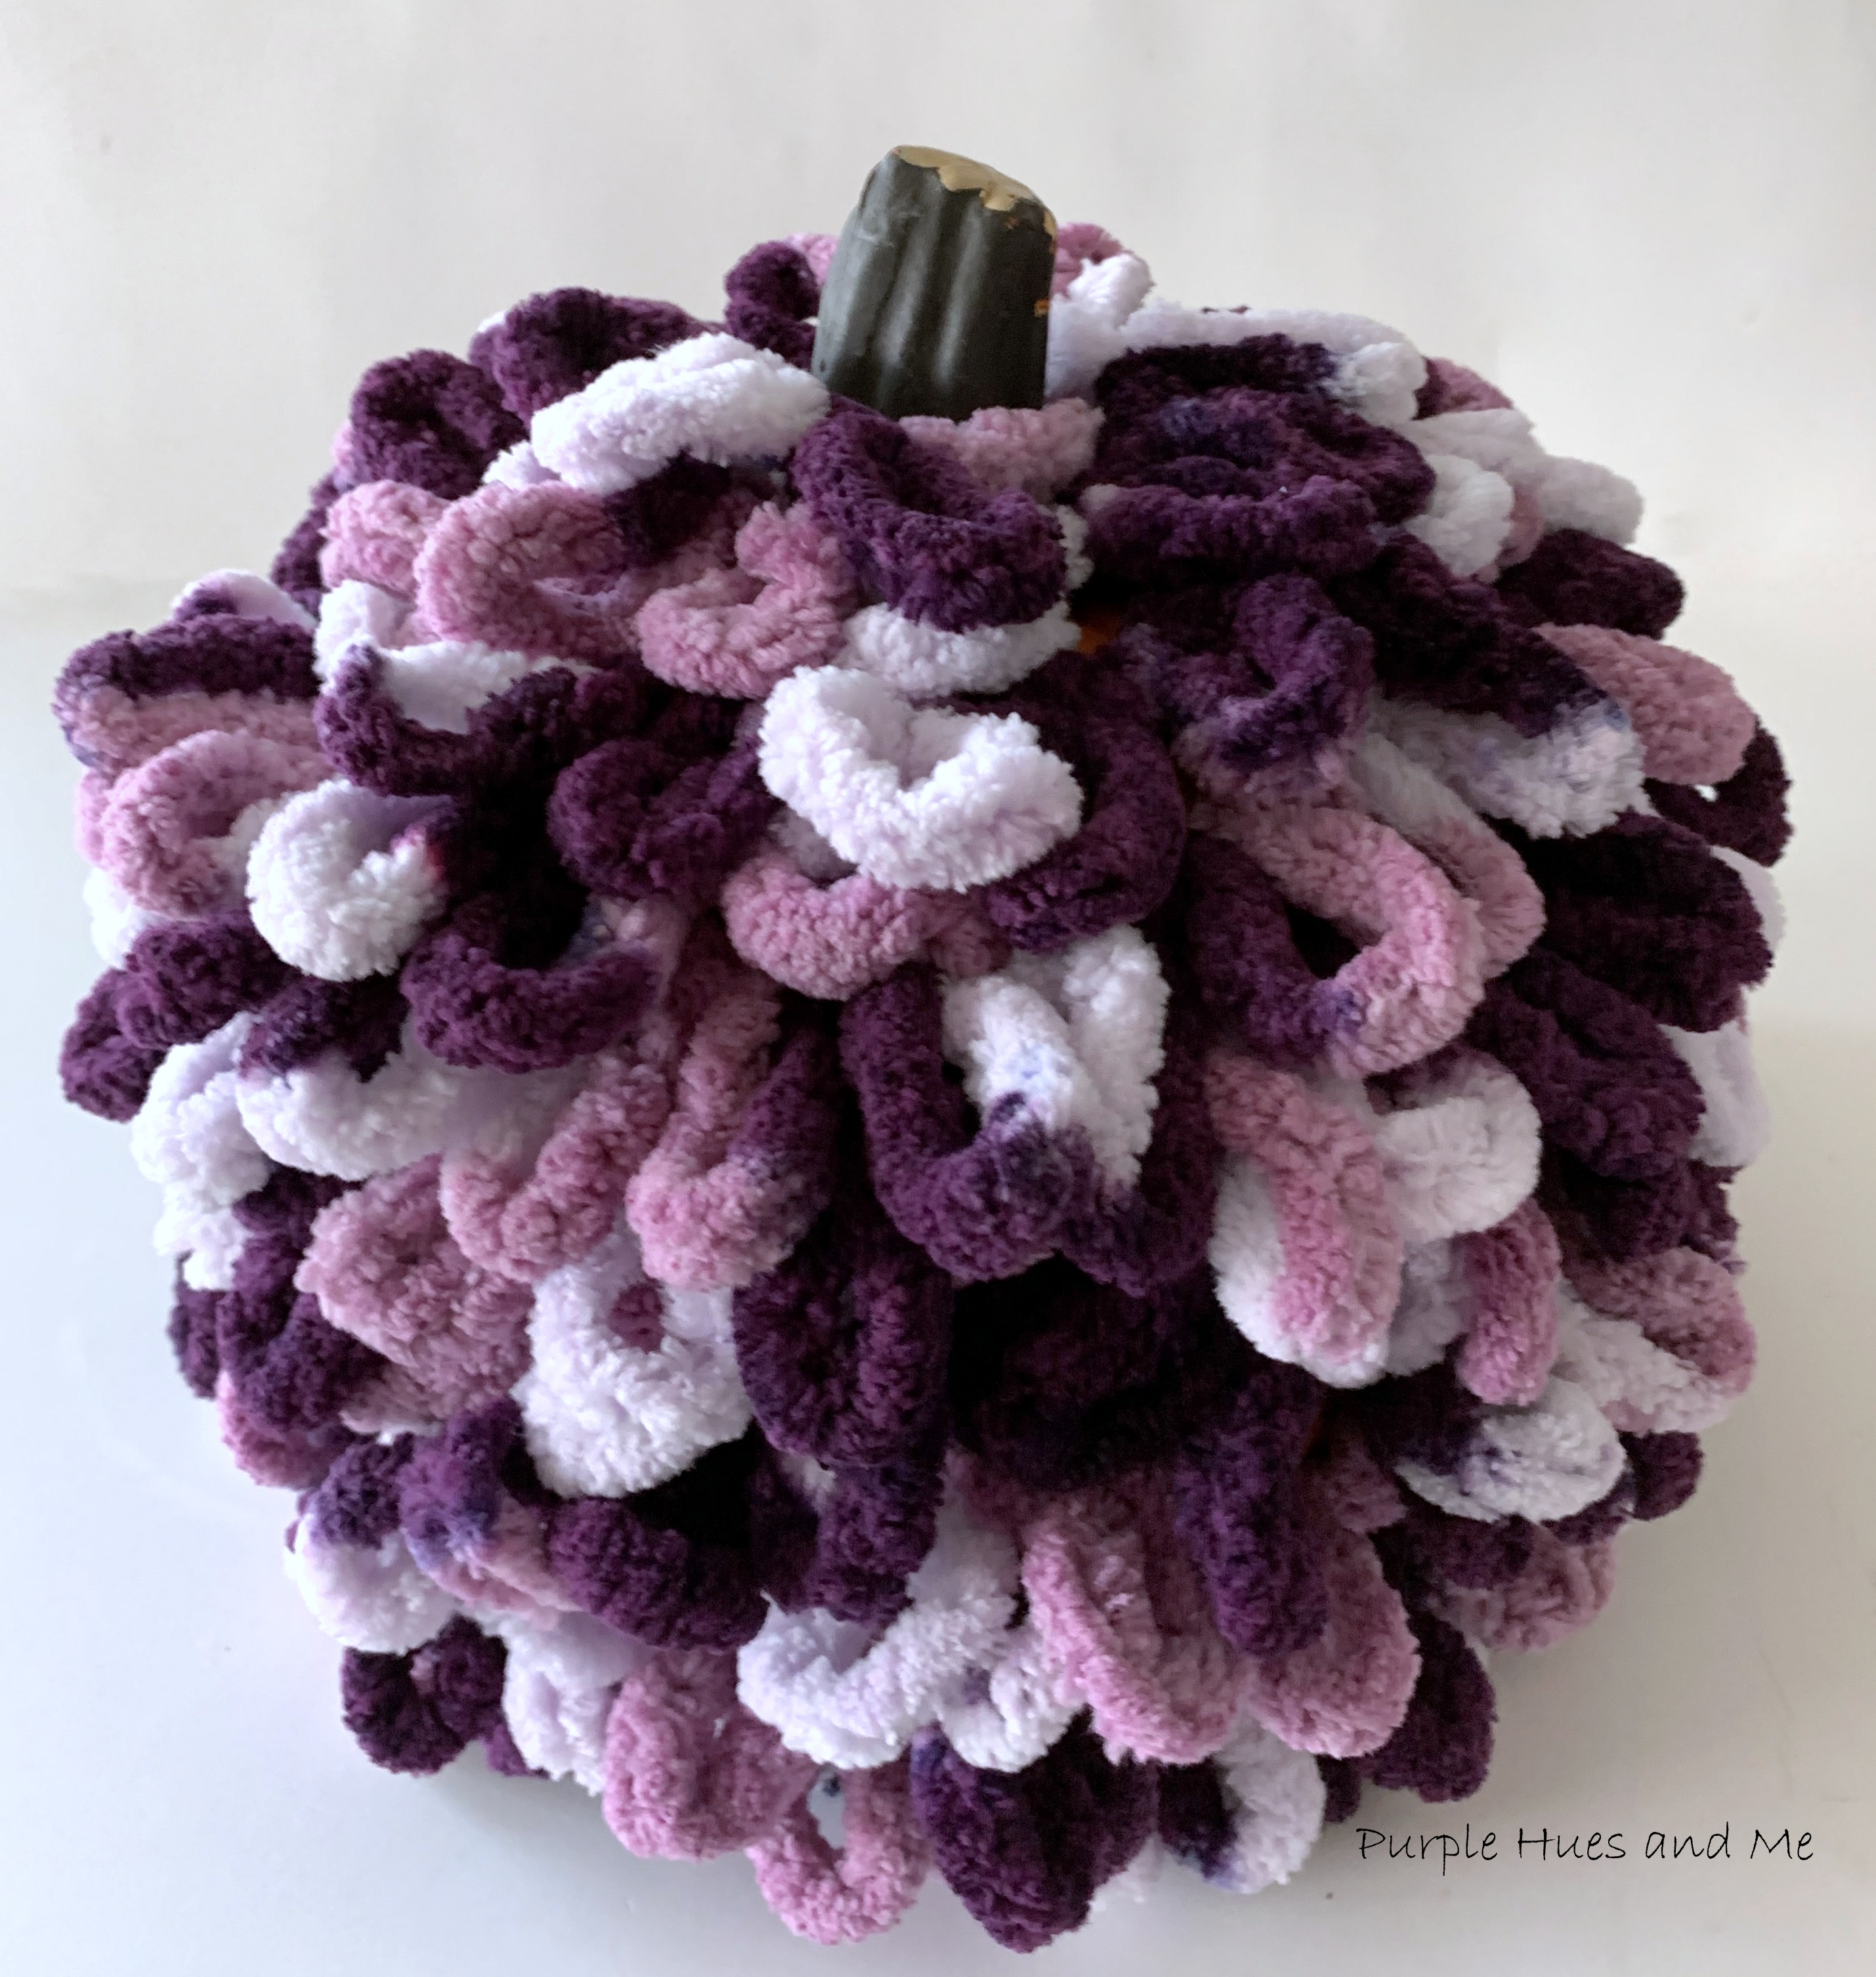
I was in Hobby Lobby recently, trying to take advantage of their fifty percent off on Fall and Christmas items. So naturally I'm going aisle by aisle looking for goodies when I came across loopy yarn in maroon, pink and white! Wow, I was loving the color combination! Now, I don't crochet or knit so I immediately thought of wrapping it around a pumpkin! There are so many ways to use loopy yarn! You should see the fabulous wreath my blogging friend, Michelle @Our Crafty Mom, made with loopy yarn.
But how hard would that be to wrap a pumpkin? At first, all of five minutes - from start to finish! Here's the yarn and pumpkin!
After putting a few strips of double sided tape around the pumpkin, began laying the loopy yarn on top and around the pumpkin!

Going around and around . . .
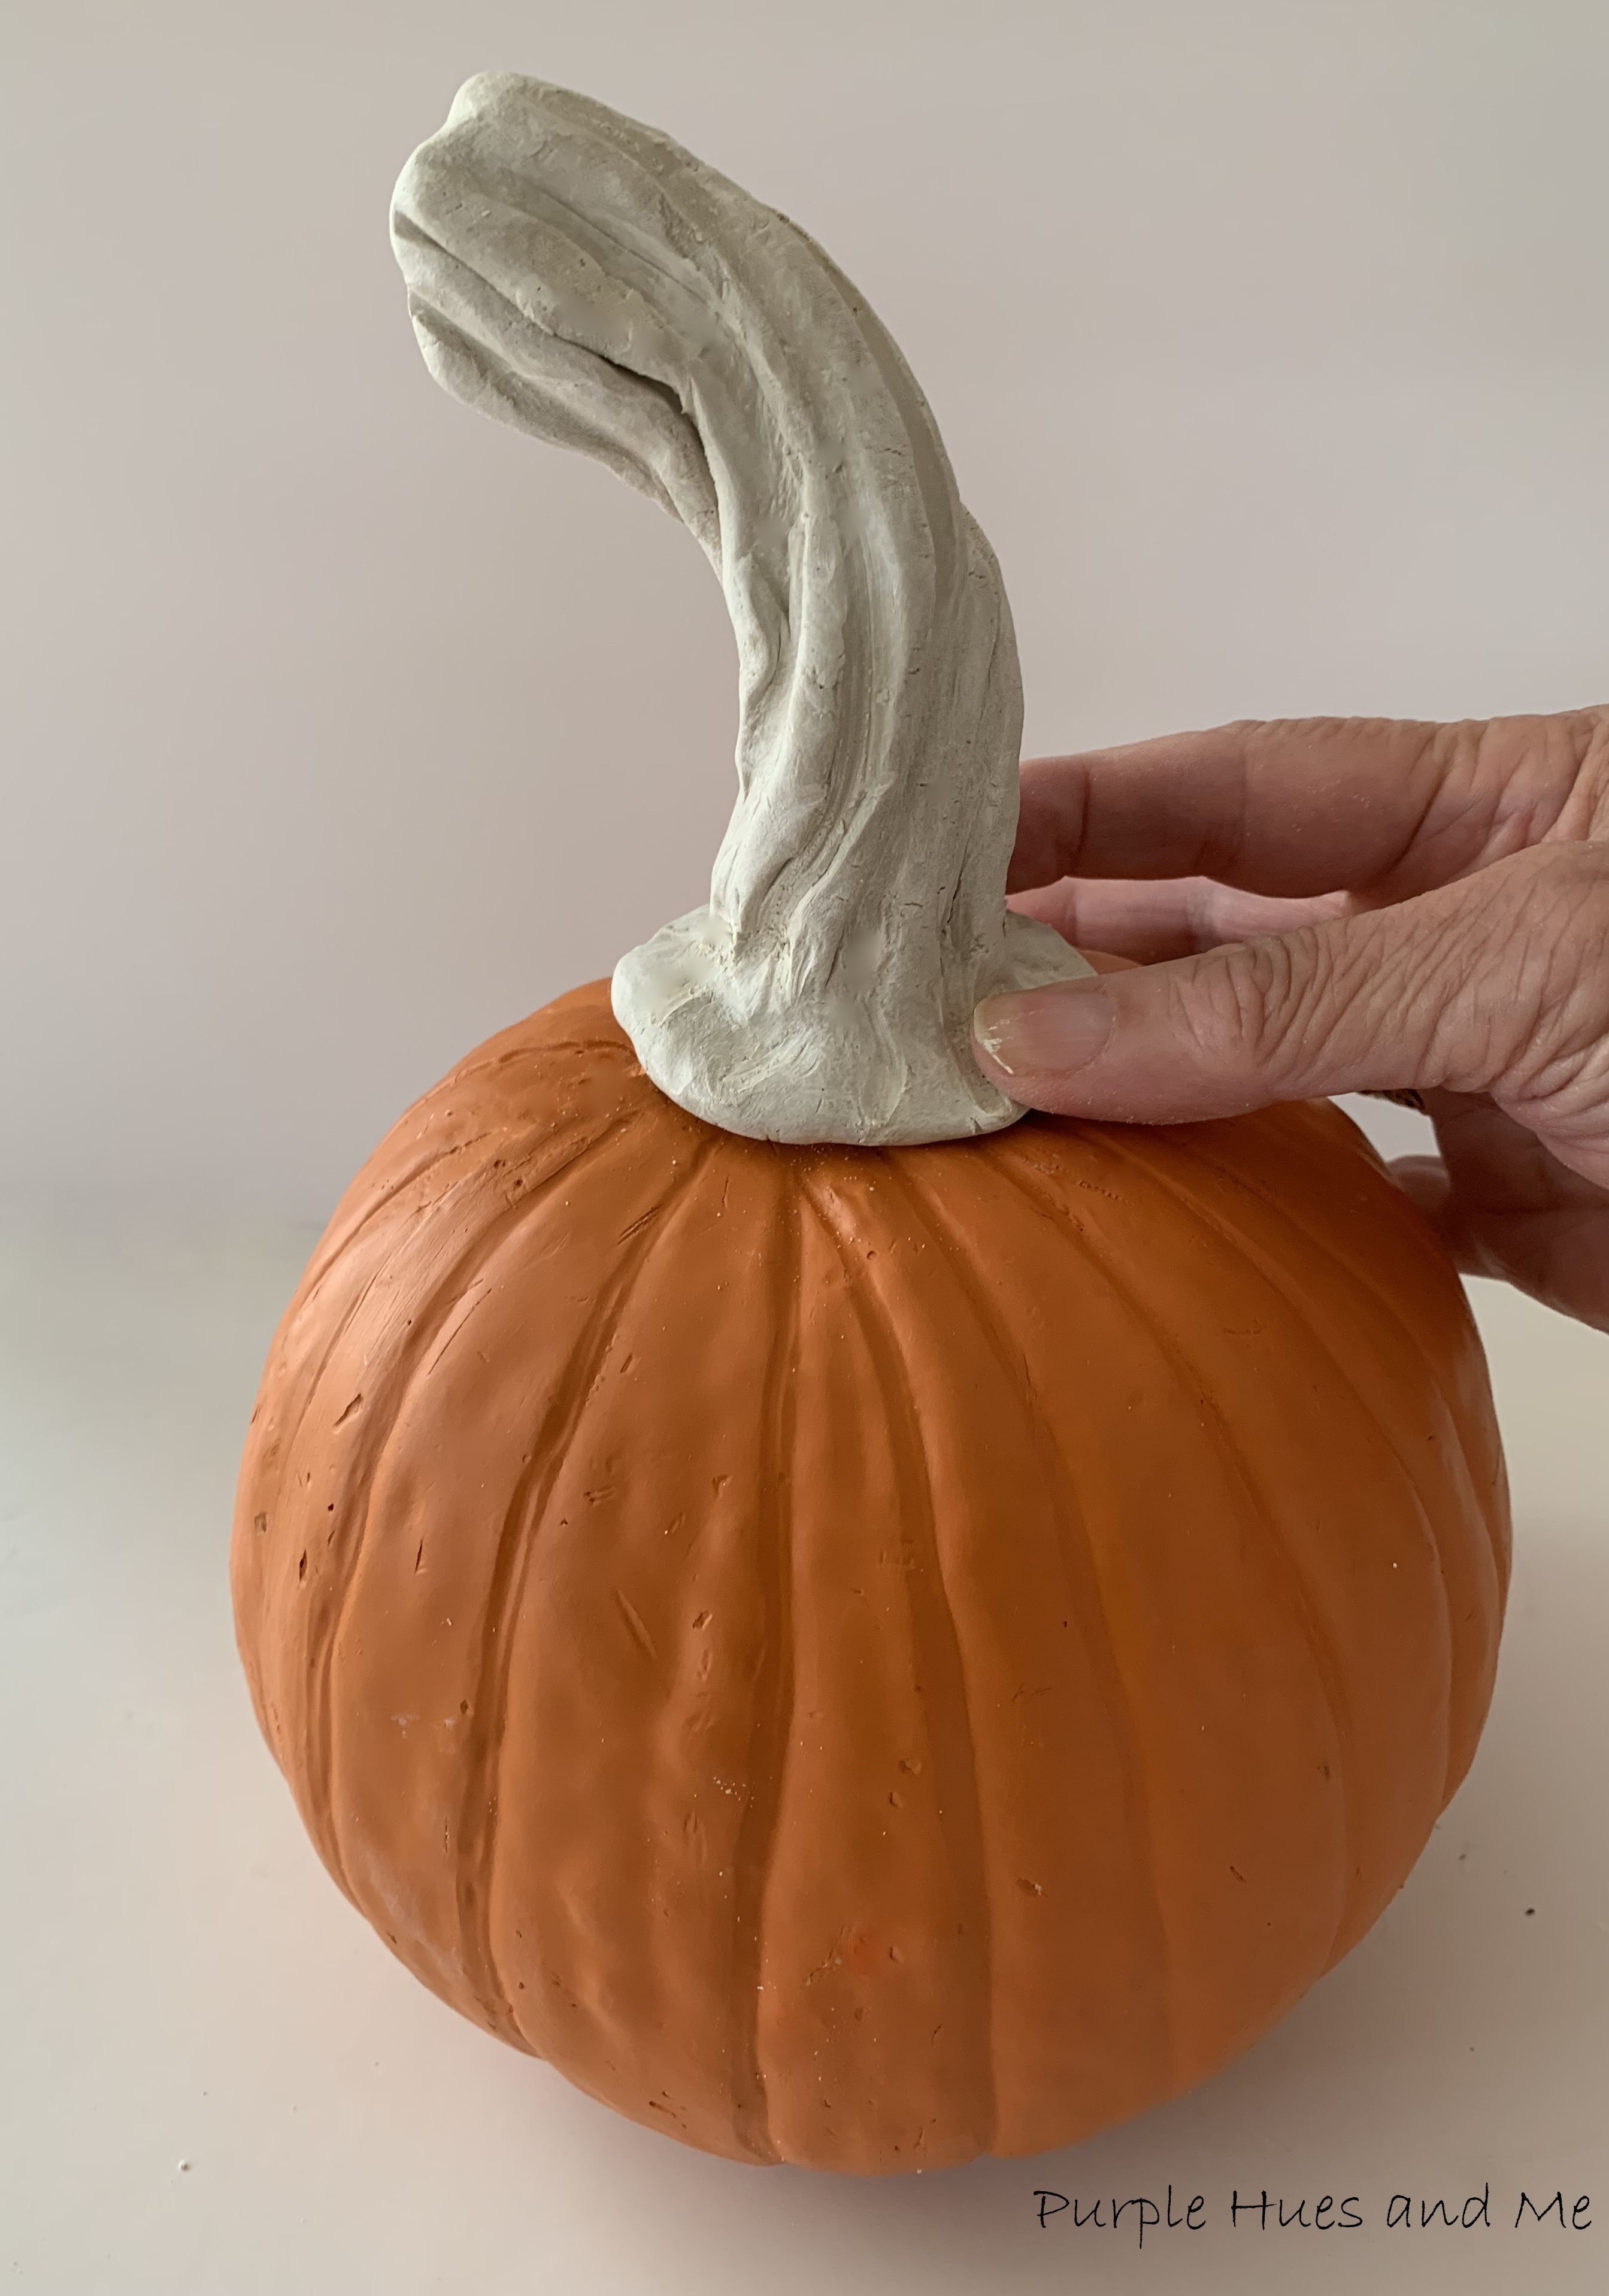
until the pumpkin was completely covered. I think this might be the quickest craft I've ever done!But wait! Look at that stem! Mercy me! It didn't look good - at all!!! But what was I going to do? Make a stem out of air dry clay that's what! But first, I had to unwrap the pumpkin and then cut off the stem, using a coping saw.Next, grabbed some Crayola Air Dry Clay from my stash and began rolling the clay in my hands to soften it . . .
I wanted to make a bold stem that would stand out from the loopy yarn, so I began shaping the clay to form a stem. Making the bottom portion a bit fatter than the top . . .
to make a flat surface . . .
to attach to the pumpkin.
Then used a large Phillips screwdriver to add ridges around the stem like real pumpkin stems have.Then twisted the stem and curving it a bit to mimic a real pumpkin stem!
Normally, air dry clay usually takes a day or two to dry out in the air, but it has been raining here for the past couple of days. And we had the air conditioning running since it's still warm and humid outside, so I'm sure it would have taken several days for the stem to dry naturally - especially since it's rather thick. More days I didn't have to finish this craft. So I placed the stem on parchment paper that I put on a metal tray. Then balled up a piece of aluminum foil and placed it under the curve to stop the stem from falling over.
Then, I placed the tray and stem in a cold oven and turned the oven on to it's lowest temperature which was 170 degrees. I left the stem in the oven a couple of hours, checking on it ever so often. Then I turned the oven off and let the stem stay in the oven overnight, to cool off.
The next day, it was dry and seemed to be in perfect condition. However, the manufacturer of air dry clay does not recommend drying it in the oven! Oh well!
I used a dark brown gel stain to paint the pumpkin stem. I loved how the stain made variated color streaks on the clay - from light to dark!To attach the stem to the pumpkin, I applied a blob of Quick Grip by Beacon (the makers of E6000) to the bottom center of the stem and hot glue around the bottom edge to secure.This time, I used small straight pins to attach the loopy yarn around the pumpkin since the double sided tape didn't hold up the yarn that well.What a lovely whimsical look for a pumpkin!
Disclosure I am a participant
in the Amazon Services LLC Associates Program, an affiliate advertising program
designed to provide a means for us to earn fees by linking to Amazon.com and affiliated
sites, this post may contain links. I may receive a very small commission at no
cost to you! The affiliate money I earn helps pay my crafting expenses. Thanks
so much for your support! And it goes perfectly with some of my other DIY pumpkins, too!
I hope you enjoyed my tutorial on wrapping a pumpkin with loopy yarn and the clay stem I created especially for the pumpkin for this month's Fall Crafts & Decor Blog Hop! I've joined a group of creative bloggers to bring you a themed monthly challenge blog hop on the 2nd Monday of each month, hosted by Beverly @Across the Blvd.
Meet this month's Co-Hosts: and their awesome projects:
Be sure to click below to see the Creative Ideas from the co-hosts!


I've seen this loopy yarn but had no idea what it could possibly be used for! This is so fun, what amazing texture.
ReplyDeleteI haven't seen the loopy yarn yet, but if I had I don't think I would've known what to do with it. This is adorable! Great job with the stem! Pinned!
ReplyDeletewhat a great project and a wonderful way to use the loopy yarn
ReplyDeleteYou've made a pretty looking pumpkin. I love that yarn you used to make it over. I hope you have a nice week Gail.
ReplyDeleteWhat a fun idea for a pumpkin! And you did a wonderful job making a new stem. I don't think I've seen a loopy pumpkin before, but this is super cute, and I love that it's purple!
ReplyDeleteWhat a cute way to dress up a pumpkin, Gail. The loopy yarn was perfect for this and your DIY stem looks great.
ReplyDeleteYour pumpkin looks amazing and like it took a while to put it together, but you fooled us all! LOL The colors of the yarn are so pretty and looks so good coordinated with your other pumpkins. Great job on the stem, too!
ReplyDeleteHi ,
ReplyDeleteRyan Axel.
I am a huge fan of your site (https://www.purplehuesandme.com/) and have really been enjoying your writings.
I’m not here to waste your precious time, instead, I have some new post ideas that your readers would certainly love to read. And, I was wondering if you’d be open to a guest blog post.
Get Her Crazy in Bed