Christmas in July is one of my favorite times of the year - it's when I get to
create adorable Christmas ornaments free of any stress and hassles! You know I love purple, so most of the ornaments I create have some type of purple color
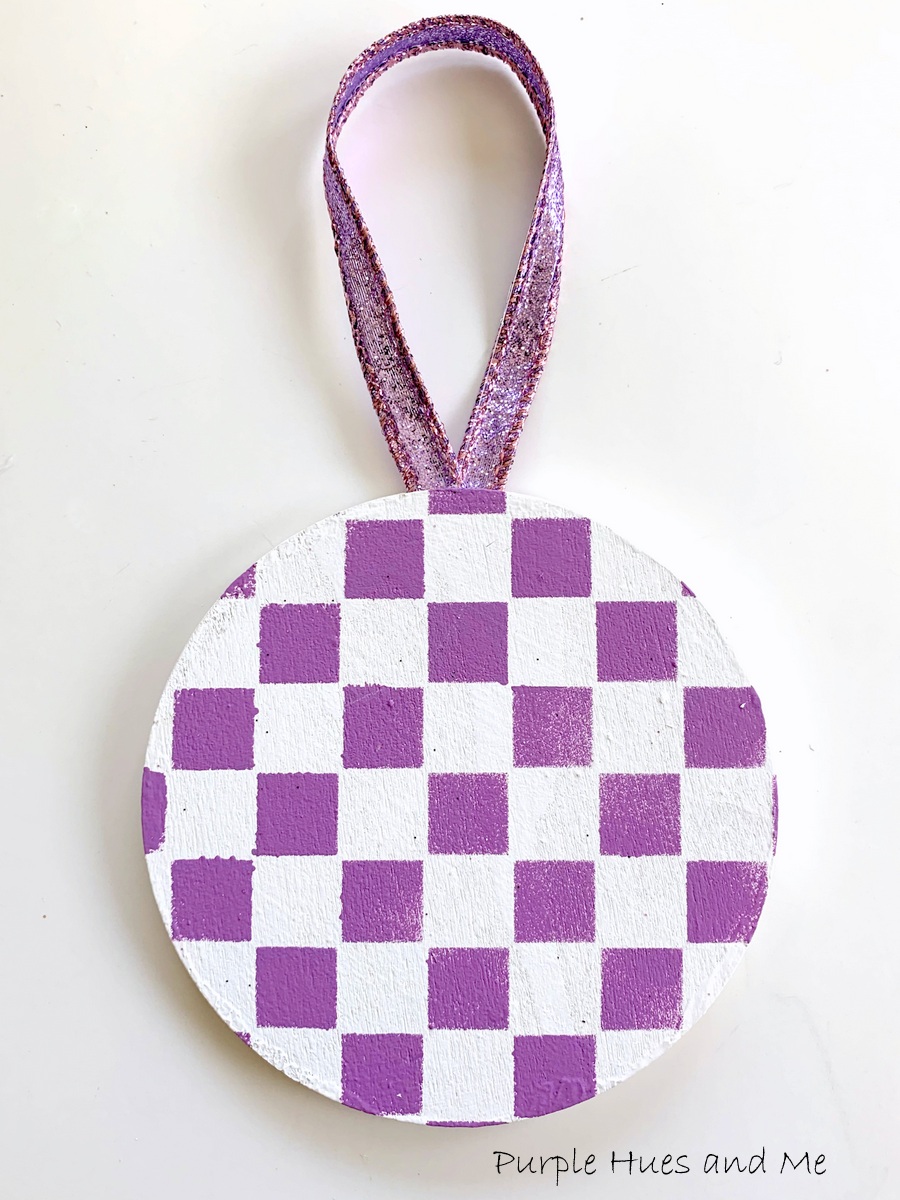
going on, lol! For this project, I pulled out my checkerboard stencil, wood rounds, silicone molds, and purple and white paints to create a simple but beautiful ornament to hang on my tree. And the best part - you can make some too using any paint color you like to go with your holiday decor, just like I have!
Materials Used:
- Wood rounds
- 1/2" check stencil
- Acrylic paints
- Paper plate
- Sponge pouncer/paint brushes
- Clamps
- Baroque style silicone molds
- Hot glue gun and glue sticks
- 3-in-1 Beacon craft glue
- 1/4" Wired ribbon
- Parchment paper
Disclosure I am a participant
in the Amazon Services LLC Associates Program, an affiliate advertising program
designed to provide a means for us to earn fees by linking to Amazon.com and affiliated
sites, this post may contain links. I may receive a very small commission at no
cost to you! The affiliate money I earn helps pay my crafting expenses. Thanks
so much for your support!
How to:
I love making projects with what I have in my stash! Fortunately, I had plenty of round wood rounds left over from a previous project. And the fun thing about wood rounds is that you can make so many different types of adorable ornaments out of them!
Lets get started with painting both sides of the rounds with white acrylic paint, letting them dry after painting each side. You will need to apply two coats of paint on each side of six wood rounds. Because the wood rounds are thin I'm gluing two together for each ornament.
To stencil, place the stencil down on the wood - trying to center and line up the checks. For me, I just eyeballed it, lol! No stressing on this for me!
Then pour a little bit of paint onto a paper plate and lightly dab the sponge into the paint. Gently dab off any excess paint on the paper plate before stenciling. Then dab the paint sponge down onto the stencil - dabbing up and down to cover the area.
Since the wood round area was small, initially I held the stencil in place with my fingers while dabbing the paint on, but later switched to taping the stencil sides down using painters' tape. A great way to prevent the stencil from moving!
Once the stenciling is done, peel off the stencil to reveal the amazing results. Not too bad for someone who doesn't do much stenciling! The last time was back in 2018! At first, I tried fixing any paint bleeds using a tiny paint brush and straight edge, but then decided they weren't that bad after all and left them as is.
Next, make a ribbon hanging loop by overlapping the ends of nine inches of wired ribbon and gluing in place at the top of the plain side of one of the wood rounds. Then apply glue over the entire area of the wood round to . . .
seal the plain sides together - then using clamps to hold in place until dry.

To make the hot glue baroque designs for the ornament, make sure the molds are clean and free of any dirt and grime. Heat up the glue gun and begin filling the mold with hot glue . . .
making sure every nook and cranny is filled.
I placed a piece of parchment paper over the hot-glue filled molds. And covered it with a plain wood round so I could press down the hot glue in the mold to make sure it fills up the entire mold.
Let the hot glue molds cool down and set. You can feel the molds to see if they're still warm or have cooled off.
Once the hot glue has cooled, remove from molds. They will easily pop out from the flexible silicone molds. Peel off the thin glue overflow from the mold or use the tip of the hot glue gun to remove.
Now it's time to paint the baroque hot glue pieces - using a purple metallic paint.
Painting both sides and drying after each side.
Once the paint is dry, glue onto the wood rounds. First the top and . . .
then the bottom piece creating a gorgeous ornament design!
Complete the look by adding a bow to the top!
How adorable are these!
I hope you enjoyed my tutorial on making purple and white checkered ornaments! It was so much fun to make and share at our monthly Creative Craft Hop hosted by Sara @Birdz of a Feather!
And I know you're loving all the wonderful craft projects, ideas, and inspirations shared this month! If you're coming over from Terrie @ Decorate and More with Tip, Welcome! Doesn't Terrie's DIY Peg Board look fabulous! Next up is our fearless leader, Sara @ Birdz of a Feather sharing her awesome Terra Clay Paint Tiki Makeover! Doesn't that sound divine! Be sure to check it and all the amazing projects out!


Great way to use up the stash Gail; these are awesome. Especially love the hot glue adornments!
ReplyDeleteGail, your checkered ornaments are lovely and I love the embellishments you crafted for them!
ReplyDeleteGail you never fail to inspire me with all your great ideas! Love the ornaments you made and will look amazing on your tree or anywhere you style them this year for Christmas. Thanks for sharing.
ReplyDeleteI have never even thought to use those molds with hot glue before. Brilliant idea! Your ornaments are just lovely. Pinned because I need to remember these tips.
ReplyDeletehi Gail, wow, these are so pretty and I am blown away that you made the baroque designs with hot glue!! I love your check stencil too, do you wash it off each time you use it to remove the paint? I just love how these turned out, so smart to use 2 rounds so you could add the ribbon hanger in between them. These will be so perfect for your purple Christmas tree!
ReplyDeleteJenna
Amazing Gail. I can see these in checked black and white to match MKC decor. The molded designs are beautiful. I love the baroque design.
ReplyDeleteThese are beautiful Gail! I love the idea of using silicone molds filled with hot glue! I never thought about that, and it's something I'm definitely going to use. Adding those baroque pieces brought your ornaments to a whole new level! Love it!
ReplyDeleteForgot to let you know I pinned your post!
DeleteYay! I've been trying to comment on here for days, but I couldn't even when I signed into Google. Finally it occured to me to try when I'm signed into Chrome and Ta Da! It worked! I absolutely love your checkered ornaments. I have seen the hot glue molds but wasn't sure how well they would work, but you have convinced me to give them a try. Your ornaments turned out so cute!!! Thanks for sharing!
ReplyDeleteNice to meet you, I'm James Marry. I'm a college student. Today I found the ideal the best expository essay writing service for my situation. Your writing quality is another thing I've observed. I like reading what you have to say. You mention Acrylic Wall clocks. I continued reading your post as well. Thank you for sharing with us.
ReplyDeleteChristmas in July is the perfect escape! Forget the winter rush and get creative. My purple ornaments are a relaxing project, using stencils and molds. It's like managing Papa's Pizzeria , but instead of pizza, you're crafting joy. Customize with any color – your own unique holiday recipe. Simple, fun, and festive!
ReplyDeleteI love the unique combination of purple and white checkered ornaments! They really add a playful yet stylish touch to any decor. It's interesting how certain patterns, like checks, can evoke a nostalgic yet modern feeling at the same time. This reminds me a bit of the quirky designs you see in games like Funny Shooter 2 , where unexpected colors and patterns come together for a fun look.
ReplyDeleteThese ornaments are so cute Gail! The purple and white checkerboard is really striking. It reminds me of the creative freedom you have in games like Melon Playground where you can build anything you imagine. I might try this using some blue and silver I have lying around. Thanks for the inspiration!
ReplyDeleteJuly's bliss! Ornament crafting sans stress is my jam. Purple reigns, naturally! Checkerboard stencils, wood, silicone molds, purple and white paints are my arsenal. Simple, pretty ornaments, tree-ready. It's surprisingly fun, like mastering a tricky level in Moto X3M, but way more relaxing. Get creative!
ReplyDelete