

I love making woven crafts! I've made all sorts using different types of ribbon, like here, here and here, newspaper - here, here, here and here, macrame cord - here, here, and here - mostly on upcycle items like tin cans, yogurt jars, books, and picture frames. It's so easy to have whatever you're using to go 'over and under' to create a cool look!
So naturally I was excited to see a diy woven Easter basket on Pinterest that I was interested in! Clicking on the link took me to marthastewart.com where I saw the tutorial for making one. The cool thing about making this basket is that it uses a cornstarch container as the mold. And of course I had an empty cornstarch container in my stash just like the one used. And you know I had to make a woven basket for this month's Sustainable Pinterest Challenge Blog Hop hosted by Julie @ @Sum of Their Stories. The blog hop for this month is all about Welcome Spring Crafts!

The original tutorial comes from one of Martha Stewart's contributors, Anne Weil @FlaxandTwine. She is a very creative and talented lady!
Baskets and Spring go hand in hand. Did you know historians believe that the word “Easter” derives from “Eostre,” the pagan goddess of spring and fertility. Drawings of Eostre often depict her holding a woven basket on her arm. Perhaps that's where Easter baskets originated. Nevertheless, we all love baskets and making a woven one is sure to please just about everyone!
I'm sharing my take on making a woven Easter basket based on the tutorial by Anne Weil. I must confess that since very few items are needed to make this basket, I thought it would be a breeze to create! But in reality, I spent more time on it than I do for most of my craft projects. In fact, I found it very time consuming and was not quite satisfied with my results. I'll tell you more about that as we go along.
Supplies
- Cornstarch Container (3.5"x3.5")
- Macrame Cord (3mm - 109yds)
- Yard stick
- Masking tape, scissors
- Bobby pin/hairpin
Instructions
First off, the original tutorial called for a ball of hemp cord. There was a link to that but it was no longer available and I couldn't see what it actually looked like. When I think of hemp cord, I think of a rather sturdy but thin type of twine which doesn't look like what was used. I went on Amazon to see its' list of hemp cord, but nothing really looked like the type pictured in the basket. Most were thin - although there was a hemp rope, but I didn't want to use a rope. So, since I already had lots of different color macrame cords on hand - I picked out a lavender shade to use.


I somehow misread (my fault - senior moment) the directions and made 10 - 25" long four cords groups, plus the 30" long group (handle) which I placed horizontally in between two groups on one side and three on the other side. I didn't realize my mistake and left them there in place to weave each group in a over and under pattern mid-way across the vertical group. I must say this extra group of cords didn't crowd the basket shape or weaving. In fact, it helped to fill up space between the groups.


 Continue weaving around the mold - over and under - as before, forming the shape of the woven basket.

As you move around the mold with the working cord, be sure to tighten the cord and pull and straighten the cord groups.

 To do this, I started out using a darning needle, but it was difficult to pull the cord through the eye of the needle without separating some of the strands of the cord.
 To finish the top of the woven basket - first take the longer group of cords and drape across the top of the mold. Then take the group of cords to the right and take it behind the handle cords, draping down in an arc. Be sure to keep the cords together and in line. Then take the group to the right, curving behind and around, down into the first arc.
 Continue creating cord arcs as you move around the top. I used a hairpin to group the cords together to insert behind the previous arc. It was easier for me to pull them through that way.

When reaching where you began, tuck the last group of cords through the arc created by the first group. Then begin tucking the ends of the group cords under or behind several of the weaving cords.
 And be sure to leave the longer cords out to make the handle.

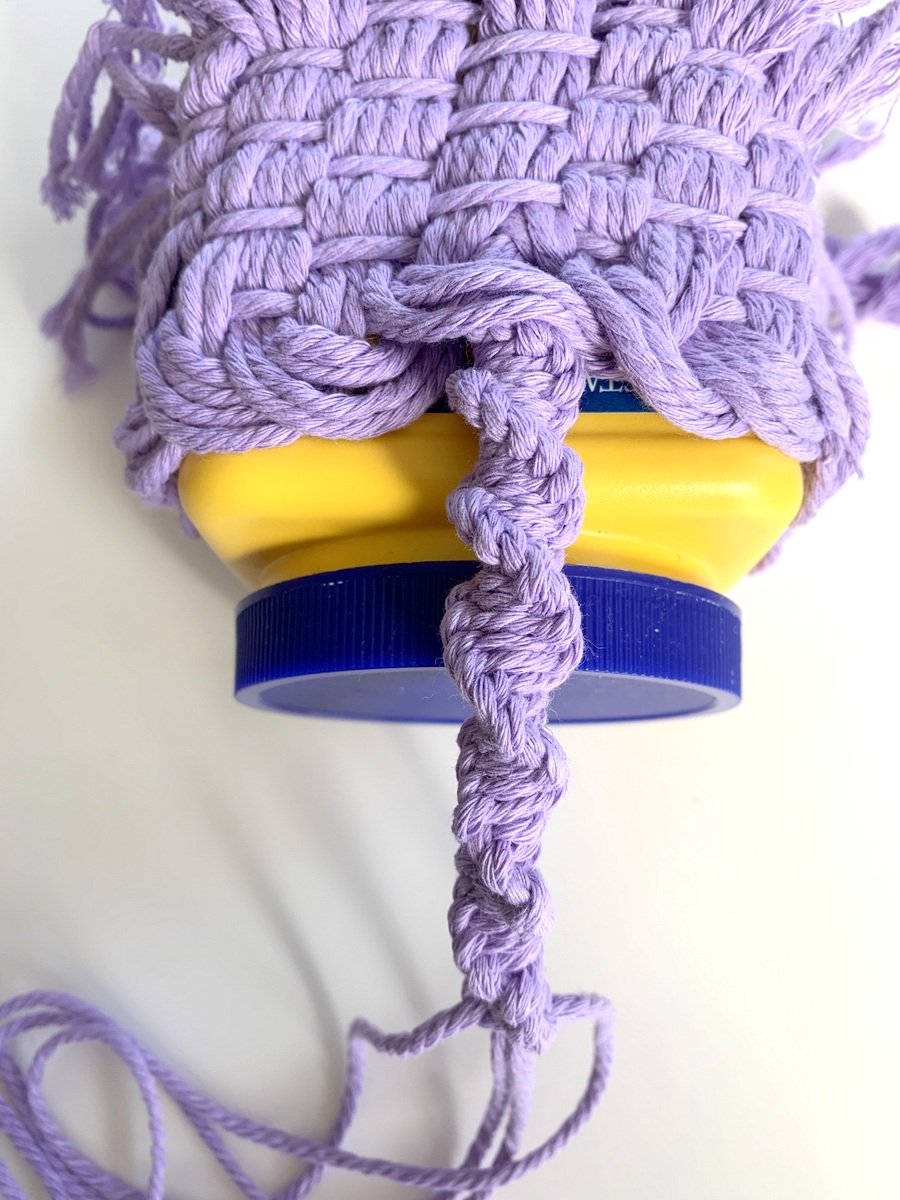
 since I had four cords, I decided to make a four strand spiral knot handle - with the two middle cords as anchors and the two side ones as tying cords. But to do this, I had to lengthen the tying cords. So I cut off most of the left - right cords leaving a couple of inches and replace them with longer (108") cords (tying them in knots to the leftover portion of the previous cords) inside the basket. These would have been the tying cords and the lengths would get shorter and shorter while the anchor cords remained basically the same length. That wouldn't be enough using the 30" length for making a spiral knot handle.


Next, move the woven cord groups close together in the center to tighten the weave. Then take the cord from the original 109 yd roll and lay across the bottom of the horizontal cords at the left side end. Then begin weaving that cord (working cord) over and under the cord groups around the woven cords.

Continue to weave the working cord around the woven group base. After several times, place the woven cords on top of the mold which is the bottom of the cornstarch container.


Once you reach the end (top of the mold) leave enough working cord to weave another group (four) over and under into the weaving pattern along the entire height of the woven basket.


When reaching where you began, tuck the last group of cords through the arc created by the first group. Then begin tucking the ends of the group cords under or behind several of the weaving cords.

I used a bobby pin to insert the group cords behind the weaving cords which were quite tight in places. And I had to tuck each cord under, one at a time. It took me what seemed like forever to do this. I wanted it to be over and done.


Since mentioning the handle, the original tutorial called for twisting the handle cords together in two groups. I tried that but the handle seemed too flimsy so -

To begin making the spiral knot, take the left tying cord and pass it over the anchor cords and above the right tying cord.


 While making the spiral knots, if you twist the spiral knots closer together, a somewhat new look will emerge for a chunky more sturdy design. Perfect to use as a handle!
 Measure the finished spiral knot handle to the basket securing the cords inside by inserting them under a couple of working cords and tying in knots, cutting off excess cords. Then trim the ends of the tucked in cords. And then, straighten and flatten the arcs before removing the mold from the woven basket.


Now, it's time to meet the other participants and their projects!

Pass the left tying cord above the anchor cords and through the loop formed by the right tying cord.

Pull on both tying cords to tighten the knot and you've completed a right half square knot. A spiral knot is basically two right half square knots . . .

tying them over and over making sure you are always tying the half knot in the same direction to create the spiral design.


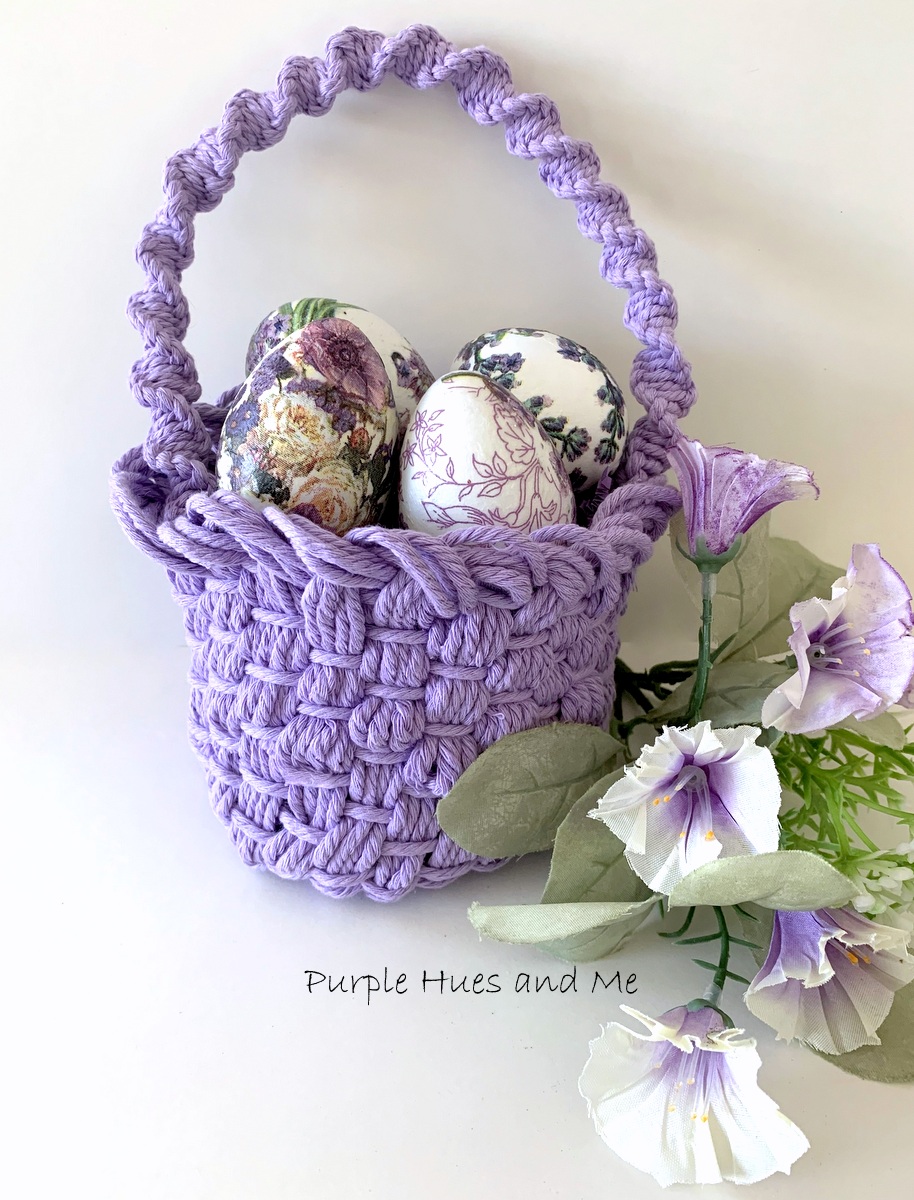
I love the look of the basket, but in retrospect, I would use a much sturdier, stiffer cord to maintain the adorable shape of the woven basket. Mine doesn't look like the one pictured on Pinterest or in the tutorial. A stiffer cord would make the weave look much neater, too.

There are so many ways to use this adorable woven basket!
Now, it's time to meet the other participants and their projects!
Julie | Sum of their Stories
Gail | Purple Hues and Me
Terri | A Good Life
Lydia | Life Beyond the Kitchen
T’onna | Sew Crafty Crochet
Julie | Treasures Made From Yarn
Allyson | Southern Sunflowers
Mel | Decor Craft Design
Niki | Life as a LEO Wife


Wow Gail, you continue to amaze me. Love your woven basket. I don't have the patience to do what you do, but I can work on blogs, coding, etc.
ReplyDeleteThanks, Linda! I think I lost my patience with this one! Lol! What you do is very creative and takes talent! It's also quite important and on trend these days! I'm so impressed!
DeleteI love this pretty woven basket you made Gail. It's the perfect Easter decoration. :)
ReplyDeleteI think your basket is every bit as lovely as the original pinspiration! The colour is certainly very you! :-D
ReplyDeleteIt does look like it was pretty time consuming, but worth the effort I think. I love the curved effect at the top, so pretty.
Your basket is so pretty! That's such a lovely shade of purple, and at first, I thought this was a crochet basket. It looks like the basket weave stitch. So pretty! Pinning!!!
ReplyDeleteI love your woven basket, Gail. It's perfect for the season, but I think it would also be perfect for 'wrapping' a gift!
ReplyDeleteYour patience paid off as your basket looks amazing, and it looks so pretty in your signature color, too!
ReplyDeleteI love the color and the shape, it's so adorable, Gail! I agree, it would be fantastic as a Easter gift basket too.
ReplyDeleteGreat tutorial, Gail and so easy to follow. I wonder if you can adapt the pattern and leave some those strands that you wove back down to hang lose to give it a boho flair? I'll have to give it a try.
ReplyDeleteI don't have macrame cord but I do have cotton yarn. I wonder it it will work for a project like this? I'll have to add it to my "to do" list :)
ReplyDeleteThis purple color is really beautiful. And this handmade basket diy is very helpful and useful. Thanks for sharing this article. Now it's time to avail Locksmith Leeds for more information.
ReplyDeleteThis comment has been removed by the author.
ReplyDeleteThanks for posting this info. I just want to let you know that I just check out your site
ReplyDeleteSimple yet powerful, the rumi jacket defines understated luxury. Crafted for a sharp, modern fit, it delivers everyday versatility with a premium edge. Whether casual or dressed up, it completes your look with effortless charm.
ReplyDelete