Welcome to our Monthly Challenge Blog Hop! I've joined a group of creative bloggers to bring you a themed monthly challenge blog hop on the 2nd Monday of each month! This month it's Christmas in July and time to get a head start on making all things Christmas!
I love making handcrafted ornaments for the holidays, but it can be quite stressful when you're trying to do a hundred other things! So now's the time to begin creating those pretty ornaments you've had in mind for so long! Here's an easy way of making gorgeous looking ornaments - if you have left over gimp braided trim like I do, how cool would it be to wrap a styrofoam ball around it and then top it off with a beautiful Bowdabra bow for a lovely Christmas ornament! It's definitely easy to make and yet very dramatic in design!
Materials Needed:
Styrofoam Ball
Acrylic Craft Paint
Ornament hanger (from broken ornament)
Gimp Braided Trim
Fabri-Tac Fabric Glue
Mini Bowdabra, Bow Wire, Ruler and Wand
5/8" Sheer Metallic Trim Ribbon
Disclosure I am a participant
in the Amazon Services LLC Associates Program, an affiliate advertising program
designed to provide a means for us to earn fees by linking to Amazon.com and affiliated
sites, this post may contain links. I may receive a very small commission at no
cost to you! The affiliate money I earn helps pay my crafting expenses. Thanks
so much for your support!
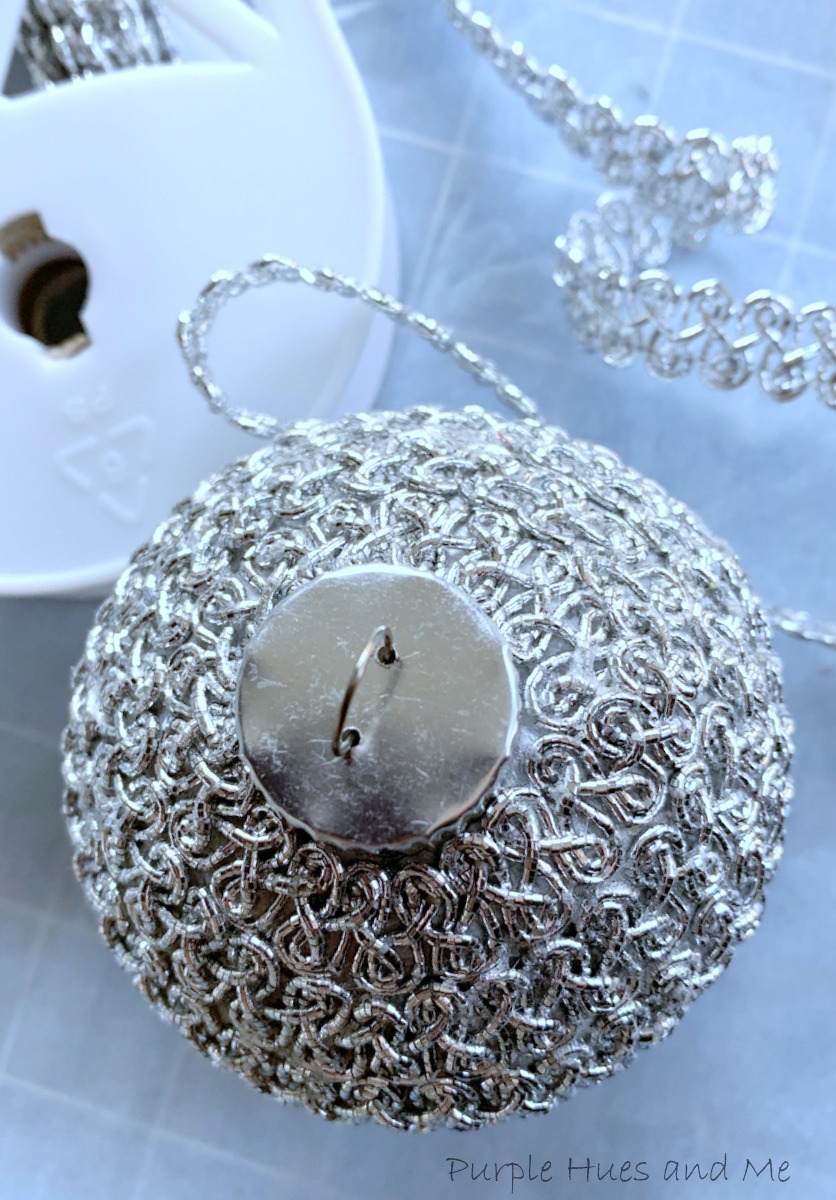
Begin by placing the ornament hanger in the top center of the styrofoam ball.
But in hindsight, it's easier to paint first using FolkArt Brush Metal to cover the white - let dry and then add the hanger.
Next, apply a generous amount of fabric glue around the base of the ornament and begin placing the trim down following the edge of the hanger, making sure the loops in the design are as close to the hanger as possible.
Continue applying glue in the width of the trim to the ball and then adding the trim -
Make sure the trim fits as close to the previous row.
And try to place the loops in the open grooves of the trim as you're gluing it on.
Proceed with wrapping the styrofoam ball with the trim being . . .
very careful with placement of the trim as the area gets smaller and smaller. You'll have to tighten it up a bit!
And finally, to finish, squish together the end of the trim in a circle while gluing it down, and then cutting off the excess.
Adorable - isn't it! But to complete the look, add a loopy bow to the top!
Here's how:
Using a Mini Bowdabra, insert a 24" piece of bow wire folded in half into the Mini Bowdabra, tucking ends under. Then, make a crease near the end of the ribbon and place into the Mini Bowdabra. Fold the ribbon at the 2" mark and press into the Mini Bowdabra. This is your first loop.
Next, fold the other side at the same 2" loop width. Continue folding loops one at a time down through the center of the Mini Bowdabra . . .
making 13 loops on each side for a total of 26 loops - this happened to be the end of the ribbon that's why 13 loops were made. Then scrunch down the loops with the Mini Bowdabra Wand.
While the bow is still in the Mini Bowdabra, thread the two loose ends of the bow wire through the loop at the other end pulling tightly, tie in a knot and gently pull bow out.
Fluff the bow, arranging the loops. Then tie the bow onto the hanger with the bow wire adjusting the wire through the center of the bow. Make a loop with the two wires for hanging, tying the ends together and cutting off excess wire.
How adorable is this! Perfect for a Christmas in July project!
Now on to our Christmas in July Blog Hop!
Be sure to check out all the amazing Christmas in July projects from these talented bloggers:


This is stunning and I love how it turned out. Thank you so much for sharing and wonderful hopping with you :)
ReplyDeleteThanks, Chas! It was fun to make! And it's always a pleasure hopping with you, too!
DeleteYour ornament is gorgeous and elegant. The trim is so pretty. What a great tutorial so I can make my own.
ReplyDeleteThanks so much,Jenny! It's a great way to use up some of those trims we have leftover in our stash!
ReplyDeleteThis comment has been removed by the author.
ReplyDeleteI love this! You did a wonderful job perfectly gluing the trim onto the ornament. That trim creates a really nice textured design on the ornament. Pinning! Thanks for sharing!
ReplyDeleteThanks, T'onna! The texture of the trim was the main reason I thought it would look great on an ornament! I love how it turned out, but wish is came in purple, lol!
DeleteYour ornament is lovely, Gail. That trim has a great look to it and your bow really sets it off.
ReplyDeleteThanks, Beverly! Yes, the trim does give it a nice intricate look and a bow is always the final touch!
DeleteThis is gorgeous, Gail! Lovely!
ReplyDeleteThis is so pretty Gail, I love how glittery and detailed it all is.
ReplyDeleteThis is so pretty Gail, I love how glittery and detailed it all is.
ReplyDeleteIt looks cute and has turned out really well.
ReplyDeleteYou made a beautiful ornament!! I wouldn't have thought it would be so easy to make because it looks so fancy. Great detailed tutorial.
ReplyDeleteThis reminds me of ornaments my mom used to make. Love it. Pinned.
ReplyDelete