

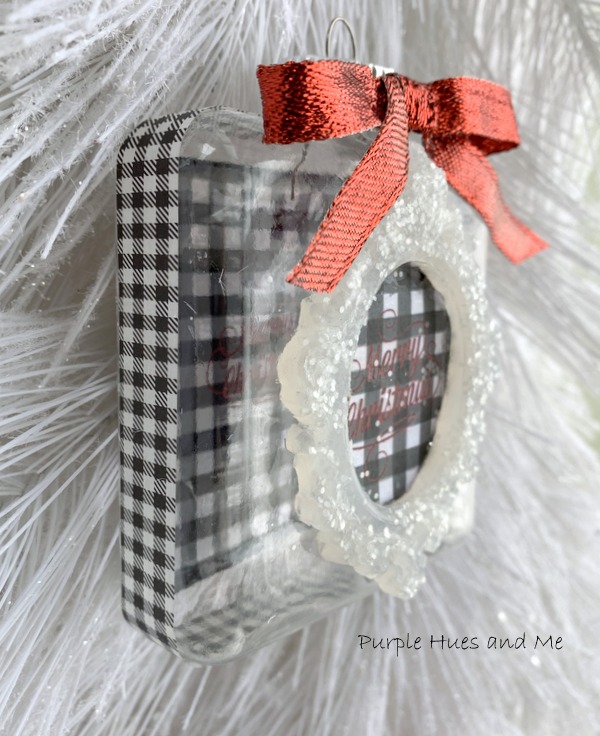
My project was inspired by this one - using clay in molds for decorative ornaments. The only problem, it didn't work for me when I tried it. I was all pumped up to make ornaments using clay I already had on hand to make decorative trim on ornaments. I had nearly a tub full of air drying clay, and this post stated that just about any type of clay would work. Although paper clay was used, I should have noted that she did say there might be cracks when removing the clay from the molds - and that she liked the look the cracks gave! Well, not me! When I tried taking the clay out of my molds, that's what the clay did - crack! And I couldn't make them look decent, either. No matter what I tried. So I had to come up with another plan. Using hot glue in the molds!
Materials Used:
Cake Border Silicone Mold
Hot glue gun and glue sticks
Glass Ornament (square shape ACMoore)
Small scissors
Buffalo paper (online image)
Mod Podge/ brush
Glitter
Washi tape
1/4" Ribbon
I knew hot glue would work and conform to just about any type of mold and with no cracking, either! Problem solved! So, if you have a glue gun that takes regular size sticks, I would recommend using that. It takes less time to fill up the mold and you probably won't go through as many glue sticks, either.
Instructions:
Begin with placing the tip of the glue gun as far into the mold as possible when filling with hot glue. The glue will settle in the bottom and you can direct the nozzle in spots you might have missed.


Once the glue is cool, the design can easily be removed from the mold.

Then use small scissors to remove any excess glue or strings.

Since buffalo check plaid remains trendy, I found a free black and white check pattern online and added the words "Merry Christmas" to copy and print out on using my laser printer.


Then let dry for a beautiful sparkling effect!


How cool is this!

TO JOIN NEXT MONTH’S #PINTERESTCHALLENGE, CLICK HERE TO SIGN-UP ⇒ December Pinterest Challenge
For more Pinterest inspired projects from this month's Pinterest Challenge hosts, check out the links below ↓

My Pinterventures
Cookies Coffee and Crafts • Across the Boulevard
Purple Hues and Me • My Family Thyme • Our Good Life
Farm Girl Reformed • Decorate and More with Tip • Mom Home Guide Our Unschooling Journey • This Autoimmune Life • Christina Faye Repurposed • Stone Cottage Adventures • Love My Little Cottage
My Bijou Life • K's Olympic Nest
Seeking Serenity & Harmony • Peony Street • DIY Vibes
Now, let's see what the other hosts have created ⇓⇓


It turned out so nicely. Love the shape and the glitter is the perfect finishing touch!
ReplyDeleteThanks for sharing!
Ellibelle's Corner
That is really neat! I am so sorry the clay kept cracking (that would have drove me nuts too!) but you came up with a really great solution. Pinned.
ReplyDeleteIt is frustrating when a project doesn't work out! I think we've all had our fair share! But I love the ornament you came up with - very pretty and trendy with the buffalo check!
ReplyDeleteSometimes the best projects are the ones that have a few kinks along the way! Your ornament is adorable and I love love the black and white check! Pinned :)
ReplyDeleteVery cute. I never knew an ornament could be made out of glue!
ReplyDeleteThis looks like such a fun project. I've seen things made with hot glue and molds before and always wanted to try it. Pinned.
ReplyDeleteWhat a cool idea to use hot glue in the mold, the colored hot glue sticks would be perfect for this (if you wanted color). It's a perfect buffalo check ornament.
ReplyDeleteClever solution to the clay problem. Don't think I would have thought of that. Seeing a whole new purpose for hot glue, lol. Cute ornament that anyone could make to fit their Christmas theme.
ReplyDeleteThis is so inventive. I would never have thought of molding hot glue - what a beautiful ornament!
ReplyDeleteThanks for sharing. It is very informative. Keep doing. Frederick Traffic Lawyer
ReplyDeleteIt’s an interesting article..!! Thanks for sharing. Looks Useful. Keep Posting . Uncontested Divorce Lawyer New York
ReplyDelete