

Do you remember the fabric bread baskets from way back when? Weren't they awfully cute? Especially the way you tied the corners or could put them away flat. I recently saw one online with what I thought would be a free tutorial, but it turned out to be one where you had to "pay" to have the instructions downloaded. Oh no! There are too many free sites available or you could just improvise and make your own, like I did. All of the tutorials I found required some sewing like here and here, but there are a lot of crafters who don't like to sew or can't sew, so I came up with my own version using Aileen's Tacky Glue. I chose this glue because I've used it before with fabric ( I glued fabric to bench legs for an upholstered look) and it dries clear, and also, it's what I had on hand, lol!
- Burlap (I had 1/2yd of 45"wide burlap which was more than enough)
- Jute twine (cut into 8 - 12" pieces)
- Mod Podge
- Poster board
- Aileen's Tacky Glue or fabric glue
- Cardboard
- Scissors or paper cutter
- Yard stick
To prevent the burlap from raveling, I painted mod podge on first. While that dried I drew a 16"x16" square on poster board for my pattern. I divided the large square into 4" squares for a total of 16 squares.


I placed a heavy board on the entire burlap square so the ends would not lift up while drying. Allow the folded edges to dry completely.
After drying, I folded the sections up into the shape of the box just to make sure it would fold properly.
Measuring 4 inches from the corners and beside the cardboard, I glued the twine ties down in the folded area. I used clips to hold them in place until completely dry.


With the second burlap square, I started folding and gluing the edges down, one side at a time, to line up exactly with the first burlap square. I placed a large board on this, too, until it was completely dry.

After drying, I laid it on top of the cardboard burlap piece, and folded it along the same folds. Then I spread fabric glue (first burlap piece) along the edges (border) and on all of the pieces of cardboard (used an old credit card to do this). *But not on the burlap in the four corners. Place the second burlap piece on top - lining up all the edges and pressing and smoothing together the two pieces. I used clips on the corners and sides and where the twine pieces extended making sure all areas were sealed together.

*I also put heavy books on top where there was space just to make sure the burlap was flat and together while drying.

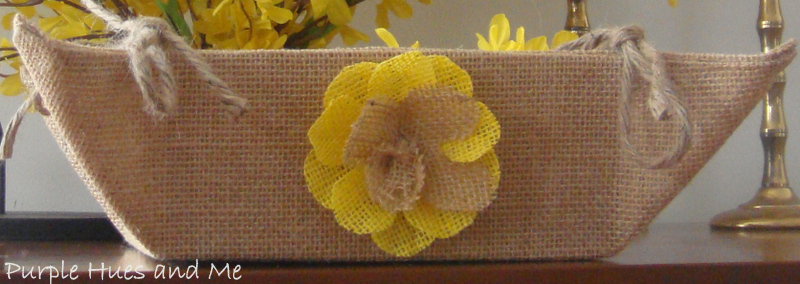
Bring the corners together at the twine and tie to form your basket!


This no sew fabric basket makes for a fun item when filled with treats, flowers or even supplies for a favorite hobby like crafting! You could do a little bit of this . . . or a little bit of that . . . the options are endless!
Thanks for stopping by
and take a little time
to enjoy,
Happy Crafting!


I love this, Gail. I am honestly going to attempt to copy it using the printed burlap Hobby Lobby just got in. I have been wanting some reason to buy some. My favorite part is the twine ties on those cute corners. Thanks for the excellent tutorial. I am a little afraid of my math skills(or the lack of them!)
ReplyDeleteHi Gail, I loved your basket and the detail of yellow flower.Thanks so much for sharing the great tutorial!
ReplyDeleteHave a fabulous week!
Hugs from Portugal,
Ana Love Craft
www.lovecraft2012.blogspot.com
Very cute! I just found some burlap at Joanne's yesterday that is stencil with what look like black typewriter keys. I had no idea what I would do with it, but I bought it anyway because I love anything with the alphabet. I think your little breadbasket is a great idea for it.
ReplyDeleteTotally love the bright yellow petals you added to the flower in front. So pretty!
ReplyDeleteAbsolutely gorgeous, Gail! Love your photos, too.
ReplyDeleteThis is really happy, cheery and Spring! I love this. Thank you for sharing it at the party at http://www.finecraftguild.com Now we can ALL make it. Fun!
ReplyDeleteI love this project Gail! No-sew is right up my alley! Thanks for the FREE tutorial too! Nice job on both!
ReplyDeleteWhat a great burlap basket tute! I'm pinning. Little Bit from www.DecorateWithaLittleBit.com
ReplyDeleteWow, amazing job Gail, and really helpful tutorial! Wonderful to "meet" you on Craft Schooling Sunday and hope to see you again soon!
ReplyDeleteThanks for a cute no-sew project. This would be perfect for rustic decor.
ReplyDeleteI love this, and have plenty of burlap in my inventory! The basket would look nice with my burlap bunny napkin rings for Easter. Nice job!
ReplyDeleteThis is brilliant Gail!! I love that it's no sew, and can be easily embellished for a custom look for any decor. Amazing!!
ReplyDeleteI love this Gail! Since I don't sew it's perfect for me lol! Thanks for sharing at the party this week!
ReplyDeleteLove this burlap basket and what a great tutorial...Thank you so much for sharing at One More Time... ok I so have to make one of these so Cute!
ReplyDeleteYou are a smartie!!!! First of all, I never thought of painting burlap with mod podge... brilliant! And I love this little basket! What an easy project. I'll be making this for Easter, for sure!!! Thanks for sharing it on TUTORIALS TIPS AND TIDBITS!
ReplyDeleteI love this diy! Great tutorial with easy to follow along steps! Thanks so much for sharing your creativity at Project Inspired!
ReplyDeleteOh wow Gail, this is so neat. Now I have a use for all that extra burlap I have. Thanks so much for sharing this.
ReplyDeleteWho couldn't use one of these burlap boxes? I love that you add a splash of color, but that it is still mainly neutral. We are starting a link up party on Thursdays (today:), and we would love for you to join us with this post and/or any others you would like to include. We are at allthingswithpurpose.com. Hope to see you there!!
ReplyDeletewho knew it was that easy...thank you so much for sharing this ...xo
ReplyDeleteThis comment has been removed by a blog administrator.
ReplyDeleteVery cute! Great tutorial and I love the burlap flowers!
ReplyDeleteJenna
Gail, this looks fabulous! So creative and beautiful. You know I love that burlap!! Thank you so much for sharing at A Bouquet of Talent this week. So thrilled to have you share with us. Have a great weekend. :)
ReplyDeleteHugs
Kathy
Super cute!
ReplyDeleteShannon @ Sewing Barefoot
This is so cute. I love the basket idea and laying flat for storage is even better. I will definitely be adding this to my DIY list.
ReplyDeleteRuth
Love this! I purchased one of these when we were stationed in Turkey...had plans of recreating it for friends & family but never knew "how." now I know :)
ReplyDeleteThanks for sharing & linking up at Crafty Thursday Obsessions
<3 Stacey @gluedtomycrafts
My Mom used to make something like this but with regular fabric. I like the burlap. Good work. Linda
ReplyDeleteNewest follower here, I found your blog through the blog hop! You have a wonderful blog, I can't wait to read more.
ReplyDeleteYou can find me at meandmr.com
-Melanie @meandmr.com
Love this idea - so easy!! Thanks for linking up at Romance on a dime! I'm featuring this today.
ReplyDeleteSuch a clever idea! Your tutorial is so easy to follow. Thanks for linking up with the Craft Challenge Creative Link Party.
ReplyDeleteBlessings,
Diana
what a great idea and pretty easy to make! appreciate the step by tute as now i could make my own :) Thanks for sharing with the creative craft challenge! awesome share!
ReplyDeleteI really appreciate this post thank you for sharing these type of posts.burlap fabric for sale
ReplyDeleteThe baskets are beautiful. I really want to place my hand in there. I must be having withdrawals from hands on craft.
ReplyDeleteHave a good week.
Hannah
Ketterman Rowland & Westlund