I saw how to make the neatest fringed burlap flower on YouTube by Heidi Borchers@Cool2Craft the other day and really had fun re-creating my own version.
I found the prettiest yellow burlap fabric at HobbyLobby to make these adorable flowers. I got a half a yard which was twenty-two inches wide. I used this measurement and cut my piece 22"x6". Next I spread Aileene's Original Tacky glue approximately 1/4 inch along the edges with a piece of cardboard the size of a credit card.
Then I let the glue dry completely until it was invisible.
Finding the center thread at the end of the burlap, I pulled it completely out of the fabric.
All the other threads were pulled out until I reached the glued borders, one by one, holding back the end while pulling.
You'll know when you reach the border. The threads are glued and your piece should look like this (without the glue). Next, more glue was spread along the edges as pictured.
The glued edges were folded together, pressing and making sure the edges were lined up evenly. This was allowed to dry completely.
For the center of the flower I tried some variations from the original suggestion of using a button. I really didn't like the button and thought I would try something different. I looped a florist wire stem through the holes in the end of a crystal gem that I had. It was perfect to use for the center of the burlap flower.
I didn't cover the wire with florist tape until later.
Next, glue was added along the inside straight edge of the burlap. Placing the gem at the end edge of the fringed burlap, I began to roll the burlap along with the gem stem as tight as possible.
Make sure to keep the burlap and loops straight and away from the glue.
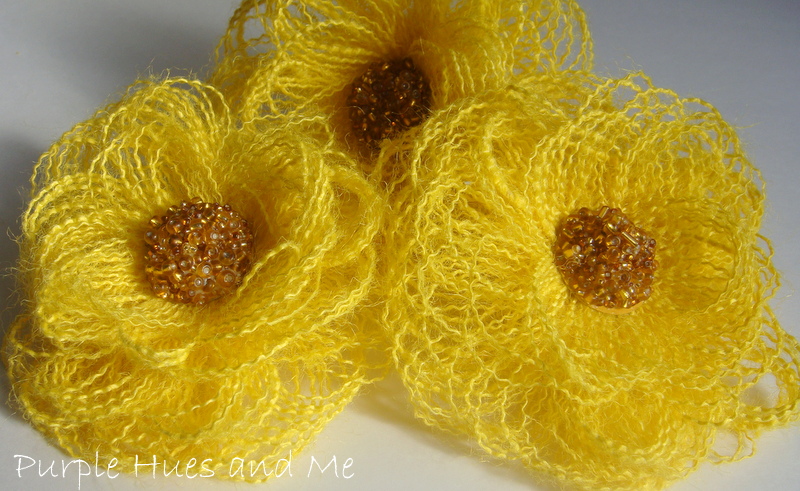
Apply a dab of glue at the end of the burlap, pressing to secure, and fluff open.
How pretty is this?
I tried using different items for the center . . . some pearl stems and seed beads that I covered in mod podge and glued to a round piece of cardboard.
I think I like using seed beads the best. They are more versatile to use and using buttons seemed old fashion - although, there are some pretty buttons out there. With the seed beaded cardboard piece, I rolled a top twisted florist wire with the burlap and then hot glued the beaded circular disc onto the burlap flower after it was fluffed open.
I also glued some yellow and natural fringed burlap to cylinder containers and hot glued the flowers (without stems) onto the front.
This really makes for a pretty spring arrangement!
Take a little time to enjoy!
 Linking to: My favorite linky parties
http://www.settingforfour.com/2013/03/its-spring-thing-linky-party.html
Linking to: My favorite linky parties
http://www.settingforfour.com/2013/03/its-spring-thing-linky-party.html


Read more at http://diyshowoff.com/2013/03/10/that-diy-party-7/#ChRB6x2PHXlOOD8F.99


http://itssoverycheri.com/2013/03/10/its-party-time-3-10-2013/


Read more at http://diyshowoff.com/buttons/#dy35wHOycOdF7WI0.99


 http://gluedtomycrafts.blogspot.com/2013/03/crafty-thursday-obsessions-5.html
 http://www.craftberrybush.com/2013/03/the-inspiration-gallery-week-27.html
 http://www.loveoffamilyandhome.net/2013/03/inspire-me-please-weekend-blog-hop-2.html


 http://www.craftberrybush.com/2013/03/the-inspiration-gallery-week-27.html


These are so pretty Gail! They make me think of spring and sunshine. I'd love to make these in pink, if I could ever find pink burlap in my neck of the "no craft store within 2 hours" woods. Do they even make pink burlap?
ReplyDeleteLOVE these! I am pinning! Life to the full, Melissa
ReplyDeleteThese are so cute!! Thanks so much for the great tutorial. They look like a fun spring project!
ReplyDeleteThese are so cute! Thank you for the great tutorial. :)
ReplyDelete~Liz
Gail, these are great! I love the color and your tutorial is wonderful! Happy Spring!
ReplyDeleteIf there is more than one comment, I am sorry. Blame it on a glitch!
ReplyDeleteThese flowers are so cute - love the one with the gemstone in the middle. I like the idea of using them on glass vases. The new header looks great.
Wow so cute....Thanks Gail for sharing at One More Time Events.... tutorial is great!
ReplyDeleteThese are awesome. Love how you made these. I was working with burlap over the weekend and kept pulling threads, but I did not think to do this. I love it.
ReplyDeleteI am your newest follower.
Have a great week,
Bev
@ http://eclecticredbarn.blogsot.com
These are beautiful, Gail! Thanks for sharing how you made them and for cluing me in to the presence of yellow burlap...so pretty! Thanks for sharing at A New Creation link party this week.
ReplyDeleteVery fun.
ReplyDeleteGreat to have you be a part of Seasonal Sundays.
- The Tablescaper
This is absolutely lovely. New follower via GFC. Stop by my blog sometime. http://viewfromrivermountain.blogspot.com
ReplyDeleteI came byway of Homwork..and this is a lovely spring feeling post. Just what I needed to brighten up my day.
ReplyDeleteWe are having more wind and snow and I am frankly tired of it. Thanks for the tutorial and sharing your lovely design.
Gail,
ReplyDeleteThese are such dressy, creative and happy flowers!! I love flowers, all kinds, silk, real, dried and now yours!!
Hugs!
Jemma
I love the yellow so cute, Thanks for sharing.
ReplyDelete- Desiree
yourcraftyfriend.com
Gail I have never seen anything like this in my life! I love it! As usual...I'll be seeing it everywhere!! Awesome girl!
ReplyDeleteLove this! What a really neat idea... someone is always coming up with new fun things! Thanks for sharing at The Weekly Creative.
ReplyDeleteShannon @ Sewing Barefoot
Those are really cute, I'm not sure if I have that much patience, but I love what you have created! Love the yellow burlap too!
ReplyDeleteJenna
This is so cool...I had no idea ..thanks for sharing...ox
ReplyDeleteGail, I am in love with these flowers!!!! Wow, you are so amazing with your awesome projects. I can't wait to make some of these. I featured you at Pick of the Bunch last night! Thank you so much for sharing at A Bouquet of Talent. I always love seeing your beautiful work. Have a wonderful weekend. :)
ReplyDeleteHugs
Kathy
I love these! They turned out so pretty! I have to pin to try these.
ReplyDeleteSaw you featured at Bouquet of Talent and sharing at the Power of Pinterest Party.
Debbie :)
Thank you for joining our Thursday link party over at All Things with Purpose! We're featuring you today in our Link Party Favorites post. These are adorable, I can't wait to try some for myself! :)
ReplyDeleteVery creative Gail. I see the rolled burlap ones all the time, but don't like the loose shaggy threads. These are perfect and I will try them. Nice tutorial to follow.
ReplyDeleteThanks for sharing,
Audrey Z. @ Timeless Treasures