Tuesday, May 18, 2021

Dad's Special BBQ Dry Rub


It's always a struggle every year to come up with a gift for Father's Day to someone like my hubby who doesn't really need anything.  However, thinking about his likes and dislikes - an ongoing topic of discussion where food is concerned is his dislike of sauces. I know not to add an abundance of sauces to anything I cook or if I do, it has to be a light coating so he can scrape it off. And when we go out to eat he always orders whatever he's having with the sauce on the side. Lol! All of his friends kid him about ordering with "sauce on the side." And he always has a good nature about us teasing him about this! Naturally, he doesn't like gravies or soups, either.

Since warm weather is upon us and outdoor cooking a favorite of his, I decided to make an easy DIY BBQ Dry Rub with his special favorite ingredient - Old Bay seasoning for Father's Day! Perfect for this month's Pinterest Challenge hosted by Alexandra @Eye Love KnotsThe theme for May is "Gifts for Him" and there are lots of inspirations on Pinterest to make a Special Barbeque Dry Rub for Dad!

Welcome to the May Pinterest Challenge! The purpose of this Pinterest Challenge is to motivate us to not just pin, but to make it happen!

In case you didn't know, Old Bay seasoning is a blend of mixed spices primarily for seafood, but hubby likes to put it on lots of his dishes - which is why I'm adding it to a BBQ rub I'm making for him. Old Bay is regionally popular, specifically in Maryland where we live, as well as in the Mid Atlantic states, southern states, New England and the gulf coast. And I know adding it to a homemade BBQ rub would get me lots of gracious kudos from him! Lol!

The rub is simple and easy to make. While looking at lots of BBQ Dry Rub recipes on Pinterest, most use the same spices readily stocked in household pantries with just variants in the amounts mixed together. In blending the spices together, I like that you're basically in control of the flavors you want to taste! Adding a little more of this and a little less of that! So here are the spices I used:
Gather -
4 tbl kosher salt
4 tbl brown sugar
4 tbl Old Bay
2 tbl paprika
2 tbl paprika
2 tbl chili powder
2 tbl garlic powder
2 tbl onion powder
2 tsp cayenne pepper
2 tsp pepper
1/2 tsp thyme


and mixing it all together!


Then pour the mix into a glass jar with a shaker lid for easy blending on your favorite pork, chicken and beef meats, seafood and even veggies, too! Don't you just love this shaker from the Dollar Tree. It's five inches tall and holds a lot of dry rub! Refrigerate for a couple of hours or overnight to let the spices season and flavor the meats before cooking.

Store in an air tight container (tie a little cloth or plastic wrap around the top) to keep fresh for a few months.

For gift giving, be sure to make a tag! - if you like this one, just copy and paste to print out on cardstock!
                                
And don't forget to:

Wasn't this fun!!!!
For more Pinterest inspired projects from this month's Pinterest Challenge hosts, check out the links below  

You are invited to the Inlinkz link party!

Click here to enter

Monday, May 10, 2021

DT Wire Tray Wall Decor


It’s time for our monthly blog hop challenge hosted by Beverly @Across the Blvd. This month’s theme is a Dollar Store Craft. The participants were challenged to create a project using mostly items from a dollar store.
Occasionally you can find some very chic and out of the ordinary looking items while shopping at the Dollar Tree!  How about a gold wire tray and basket? I had to do a double take when I saw them and actually looked around to see if anyone was watching me. Lol! 


And as the description for the wire basket stated, it gives off a vintage chic vibe that will compliment any home decor! Imagine that! So I grabbed one of each, but didn't have a clue as to what I would do with them. I know they make great storage pieces - perfect for keeping things like decorative cardstock in the tray or fruit in the basket. But wait a minute! For the wire basket, DT said it was perfect to store blankets and pillows or turn it upside down to make a table. What, for dolls? I think someone got the descriptions mixed-up on this one. The round basket is only 4.75 inches high. Oh well, it's still nice! But for the Dollar Store Challenge, I'd rather focus on the gold wire tray - using it as a decorative piece instead of a storage unit. 

Let's begin with gathering a few Dollar Tree supplies!
  • Gold Wire Tray
  • Paper Napkins
  • Gold Floral Wire
  • Mod Podge
Plus:  Glass bottle
         Paint brush/Scissors
         Plastic sandwich bag
         Wire cutter
         DIY Crepe paper flowers or faux flowers


First,  clean the bottle with soap and water and dry. Then wipe the glass using an alcohol dampen paper towel to remove any residual dirt and grime which might be left. Next, take a colorful paper napkin and decide how you want the design on the glass and cut it out.  

Separate the layers of the paper napkin - using only the printed top layer.
Again, measure the cut-out napkin by wrapping it around the bottle to see how much is needed. 


Then cut it out to fit the bottle. 

                    
Next, brush a light layer of Mod Podge on the front of the bottle .  .  .
and lay the napkin (printed side up) on top of the decoupage glue. Insert your hand into plastic bag and begin smoothing out the napkin. Continue adding Mod Podge to the glass and smoothing the napkin out using the plastic bag - going around the bottle in sections until all of the bottle is covered with the napkin design.  Use the brush to apply a little extra decoupage glue along the seam and under curves along the edges. 

Once the napkin has dried, apply another coat of decoupage glue over the entire napkin area to seal and let dry.


Then use the gold floral wire to attach the bottle to the wire tray by wrapping the wire around the neck of the bottle and tray several times and twisting together in place, cutting off excess wire.


Now it's time to add the flowers!
Check out how to make these pretty crepe paper flowers here!


What a simple but beautiful way to add a decorative touch to your wall using a 
dollar store wire tray!


Please visit all the bloggers participating in this month’s challenge for lots of wonderful inspiration using dollar store items!


You are invited to the Inlinkz link party!

Click here to enter

Wednesday, May 5, 2021

Garden Flower Light


Have you ever looked at something and thought, "I don't know what I'm going to do with that, but I'm getting it anyway!" Well that's what I thought about a couple of solar lights I found at Homesense last year. They were on clearance at 70% off - $3.60 to be exact - and since they were purple, you know I had to get them! Lol! But by that time, Fall was in full swing and I put the solar lights away in the garage and pretty much forgot about them. Then, for this month's DIY Challenge the theme is all about solar lightsIf you're coming over from Terrie @Decorate and More with Tip, welcome! Wasn't her garden decor using solar lights pretty!

Well, for this challenge, I thought about the solar lights I had gotten and what I could do with them. Then it hit me, why not make the solar light into a flower with surrounding petals! I've made a few flowers using soda and beer cans - you can see some of them here, here and here - but didn't think the cans were large or sturdy enough for making petals to go around the solar light globe. It's pretty big and soda cans just wouldn't work!

So looking around the hub's workshop, I found sheet metal that was labeled 28 gauge. I knew the higher the gauge the thinner the metal and easier to bend, so I decided it would be perfect to make petals for the globe solar light - or so I thought! 

You might be thinking how was I going to bend the petals and attach the metal petals to the surrounding metal where the glass globe screwed in without welding.  I did some research on connecting metal to metal and found out super glue was at the top of the list besides epoxy glues (which I didn't want to mix). So I gathered a few supplies and got started.
  • Galvanized sheet metal
  • Heavy duty gloves
  • Petal Template
  • Tin Snips
  • Metal File
  • Primer and Paint Combo Spray 
  • Multi purpose acrylic craft paint
  • DAP RapidFuse All Purpose Adhesive
  • Painter's Tape
  • Globe Solar Light

Disclosure I am a participant in the Amazon Services LLC Associates Program, an affiliate advertising program designed to provide a means for us to earn fees by linking to Amazon.com and affiliated sites, this post may contain links. I may receive a very small commission at no cost to you! The affiliate money I earn helps pay my crafting expenses. Thanks so much for your support!

Here's how I made the garden flower light:

1. Draw a petal shape on sturdy poster board for a template .  .  .
and cut out.
2.  Trace your petal pattern onto the metal using a marker. 

3.  Then, cut out using tin snips wearing protective gloves.
Be careful! The metal can be very sharp!
4. Once all the petals are cut out, use a metal file to sand down the sharp edges. Then shape the petals by bending or curving them on a secure oval shaped surface. I looked around my home to see what I could use that was sturdy enough for me to shape the petals. I finally decided to used the safety bar in my bathroom to help curve the metal. I had no problem bending the metal (sorry, I couldn't take pictures while bending the petals) but the look just didn't seem natural enough for petals. 
5.  Once the shaping is done, spray paint the petals on both sides using a paint and primer combination spray can, allowing to dry between each layer.

6.  Add additional decorative designs on the area that would be the flower center using multi purpose acrylic paint and a brush and let dry. 


7.  To secure the petals to the base of the solar light globe, add DAP RapidFuse to the petal edge. The directions said this glue is better than super glue (which I know it is since I use it all the time in craft projects) but in this instance, it didn't adhere after 30 seconds or even a minute. So I decided to use hot glue to help it along. BIG MISTAKE - unless you wear a mask and do this outside. Immediately after applying hot glue to the RapidFuse, a puff of smoke shot up - wow, it didn't like the combination. Luckily, I was working right beside my open sliding door. I quickly pressed the metals together and went outside. Once the metals stuck - after a few seconds - I drank lots of water in hopes of flushing whatever that was, out. I didn't feel anything different and there was no lingering fumes that I could smell. However, I did go to the DAP website on hazards and the first thing mentioned was not to use with a heat source and to get fresh air if mixed with heat (which I did).

For the other petals, I  taped the two pieces together using painter's tape until the two areas bonded using RapidFuse.

8.  Continue gluing on each petal, one at a time, using painter's tape to hold together until secure. 


I had intended to add another layer of petals to the solar light, but it's  been very windy and rainy for a few days and time ran out for making more petals and posting this for the challenge. 
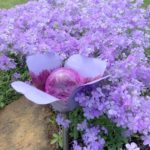
A finished four petal garden flower solar light.
Right now, the garden flower light looks pretty among the phlox and azaleas! But hasn't been outside long enough for the sun to power the cells to see how it looks at night.

Welcome to our monthly DIY Challenge hosted by Terrie @Decorate and More with Tip! On the first Wednesday of the month, Terrie hosts a DIY Challenge with a group of talented bloggers who love to create budget friendly décor for their homes. For the month of May we were tasked with a Solar Light Challenge

 Next up is Tammy @Patina and Paint sharing how to make a solar lantern! 
To see more solar lights ideas click on the blog titles below to check out their awesome solar light creations!


DECORATEANDMOREWITHTIP                    PURPLEHUESANDME

                                        
 PATINAANDPAINT                                        THEHOUSEHOUSE


PAULASHANDMADESPACE                                         B4ANDAFTERS

                                        
SWEETSOUTHERNGRACE                                 KSOLYMPICNEST