So let's get started with gathering the . . .
Materials:
- Corrugated cardboard
- Head, body, wings paper templates
- Craft knife, scissors
- Paper Vinyl
- Grapevine garland
- Floral Stem wire - brown 22 gauge
- Ribbon- 2.5" wire
- Chenille stems - black
- Hot glue
Instructions:
I keep large boxes in my stash! I open and then flatten them to store. This type pf cardboard is perfect to cut out parts for the bumblebee.
I made paper templates for the head, body and wings using simple oval, circle and teardrop shapes that I enlarge on printer paper and cut out. Then drew the shapes on cardboard.

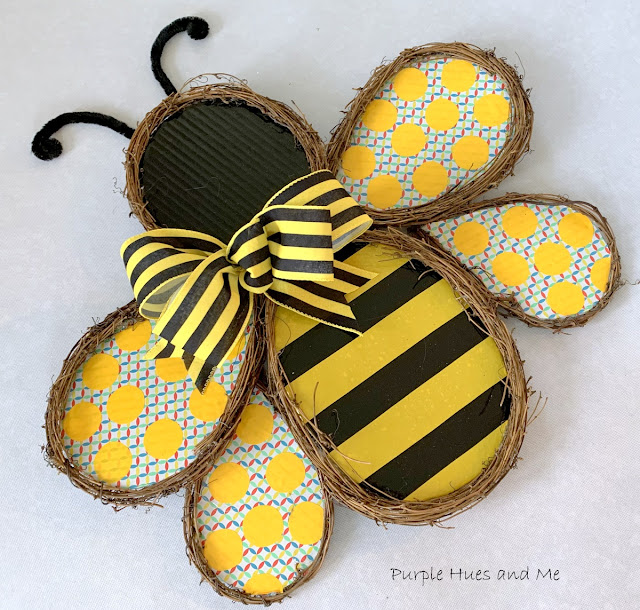
and assembled to see how it would look. The bumblebee is 19" tall by 22" wide. A nice size for your front door or wall!
Then I began to apply the paper vinyl (which has a adhesive backing) from the Dollar Tree to each part . . .cutting the vinyl out in the shape of the bumblebee parts, leaving a border and
removing the backing to smooth out over the edges onto the backside.
Working on the wings . . .
and seeing how the wings would look with yellow dots.
Applying the grapevine garland.

removing the backing to smooth out over the edges onto the backside.
I know the edges look rather rough, but they will be covered with grapevine garland.
The Body . . .I hot glued grapevine garland around the bumblebee head. Sorry, it was hard for me to take a picture while I was gluing it on.
Here, I added yellow vinyl stripes to the body before gluing on the grapevine garland.
I love that the vinyl paper has an adhesive backing. That certainly saves a lot of time and energy! Lol!
Applying the grapevine garland to the body.Working on the wings . . .
and seeing how the wings would look with yellow dots.
Applying the grapevine garland.
Once all the parts were wrapped in grapevine garland, the bumble bee was put together using floral stem wire to secure it all. Glue could not provide any type of stability for the entire piece.
And finally, added chenille stems for the antennae to the head.
Backside with added hanger. I love that the vinyl paper is water resistant, too!
Made a bow using the Bowdabra - bow making tool!
Everything looks better with a bow!

Super cute!
This adorable eye-catching bumblebee is perfect for anywhere in your home or front door!


That is adorable. I love it.
ReplyDeleteYour craft projects always make me smile Gail; this one is absolutely adorable. I do love bumblebees too!
ReplyDeleteGail, this is perfect for the summer! I was wondering where you purchased the bee grapevine, you made it!!! Thanks for sharing the tutorial, I have some grapevine garland. I love your bee!
ReplyDeleteHow smart you are foe figuring out the parts to cut out. It turned out really cute.
ReplyDeleteThis is absolutely adorable Gail! Bee decor is always irresistible! That vinyl paper looks like awesome stuff, what a fun and brilliant creation, and the grapevine framing all the pieces really finishes it off perfectly...as does the cute bow! Love this!
ReplyDeleteJenna
Gail, you are so creative and your little bumblebee is as cute as can be--pinning! Blessings, Cecilia @My Thrift Store Addiction
ReplyDeleteThis is so, so cute! You did save a lot of money by making your own, that's for sure. Always a plus, but you also got to customize it for your home. This little guy is so cute & would make great party decor or a bee themed kitchen for the summer.
ReplyDeleteXOXO,
Niki
How darling your bee turned out. You always make things look so easy. This is perfect for my bee theme. Thanks for sharing at Love Your Creativity Gail. Happy week.
ReplyDeleteGail,
ReplyDeleteI adore this!! Love that you made it out of cardboard!! Great recycling idea!! So darn cute!! Thanks so much for stopping buy and commenting on my 2 posts!! I greatly appreciate you taking the time!!! Stay safe, healthy and happy!!
Hugs,
Deb
ADORABLE, Gail! I love that you made it with dollar tree materials and recycled cardboard. This is the cutest bee wreath I've seen in blog land!
ReplyDeleteGail, you know how much I love bees. I hope you share this bee wall art next week at Love Your Creativity. This Sunday I am trying to feature patriotic decor. Happy Sunday.
ReplyDeleteHonestly I thought you had bought a shaped wreath (I think I even commented as such on social media!) This is SO much cleverer and imaginative that I realised! It's Bee-u-tiful!
ReplyDeleteOverwhelming post
ReplyDeleteThanks
Thanks for sharing this quality information with us. I like this information.
ReplyDeletevector art services
Grrrr… well I’m not writing all that over again. Anyw?ys, just wanted to say great blog!
ReplyDeletevector art services
Love the bumble bee wall ornament would look amazing against a beautiful Stone Cladding on a wall at the front.
ReplyDeletehttps://educationvibes.in/university/MBBS-Abroad/Yaroslav-The-Wise-Novgorod-State-University
ReplyDeleteThis is exactly what I needed! I’ve been searching for this information. Thanks!
ReplyDeleteYour site is good Actually, i have seen your post and That was very informative and very entertaining for me.
ReplyDelete