
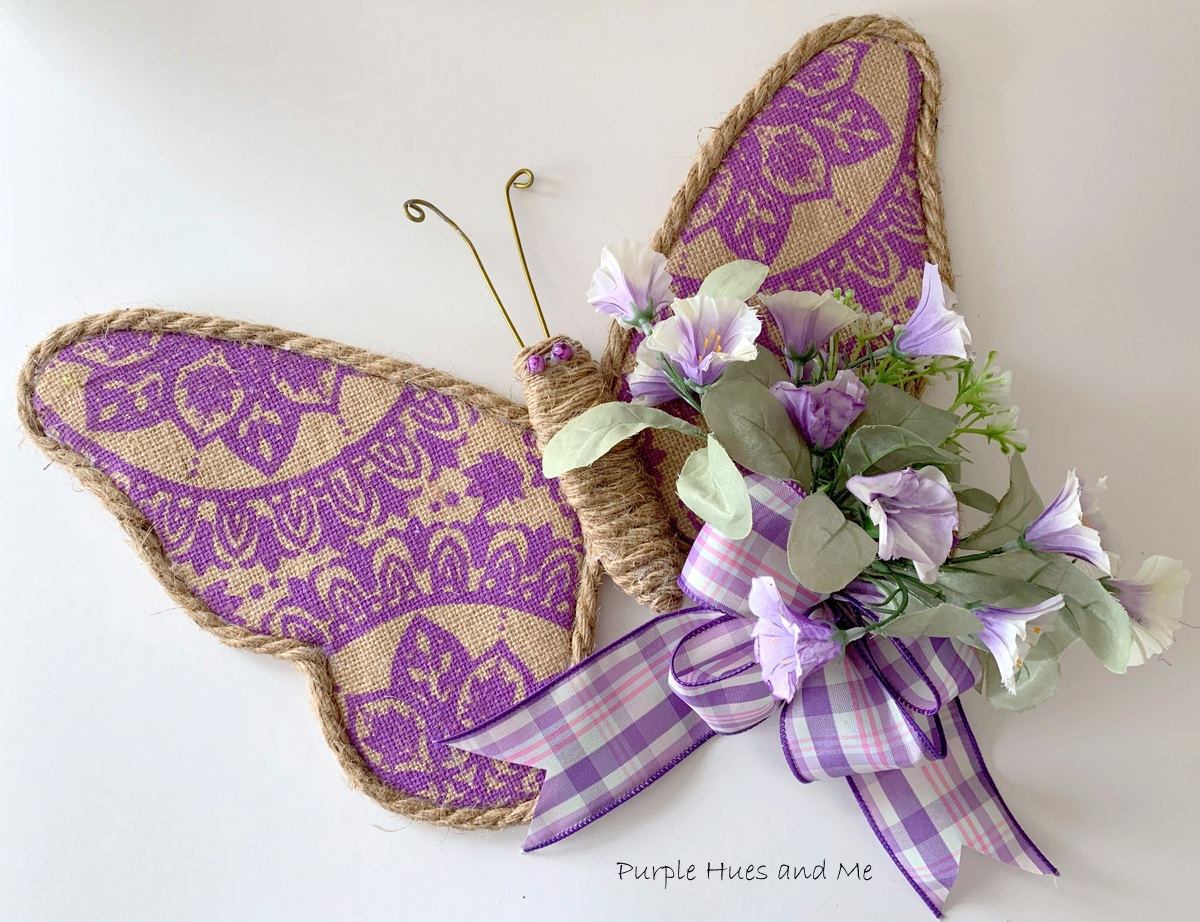
What better way to welcome spring and summer than with a gorgeous butterfly door or wall hanger! You've seen them already made - but have you wondered how to actually make the butterfly? Well, today I'm going to show you how! Made from scratch using dollar store items, you will be surprise how easy it is to make one!
This whimsical wall hanger has a rope outline in a butterfly shape made out of poster foam board with a burlap fabric covering - all from the dollar store! And the best part, you can dress it up with pretty florals and bows, too! And then, this butterfly hanger can be placed on your door or wall as a decorative accent - making a great statement to welcome family and friends to your home!
So let's get started on making a dollar store butterfly door hanger!
Supplies Used
- Poster Foam Board
- Craft Knife
- Burlap Fabric (from Dollar Store Messenger Bag)
- Seam ripper
- Iron
- Chalk
- Scissors
- Rope
- Hot glue
- Coat hanger wire/wire cutters/needle-nose pliers
- Beads (2)
- Ribbon/flowers
Instructions
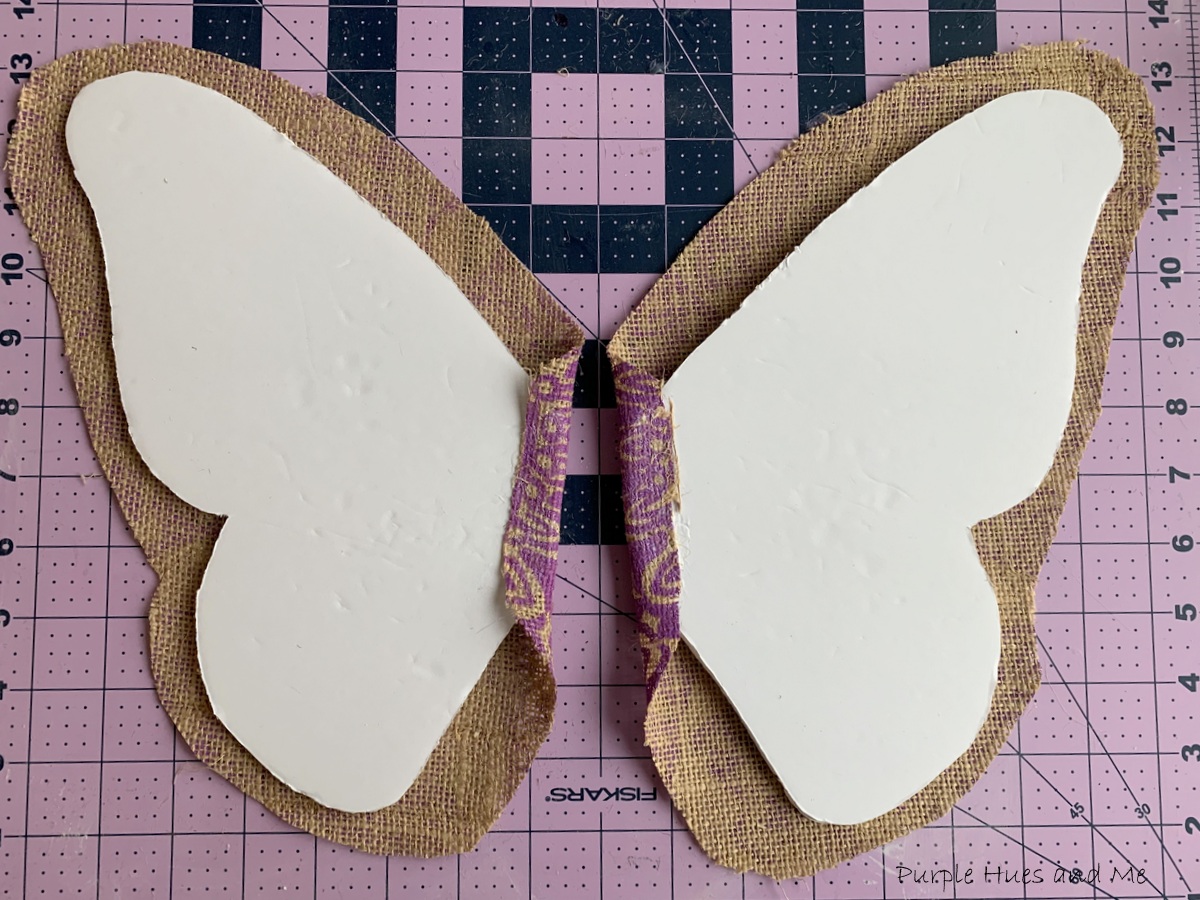
Since I can't draw that good - or should I say, I can't draw a straight line, I found free templates online of a butterfly's right and left wings and body that I copied, pasted, and printed out. Each wing took up the entire printed paper sheet. But if you want a larger butterfly, divide the wings into two pieces (top and bottom) at the curve and size each piece separately on a sheet of paper. If not, copy,
paste, and size the below images to print onto paper. Then cut the images out and . . .


draw them onto poster foam board.


Next, open the seams of the dollar store messenger bags and iron the wrinkles and folds out.


How cool is this handmade dollar store butterfly hanger!

Adding florals and a bow really takes it to the next level!


I hope you enjoyed my tutorial on making an adorable butterfly door hanger using items from the dollar store! Created especially for this month's Dollar Store Craft Challenge Blog Hop, hosted by Beverly @Across the Blvd. along with a group of creative bloggers to bring you a themed monthly challenge blog hop on the 2nd Monday of each month!

Meet this month's co-hosts:
Beverly | Across the Blvd
Gail | Purple Hues and Me
Allyson | Southern Sunflowers
Marci | Stone Cottage Adventures
T'onna | Sew Crafty Crochet
Niki | Life as an LEO Wife
Terri | Our Good Life
And their projects:


This is such a cute & creative idea! It's the perfect door hanger for spring & summer. I love it so much, & I would've never thought to use burlap bags as fabric for a project. Now I'm going to be on the lookout for some! I just uploaded a new collage with your project pic in it to our group. Thanks for such a great idea!!
ReplyDeleteHappy Hopping,
Niki ~ Life as a LEO Wife
Genius! I love how you chose just the right fabrics and patterns to create the wings of your beautiful butterfly! pinning -Marci @ Stone Cottage Adventures
ReplyDeleteThis comment has been removed by the author.
ReplyDeleteGail, you always amaze me with your creative projects. The butterfly is so pretty.
ReplyDeleteAnother lovely creation featuring the color purple! I love how you used the burlap bags to create the butterfly wings! That was so clever! I love crafts that involve burlap and rope. You did a really great job with this. It's so neat and unique! Pinning!!!
ReplyDeleteMy mom saw this and was like, MAKE THAT FOR ME! So I guess I am going to making a butterfly for my mom. Thank you for the directions.
ReplyDeleteWow, your butterfly looks awesome!! And there I was thinking I'd have to stamp my own burlap for a pattern, omg. I need to go see what colors those bags come in. Excellent tutorial, too!
ReplyDeleteThis is lovely, Gail. It's such a creative way to use those dollar store items. Perfect for spring time!
ReplyDeleteThis is so imaginative and pretty. Total thumbs up.
ReplyDeleteHow beautiful and very creative. For someone who can't draw a straight line you are very artistic! I love your pattern matching too, that kind of attention to detail makes all the difference.
ReplyDeleteI am glad to found this post, it's a good one. I am always looking for quality posts, I hope you will be adding more in the future. thanks for this. Mahindra Jivo 365
ReplyDeletewonderful art. looks like you are a professional in this field.
ReplyDeleteAshok Leyland 4220
This comment has been removed by the author.
ReplyDeleteStatistics students and professor are worried to find the deviation calculator because their work depends on it.
ReplyDelete