

How often are you inspired to re-create something you saw online? I know I have lots of times! I often look around at my favorite stores to get ideas! Just take a look at this lovely Target basket! Isn't it fabulous with a pretty triangular design?

How cool would this be to make something similar? I love the design and wanted to make my very own version! Just in time for this month's DIY Challenge - And the theme for August is our choice for a project!

So here are my thoughts on making a similar Target basket: The easiest way for me to make a coiled rope motif basket was to use sisal rope and yarn - things I already had on hand. I've made a sisal rope basket before that you can see here. And the best part, very few supplies including things you probably already have on hand are needed to make this beauty!
Materials:
- Small wastebasket trash can - 9"x8.5"(used as template)
- Sisal rope (50ft. 3/8")
- Chalk
- Yarn - 1 skein (Dollar Tree - 131yds in eggplant)
- Yardstick
- Large eyed needle
- Thimble
- Hot glue gun/glue sticks
Disclosure I am a participant
in the Amazon Services LLC Associates Program, an affiliate advertising program
designed to provide a means for us to earn fees by linking to Amazon.com and affiliated
sites, this post may contain links. I may receive a very small commission at no
cost to you! The affiliate money I earn helps pay my crafting expenses. Thanks
so much for your support!
*Note - pictured is a roll of macrame cord - I switched it to yarn to make it easier to use and less bulky in making the motif.


Next, remove the rope basket from the plastic wastebasket by gently twisting back and forth until the wastebasket releases to pull off and out.

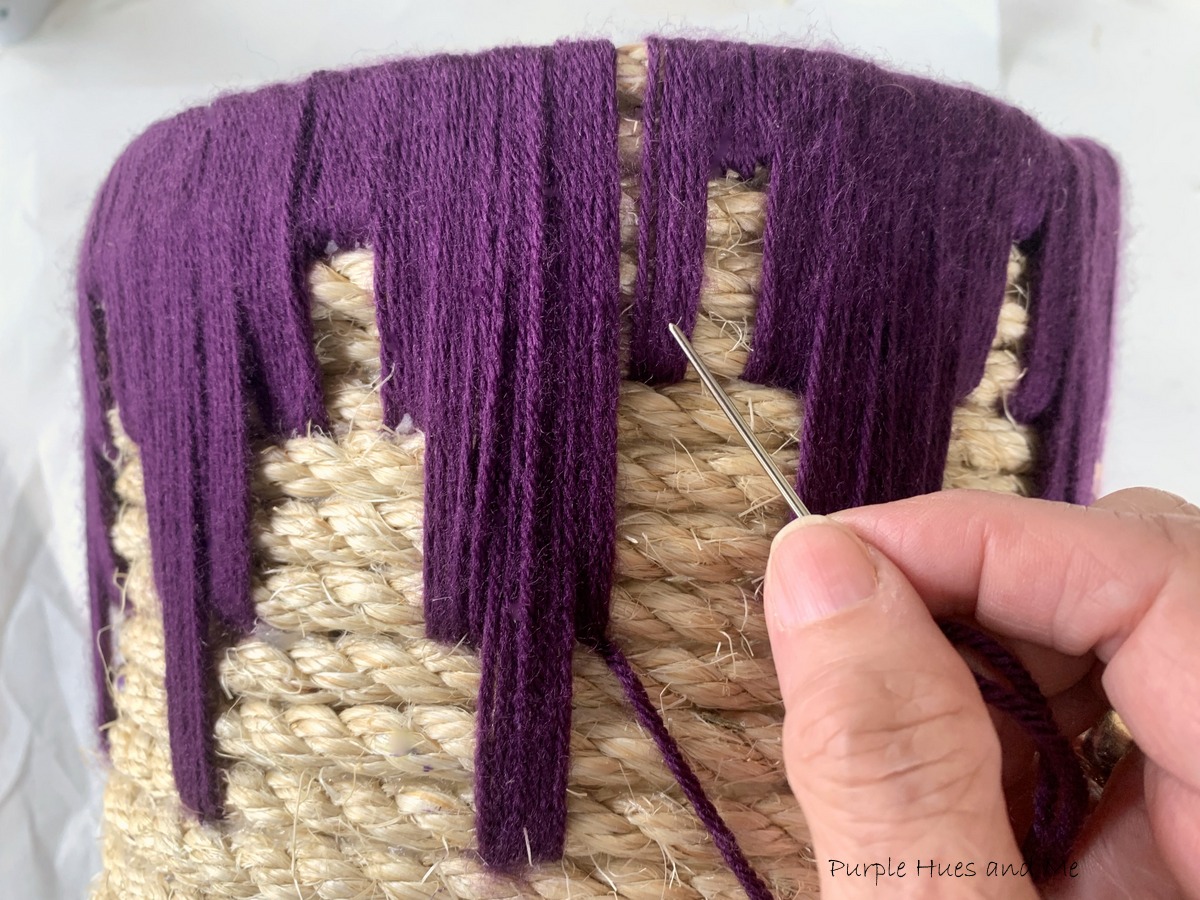
To begin adding the triangular motif-I divided the top (circle) rope into four segments - 12,3,6,9 - marking it in chalk. Then decided how far down I wanted the design to end. I wanted the segments to have the same number of rope rows so I counted in groups of three rows with four segments - counting down twelve rolls (3x4) to start.


The first triangular motif is complete in this picture.

To add additional yarn, remove needle from yarn and connect the end of the wrapped yarn with another eight yards by tying together in a double knot (inside basket). Measure enough of the yarn that's left so that the knot is inside (cutting off excess). Then thread needle onto new end of yarn piece.

Hide knot and ends by pushing needle through inside wrapped yarn.

Continue wrapping yarn in equal segments - following the previous design while moving around basket.

Use a thimble to help push needle through glued rope.

As I continued moving to the right of where I began adding the motif. I realized that the segments would not be even when they meet because of how the top rope row ended. There's an extra row or half a row at the top.


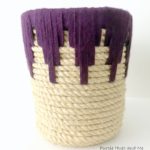
Nearing the end! What do you think? Not too noticeable, huh? Let me just say that it took me all day long - from morning to night - to complete adding the yarn design to the basket. It was very time consuming. But I loved every moment! That's what crafting is all about!
Inside finish.

Can you believe there's still yarn left over from using just one skein of Dollar Tree yarn. Amazing!


Welcome to our monthly DIY Challenge hosted by Terrie @Decorate and More with Tip! On the first Wednesday of the month, Terrie hosts a DIY Challenge with a group of talented bloggers who love to create budget friendly décor for their homes.
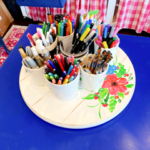
Up next is Tammy @Patina and Paint sharing her step by step tutorial on making an adorable lazy susan! How cool is that!

And be sure to click on each of the Bloggers listed below to see their magnificent creations, too!


DECORATE AND MORE WITH TIP K'S OLYMPIC NEST BLUESKY AT HOME

PURPLE HUES AND ME PATINA AND PAINT THE HOUSE HOUSE

BLESSINGS BY ME THE HOUSE ON SILVERADO LECULTIVATEUR


I am so impressed that you made this basket. So pretty and a great knock off of the Target basket. You are so talented! I love that you can use this tutorial and make it match any room in your home. Thanks so much for sharing!
ReplyDeleteThanks, Tanny! Yes, I like that you can make one to match any decor in your home!
DeleteHow fun is this? I'm very impressed. It looks awesome!!
ReplyDeleteThanks so much, Jodi! I really enjoyed making it!
DeleteWOW! Gail you knocked it out of the park again! I love your basket and the tutorial. Thanks for sharing.
ReplyDeleteThanks, Terrie! You know I love making knock-offs!
DeleteBrilliant Gail. Not only did you create the cool design, you made the basket. Kudos to you for being so talented.
ReplyDeleteThanks so much, Linda! I always enjoy a challenge! Lol!
DeleteI love this!! You are so creative!! I have seen your inspiration basket around and have often thought of getting one, now I'm going to try to make one! Thank you so much for sharing!!
ReplyDeleteThanks so much, Emily! It's always fun trying to make your own after seeing something you like!
DeleteWow! Such a clever and creative idea. Looks totally different from the original. Pinned!
ReplyDeleteNiky @ The House on Silverado
Thanks, Niky! Yes, I liked the detailed on the Target basket and felt really comfortable trying to re-create my own version.
ReplyDeleteSo pretty Gail and the stitching is perfection.
ReplyDeleteGreat job!
Thanks, Cindy! So glad you like it!
DeleteGail, I thought your basket looked awesome with just the coiled rope. Then you kicked it up a notch with the yarn design embellishment. Super great project ~ and so useable.
ReplyDeleteThanks, Carol! I had been thinking about that Target basket since the first time I saw it! I was comfortable making just a plain rope basket and it was the perfect time to try a design similar to the Target one!
DeleteThis is stunning! I have tried making a coil basket but mine wasn’t near the look you achieved. Such a good tutorial. Am pinning cuz one day I am going to try this. Would be a perfect gift basket.
ReplyDeleteThis is so pretty! I love the purple!
ReplyDeleteI love this! Great work. It gets my wheels turning. I'm inspired!
ReplyDeletewe sale the high-quality custom boxes with secure and fast packaging online packaging solutions. You can buy Disc Folder It is a very creative shape and alim
ReplyDeletewe provide the best services of Double Wall Tuck Front . Our expert want to give you the perfect packaging boxes
ReplyDeleteGail,
ReplyDeleteThis looks lovely!! I am thinking of different things I can do with rope now!! Thanks for stopping by and yes, I have just been having the best time crafting !! I am on quite roll with it and may start some Christmas things....Thanks so much for stopping by!! Stay safe, healthy and happy!!
Hugs,
Debbie
we sell the high-quality custom boxes with secure and fast packaging online packaging solutions. You can buy Double Wall Tuck Top It is a very creative shape, little wonder.
ReplyDeleteGood information is published on your website I read it regularly You are a good writer and experienced blogger I have seen and understood your website
ReplyDeleteBy publishing your important information and facts on your website, you have given better knowledge to the visitor, for which I thank you.
Open Demat Account
This comment has been removed by the author.
ReplyDeleteNew York Divorce Law Alimony
ReplyDeleteAbsolutely love your DIY approach to recreate the stylish Target basket!