Monday, June 10, 2019

Twine Altered Tuna Can

Welcome again to our Monthly Challenge Blog Hop! I've joined a group of creative bloggers to bring you a themed monthly challenge blog hop on the 2nd Monday of each month!

 For the month of June, it's my favorite Destash Challenge! And for this challenge we're to create a project using only items currently found in our craft stash! And that means making something with crafty supplies we already have or re-making an item we've been holding on to for a while. It's always fun and cost next to nothing to make things out of what we already have! 

Take cans for example! I save lots of cans of all sizes! You just never know when you might need a can for a project! Some time ago I saw a video in Russian that showed a can wrapped in twine, including a top, along with a few other items that were being made. I didn't have a clue as to what was being said and I couldn't find the original video, but I did take a screenshot of the piece when I first saw it for inspiration. 
I was inspired with how unusual the can looked especially with the top, so I thought I would try my hand at re-creating something similar with items from my stash!

So I gathered:
Tuna Can
Jute Twine
Baker's Twine
Aileene's Tacky Glue
Styrofoam Ball (1/2 of 4")
Magic Marker
Plastic Wrap
Parchment Paper
Hot Glue
Floral Stem Wire/Bead

Start by placing a line of tacky glue at the can's edge and begin wrapping jute twine around the can,
adding glue along the way while wrapping until reaching the end. Then, cut off excess twine.
To make the top, take half of a 4" styrofoam ball and place the round portion in the can, making sure it sits straight and level. Next, draw a line with a magic marker around ball where top of can meets. 
Next, wrap the styrofoam in plastic wrap, securing it at bottom and then add tacky glue following the drawn-on line. Place jute twine on glue and begin wrapping around styrofoam, 
adding tacky glue to twine as you wrap and keeping the rows straight and together until reaching top center. Cut off excess twine and .  .  .
let glue dry, becoming clear.
To make a decorative criss-cross look on top, separate the threads of baker's twine,
then slather tacky glue all over individual pieces to make the threads straight and firm. Let dry on parchment paper.
Begin the design by running a line of tacky glue across the top .  .  .
and placing the thread on top of the glue,  smoothing it down into the glue for a good connection. Next, continue spacing out lines of glue down on top and placing threads on glue making sure the threads are saturated into the glue until 
the top is covered. Next, add glue across the threads in a slanted pattern at the center top and continue placing the threads down in a cross-cross effect until the top is covered in a criss-cross design. Let dry.
Once dry, cut off excess threads around the base.  Then braid the baker's twine
to add to the bottom of the top and can.
Measure braided twine around the base and saturate the braid with tacky glue where it starts and ends so the braid won't unravel when cut. Let dry.  Glue on the braid at the base of top using hot glue and also on the base of the can.
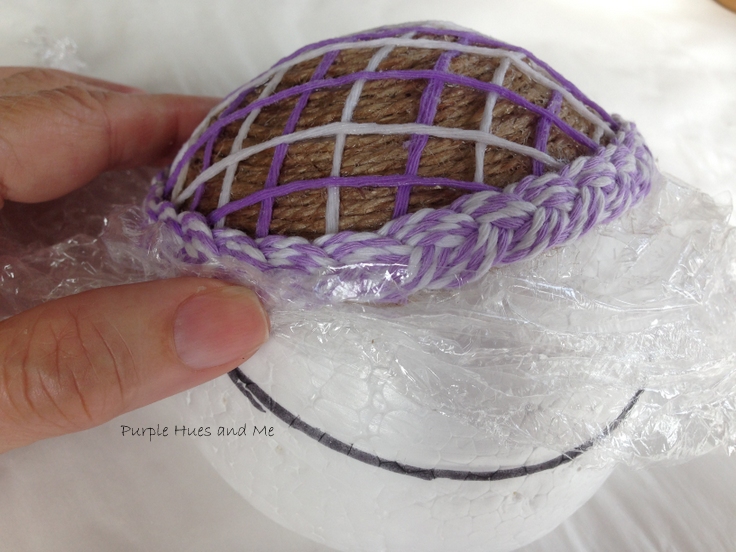
Loosen plastic wrap from styrofoam and remove top.
Remove plastic wrap from inside the top and .  .  .
cut off stuck-on plastic around edges. 

To make a decorative top handle in the shape of a flower, twist 5 floral stem wires around a magic marker to make petals,
then glue all stems together, and cut off excess wires. Hot glue bead in the center of the petals and glue onto middle of top.
Isn't this adorable for keeping trinkets and what-knots in!


I am a participant in the Amazon Services LLC Associates Program, an affiliate advertising program designed to provide a means for sites to earn advertising fees by advertising and linking to Amazon.com. This post also contains affiliate links.  I may receive a very small commission.  It does NOT result in additional charges to you or cost you anything extra.  The affiliate money I earn per month helps pay my crafting expenses. Thanks so much for your support!


Now on to our Blog Hop!
Check out my creative co-hosts to see their de-stash craft creations: 


You are invited to the Inlinkz link party!
Click here to enter

Friday, June 7, 2019

Fat Quarter and Duct Tape Tote Bag


Guess what day it is! It's the first Friday of the month and today's the day I bring you another fun themed craft to share at Bring On the Crafts Blog Hop! 
The theme for this month is Fabric!
And we're going to make an adorable tote bag using fabric, staples, duct tape and webbing! Knowing how to make your very own tote bag comes in handy these days since many people are choosing re-usable totes for their special bag needs!  Using tote bags also reduces the amount of plastic bags (a no-no today) and helps to reduce waste! And the uses for a tote bag are almost unlimited -  from shopping, grocery, school, work, carry-on, garden, book, storage, overnight, weekend, gym, beach, etc., or just as a fashion accessory!  So many!

You will need the following to make this tote bag: 
  • Fat Quarters (2-21"x18") fabric
  • Iron
  • Duct tape - ten yard roll (2)
  • Stapler
  • Scissors
  • Ruler
  • Webbing strap (2-24")
  • Lighter
  • Cardboard for bottom *optional
A fat quarter is the perfect size to make a tote bag - 21"x18" - that's a yard of fabric cut into four quarters!  And you can find lots and lots of fat quarters in prints and colors in most fabric and craft stores for just a little over a dollar! 

So, let's begin by ironing all the wrinkles and folds out of the fabric.
Next, lay the fabric down, wrong side up, left to right (21"), on a cutting mat or non-stick work surface and begin taping down strips of duct tape across the fabric starting at the top.
Overlap each strip just a bit as you continue adding duct tape along the entire surface of the fabric. Make sure to smooth down the edges of each duct tape strip on the fabric - turning over to check for smoothness, too. The fabric might wrinkle up on the other side, so be sure to smooth it out! Then apply the duct tape to the second fabric piece the same way.
To add straps - first, seal the ends of the 24" webbing with the flame of a lighter to prevent fraying.


Next, fold down the fabric of each piece, two inches on the longer side (21") creating a flap.  Then using a ruler, measure 7 inches from side end of fabric and place down one end of the webbing strap and staple midway through the flap several times. 
Next, curve the webbing strap around to the opposite side at the 7" placement and staple to fabric flap several times, as before.
Then lay a strip of duct tape from one side to the next, across handles and edges, covering all staples. Add a second strip of duct tape for extra hold and reinforcement.  
Use the strap placement from the first piece for the second piece strap match-up. Once both handles are secure, place the two fabric pieces right sides together, matching edges and begin stapling edges together in a straight line about a quarter of an inch from edges - down one side and then the next, 
until all three sides are stapled together.
Next, cover all staples with duct tape, first placing tape half way down on one side edge .  .  .
and smoothing over on to the other side, covering and sealing all the staples on
all three sides.
To square the bottom of the bag, push the inside corner out with your hand creating a triangle. Then flatten and smooth out the triangle pointed end and measure down seven inches.
Staple across, keeping edges flat and straight.
Next, cover and seal staples with duct tape.
Once both triangles are stapled and taped, turn bag right side out, placing triangle corners flat inside bag. Cover corners down to bottom of bag with strips of duct tape. Add additional strips of duct tape for extra reinforcement.
For additional bag support, I made a flat piece to insert in bottom of bag, by cutting a piece of cardboard the inside width and length of the bag.
And then, covering all the edges with duct tape first and adding strips of more duct tape until .  .  .
the cardboard is completely covered. *You may need more than two rolls of duct tape to include this piece.
How cool is this tote bag! Made out of fabric, staples and duct tape!


I am a participant in the Amazon Services LLC Associates Program, an affiliate advertising program designed to provide a means for sites to earn advertising fees by advertising and linking to Amazon.com. This post also contains affiliate links.  I may receive a very small commission.  It does NOT result in additional charges to you or cost you anything extra.  The affiliate money I earn per month helps pay my crafting expenses. Thanks so much for your support!

Join us now for this month's

Bring on the Crafts 700 x 550

Bring on the Crafts — A Craft & DIY Blog Hop

On the first Friday through Sunday of each month, a group of DIY and crafty bloggers join forces to create a fun craft or DIY project to share that follows a monthly materials theme. Together, with hosts Marie from The Inspiration Vault and Habiba from Craftify My Love, they share the #BringontheCrafts blog hop with you. June's theme is Fabric! Each blogger chooses their own craft to make as long as they love it and it uses Fabric for the project.

Our May Co-hosts

Jenny at Cookies, Coffee and Crafts   • Erlene at My Pinterventures  
Marie at DIY Adulation • Michele at Coastal Bohemian  
Beverly at Across the Blvd • Gail at Purple Hues & Me

Join in on the fun! If you'd like to participate next month, you can request to join our Bring on the Crafts Facebook Group. Next month's theme is Beads & Buttons!
Not a blogger, but a creative mind none the less!? Don't worry, Share your awesome creations in our Craft Cult Facebook Group. This is also a great place to ask craft & DIY related questions and find inspiration for your next project.

Now let's see all of those amazing Craft and DIY Projects!

You are invited to the Inlinkz link party!
Click here to enter

Monday, June 3, 2019

How to Make an Ultra Chic Fascinator


Fascinators are one of the hottest hair trends these days – especially with all the upcoming wedding celebrations occurring! Besides weddings, they’re great to wear for formal occasions, party celebrations or just as a hair accessory that’s sure to impress!!! And the best part, you can make your very own ultra-chic bow fascinator using the Bowdabra! How cool is that!

To Make, you will need:

Organza on a 6″ roll
Bowdabra/Wand
Bowdabra Bow Wire
Hot Glue
Stapler
Feathers
Hair Clip

Let’s get started by cutting an 18″ piece of Bowdabra Bow Wire, folding in half and placing it into the Bowdabra, tucking ends under.
Next, cut four 28″ strips of 6″ organza, placing each one on top of the other, together. Then take one side, creasing the ends together and place down into the Bowdabra.

Keeping the organza strips even, grab the other ends, creasing together, taking them up over the Bowdabra tower and down into the Bowdabra.

Now, crease the middle of the organza and insert down into the Bowdabra.

Then, create  6″ loops on each side.

Scrunch down the organza bow with the Bowdabra Wand.

While the bow is still in the Bowdabra, thread the two loose ends of the bow wire through the loop, pulling tightly while gently pulling the bow out. Tie bow wire around to the back.

Next, separate two organza loops from one side as you fluff the bow for the fascinator.

Next, cut two 8″ strips of organza and place one into the Bowdabra, making puffy loops on each side.

Gently remove the puffy organza loops from the Bowdabra and hold together temporarily with the clip. Twirl the other organza strip into a puffy rosebud by rolling loosely together. Then, staple the two pieces together at the center and fluff.


Glue on puffy rosebud to the center edge of bow fascinator. Then glue on feathers for an ultra chic look!

And finally, insert hair clip through bow wire on the back to wear.


Thanks for stopping by
and take a little time to enjoy,
Happy Crafting!