Hello and Welcome to the 'Do It Over' Designers Blog Hop!! In case you haven't heard, the "Do It Over Designers" is a group of creative bloggers who love to recycle/upcycle/ DIY, hosted by Anne @The Apple Street Cottage. It happens the 4th Saturday of every other month and it's all about taking something old and/or unused and 'doing it over' into something new. Once in a while, Anne will choose a theme for us to do over. This month it's Lighting! Thanks Anne for hosting this wonderful blog hop!
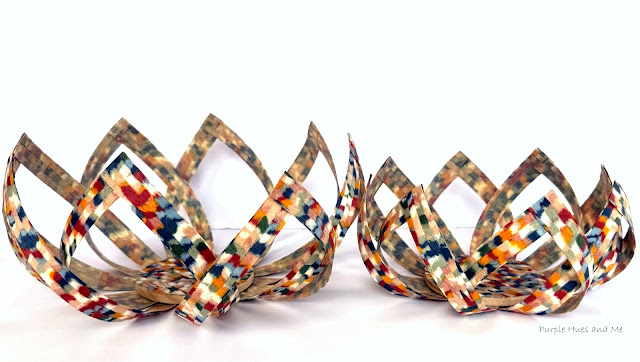
Wood veneer edge banding is usually used as an edge wood trim to cover exposed edges of furniture, cabinet doors, drawer fronts, shelves, etc. But the fun part for this 'Do It Over' project is using a very unconventional color style of the wood veneer edge band strips - one with a rainbow color painting on the band instead of the usual wood tones. So for this month's 'Do Over' I'm going to shape the colorful wood veneer strips into a lotus flower style and add a light source in the middle for the lamp! Sounds cool doesn't it? I'm really excited about making the edging into a light source instead of using it to cover furniture edges!
So let's get started!
Supplies:
- Wood Veneer edge band strips in rainbow color painting
- Wood circle disc 4"
- Quick Hold glue/Hot glue
- Puck light w/remote
- Vase base light w/remote
- Ruler, pencil, scissors
Disclosure I am a participant in the Amazon Services LLC Associates Program, an affiliate advertising program designed to provide a means for us to earn fees by linking to Amazon.com and affiliated sites, this post may contain links. I may receive a very small commission at no cost to you! Plus Google Adsense provides a platform for me to monetize my content by hosting ads from Google's network of advertisers. The money I earn helps pay my crafting expenses. Thanks so much for your support!
How To:
There are two parts to my lotus flower style veneer lamp - a small flower with 6 1/2" long veneer strips and a larger flower with 8 1/2" strips. Both sizes will be using a wood circle disc about four inches in diameter for the center.
First, to help keep the veneer strips placement as even as possible, using a ruler and pencil, divide the wood circle into four sections. Starting at the 12 o'clock position, draw a line down to the 6 o'clock position. Then draw another line from the 9 o'clock position over to the 3 o'clock position. Next, cut out sixteen, 8 1/2" long strips of colorful wood veneer. There is a right side that shows the colorful wood design. And a wrong side which is rough and actually has glue embedded on it.
After cutting out the sixteen strips, using a ruler and pencil, measure 1/2" from the end of each strip and draw a line. Then turn the strip over to the wrong side and on the opposite end draw another line at the 1/2" mark.
Begin gluing on each strip using the lines on the wood circle and the right side line on each strip as a placement guide on the . . .
12 to 6, and the 9 to 3 lines.
and then, glue on three strips in between each one the same way.
Continue gluing on the strips, matching the lines of the strips to the circle edge.
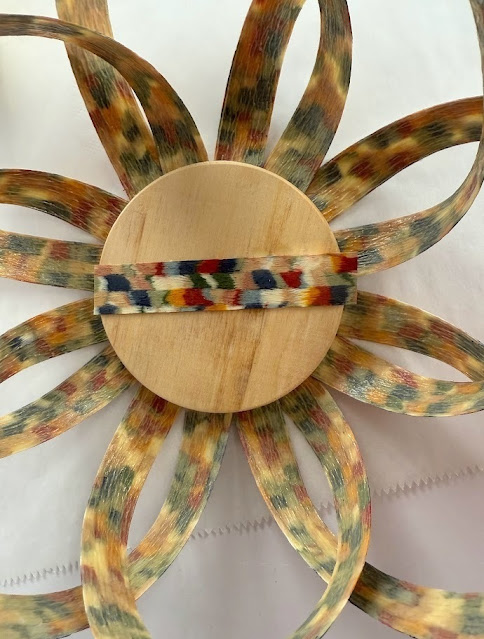
Once all the strips are glued on, turn the wood disc over and . . .
take a strip in one hand and count three strips over and glue that strip together on the end with the strip in your hand. This will be your first "petal".
From the left strip that has been glued together, take the strip to the right of it and glue this strip together with the third strip on the left.
Continue gluing the strips together on the left - from the glued together left strip, take the strip to the right of it and glue this strip together with the third strip on the left. Continue going around the disc until all the strips are glued together as petals forming a lotus flower shape.
The petals are arranged in a symmetrical, overlapping pattern, creating a full, elegant lotus flower style.
The wood circle disc needs to be covered with strips of veneer to enhance the total look! *In hindsight, I should have covered the opposite side of the round disc with veneer strips before gluing on the sixteen strips. It would have been easier to trim and so much neater, too.
Once the strips are glued onto the wood circle, cut off the excess strips around the wood circle edge . . .
The wood circle disc looks so much better covered in veneer!
For the smaller flower, veneer strips were glued on first to the wood disc (not shown) and then the excess overhang was cut off following the circle edge.
Then the 6 1/2" veneer strips were glued on, like before, and shaped into a lotus flower.
And finally, place the LED light in the center and . . .
enjoy the different lighting colors using the remote . . .
to set your decorative mood!
I hope you enjoyed my "Do Over" veneer strips lighting project!
Before you leave, don't forget this is a blog hop and the team has some amazing upcycle/recycle/do-it-over Lighting projects to share with you.
Be sure to visit all of this month's creative projects by the "Do It Over Designers" listed below:


.jpg)


