When I first saw the candle holder at Goodwill, I had no idea how popular the birdcage style was! I thought it was a bargain at six dollars, but after buying it and then looking around on Pinterest I wasn't so sure. Some stores carried similar ones for less!
I also saw lots of DIY birdcage remakes done by many including some of my favorite fellow crafters on Pinterest! But I loved the design of the birdcage candle holder and came up with a way to update its' look using soda cans and a flower punch!
Welcome to this months' "Do It Over Designers" Blog Hop! The "Do It Over Designers" is a group of creative bloggers who love to recycle/upcycle/ DIY, hosted by Anne @The Apple Street Cottage. It happens the 4th Saturday of every other month and it's all about taking something old and/or unused and 'doing it over' into something new. Thanks Anne for hosting this wonderful blog hop!
So let's get started with how I updated my thrift store birdcage candle holder find!
Materials Used:
Disclosure I am a participant in the Amazon Services LLC Associates Program, an affiliate advertising program designed to provide a means for us to earn fees by linking to Amazon.com and affiliated sites, this post may contain links. I may receive a very small commission at no cost to you! The affiliate money I earn helps pay my crafting expenses. Thanks so much for your support!
Let's begin with the soda cans! *Caution: You may want to wear gloves for this! To get a smooth sheet of soda can aluminum: Carefully cut off the top end of a clean soda can using a utility knife and craft scissors.
Make a vertical cut with scissors across the can to get to the opposite can end to remove.Cut an even edge, removing any slivers or jagged edges. Once you have the soda can aluminum cut out, smooth the curve of the can by rolling the aluminum in the opposite direction or rolling on the edge of a table or countertop.
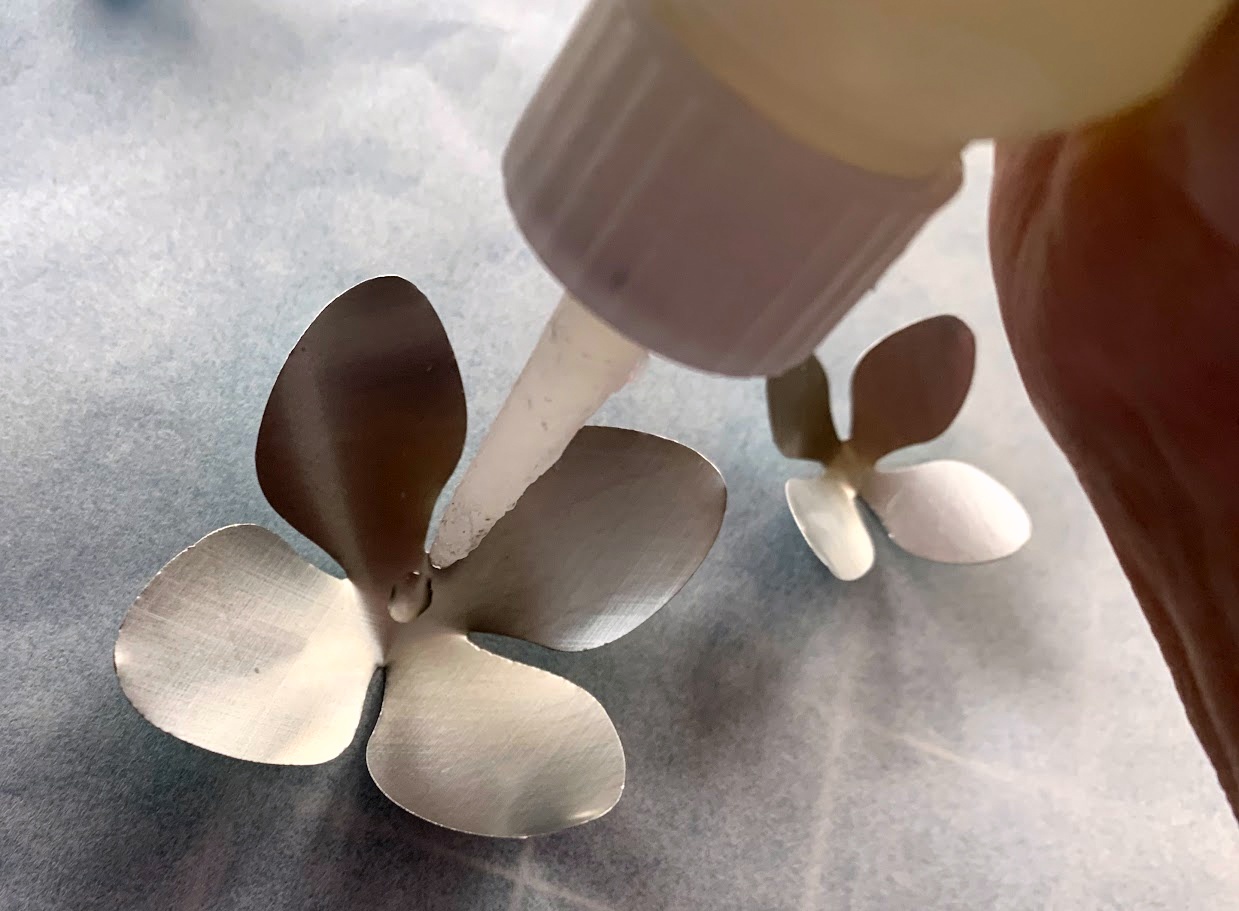
To make the petals, insert the aluminum piece into the petal punch so you can see that the aluminum is under the petal shapes completely and then punch the petals out. Once the petals are punched, adjust the aluminum to punch more or remove the excess using small needle nose pliers to pull the aluminum out.
Once the flowers are punched out, use a round stylus and foam pad to give dimension and curvature to the petal centers. Then glue the flower petals together according to size starting with the larger one on the bottom.I needed four of the larger flowers to glue around the lower bottom of the birdcage plus one more for the top. And sixteen smaller ones to place where the wrought iron designs intersect.
Once all the flowers were assembled, glued the larger ones in-between the wrought iron columns and used clothespins to hold them in place until dry.Then glued on the individual, smaller flower petals where the wrought iron design criss-crossed on the top.After all the flowers were glued on, spray painted the birdcage a matte finished white!
Once painted white, this birdcage candle holder looks super cute! The top hinges open so you can fill it with a variety of items like a candle, natural florals and more!
But wait! Wouldn't the birdcage candle holder look so much better on a pedestal? Oh, YES! I painted a glass goblet white, turned it upside down, and glued the birdcage candle holder to the stem base! 
And then added an LED candle! The cool thing about this candle is that it's an automatic color changing candle - changing colors every few seconds. Here it is in a pretty magenta and . . .
then a cool lavender!
And how about a fresh minty color or . . . a calming blue hue?Plus, a few more colors - creating a cozy atmosphere with its' illuminating touch!
Adding flair to your home, or outdoor patio!
Be sure to visit all of this month's creative projects by the
"Do It Over Designers" listed below:
The Apple Street Cottage
Birdz of a Feather
Exquisitely Unremarkable
Little Vintage Cottage
Purple Hues & Me
Southern Sunflowers
Sum of Their Stories


Oh Gail, you always have the best ideas! I absolutely love your birdcage update and now I know I can use my punches with aluminum cans. Beautiful project!
ReplyDeleteThanks so much, Ann! I love using punches in my projects!
DeleteI think your candle holder is probably much better quality than the cheaper ones you can buy in the shops and it's such an unusual shape too. Now you've given it such a classy makeover it looks much more expensive. Those punched metal flowers look great and I do love your colour change candle.
ReplyDeleteThanks, Julie! I don't think I've seen birdcage candle holders before I found this one so I'm not so sure about the quality of it. I'm so glad the makeover looks "classy!" I really appreciated you saying that!
DeleteGail, this makeover is next level! You really outdid yourself, it's so pretty and those punched flowers are just adorable. No one would ever guess they were from an old can!!
ReplyDeleteThanks so much for your sweet comments, Kim! That means a lot!
DeleteOh my gosh Gail, that turned out so pretty! I love the tin can flowers!
ReplyDeleteMany thanks, Tania! I really appreciate your lovely comments!
DeleteThis is darling - you are one clever gal!!
ReplyDeleteThanks, Patti! That means a lot to me!
DeleteThis is speaking my language Gail!! I love your aluminum can flowers on this but you really elevated the whole look (pun not intended lol) with the glass pedestal! You really take the prize for combining so many upcycles into one amazing project!
ReplyDeleteGee Sara! You are making me blush! I can't thank you enough!
DeleteThis turned out so cute, so much detail! I love it, and you have incorporated so many items into one wonderful piece!
ReplyDeleteThat is super cute Gail! I love the flower details made from the cans. Just so pretty!
ReplyDeleteWow, it's a whole new look in white and those flower punches give it a special touch. Adding a pedestal is like the cherry on top or in this case the bottom - lol. Pinned.
ReplyDeleteAnother fabulous project Gail. You amaze me with your skills. Happy summer.
ReplyDeleteVeck IO stands out as a straightforward yet highly competitive browser shooter. Its emphasis on fast reflexes, real-time multiplayer action, and easy accessibility makes it appealing to both casual players and competitive shooter fans.
ReplyDeleteThis birdcage-style candle design is truly creative and elegant. The look feels both vintage and cozy, making it a perfect decorative piece or a unique gift idea. Thanks for sharing this beautiful design inspiration!
ReplyDeleteBesides exploring creative handmade designs, I also enjoy relaxing with unique music games on Sprunki Mods . It’s a fun place to experience creative rhythm games and music mods.