It's almost Fall y'all and you know what that means! Time to decorate pumpkins! Why not take your pumpkin decorating skills to the next level using clay and a silicone flower mold! I know you've seen lots of pumpkins decorated using ornate molds! Most look antiquated - or not quite your style! But I'm here to show you how to use fashionable or up to date flower molds to decorate your pumpkins! Sounds like fun, doesn't it! And it is!
Welcome to this months' Creative Craft Hop! For the next couple of months, Creative Craft Hop will be hosted by Donna @Modern on Monticello who's filling in for Sara @Birdz of a Feather while Sara is dealing with health issues. Please keep Sara in your thoughts and prayers. And thank you Donna for keeping this awesome hop going! If you're coming over from Tammy @Patina and Paint wasn't her Pumpkin Soap Dispenser adorable! And be sure to check out all the talented bloggers and their wonderful creations listed at the end of my post.
We all love decorating pumpkins in so many cool ways for fall! The options are almost unlimited! And I'd like to share a chic and stylish way using clay and flower molds to beautify a pumpkin!
Materials used:
Disclosure I am a participant
in the Amazon Services LLC Associates Program, an affiliate advertising program
designed to provide a means for us to earn fees by linking to Amazon.com and affiliated
sites, this post may contain links. I may receive a very small commission at no
cost to you! The affiliate money I earn helps pay my crafting expenses. Thanks
so much for your support!
Let's start with a plain paper mache 10" pumpkin I had in my stash and . . .
a silicone flower mold I had gotten from Amazon sometime ago for another project. Begin by lightly brushing corn starch on the mold which makes it easier to release the clay from the mold.
Cover the entire mold with corn starch and then shake off the excess.
Pinch off an amount of air dry clay needed to begin filling the mold. Because the mold design is rather large, it's best to work in sections. Roll the clay into a ball and begin kneading it to make it soft and pliable.
Once the clay is pliable, begin pressing the clay into the mold.. . .
filling the flower design mold with clay.
Once the flower mold is filled, use a plastic spreader to smooth out the clay and to remove any excess clay around the rim of the flower design.
Then turn the mold over onto where you want to place it on the pumpkin and begin folding back the top of the mold - a little bit at a time so you won't break the design until the clay flower is completely on the pumpkin. Gently raise the clay flower to squeeze wood glue in-between the pumpkin and back of the clay flower. Press in place to secure. Continue filling the mold with clay as before, adding the flower around the pumpkin and gluing in place.
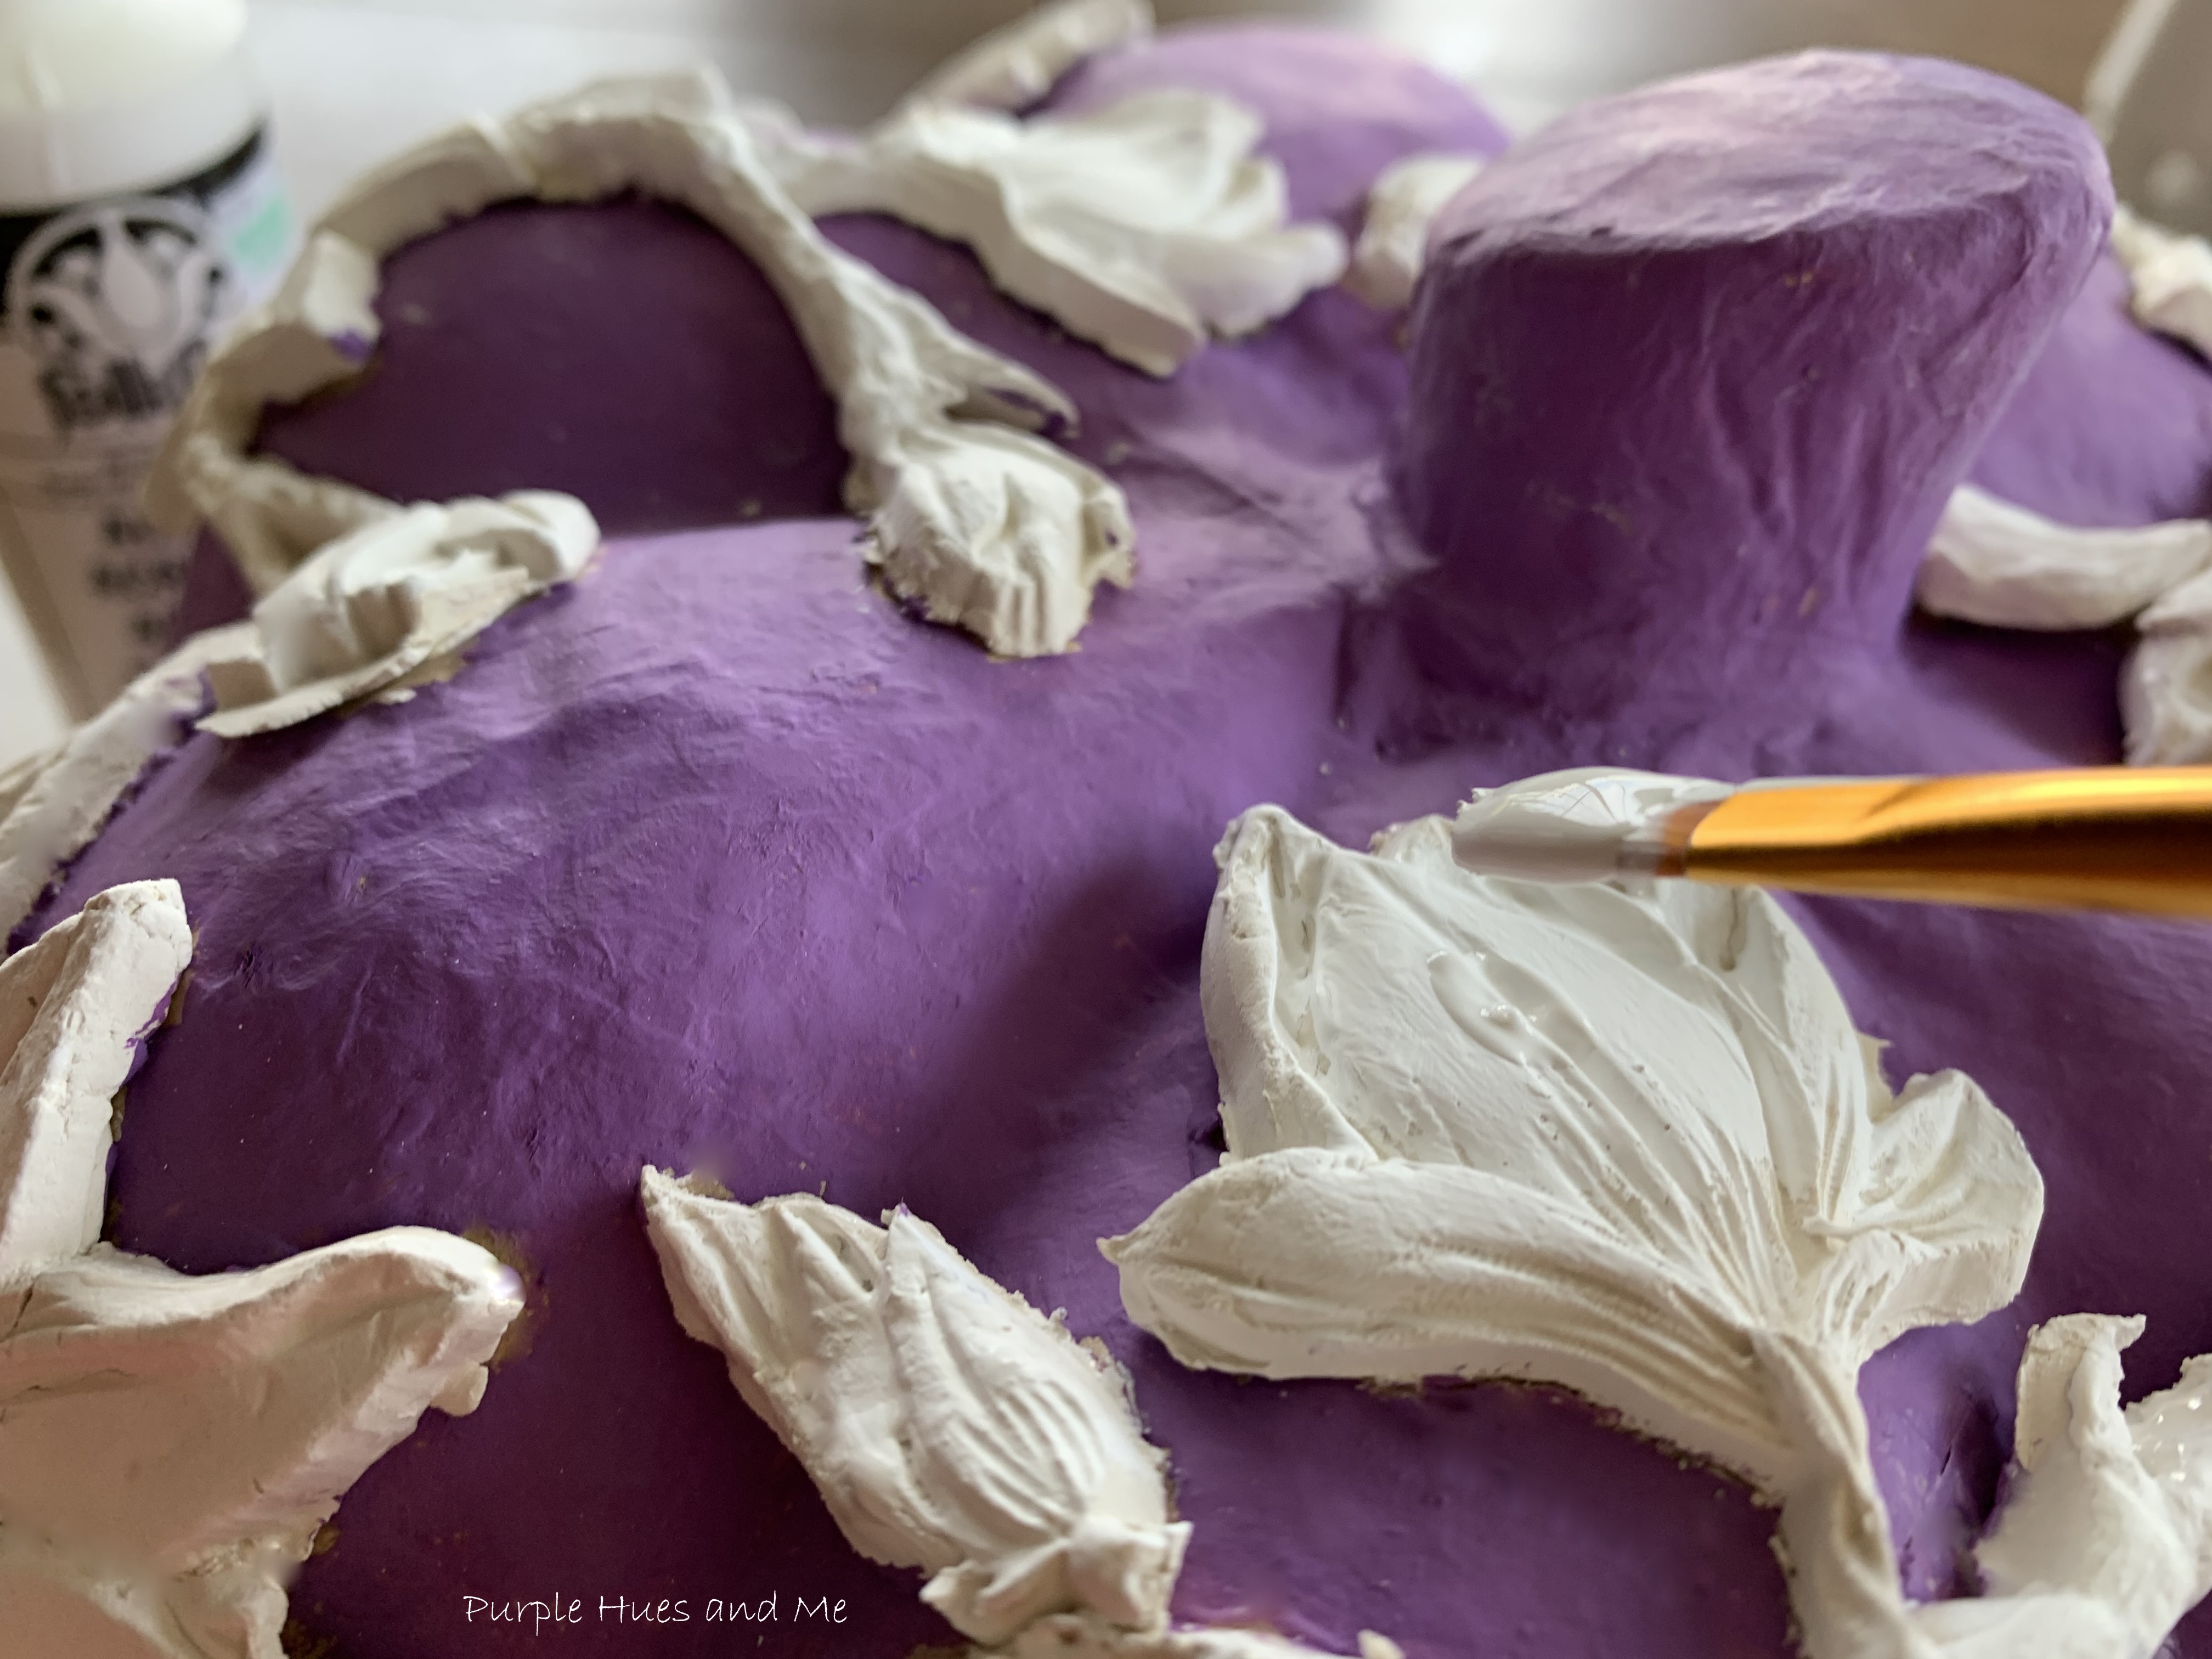
I placed six flower molds around the 10" pumpkin. And I loved, loved, loved how the pumpkin was taking shape!
Next, I started painting the paper mache pumpkin in a purple shade called FolkArt Victorian Violet Matte which looked much darker than the bottle shade implied. In hindsight, I should have painted the paper mache pumpkin first before adding the clay flowers.
After most of the pumpkin was painted and dry . . .I placed the pumpkin upside down in a plastic bowl to paint the bottom.
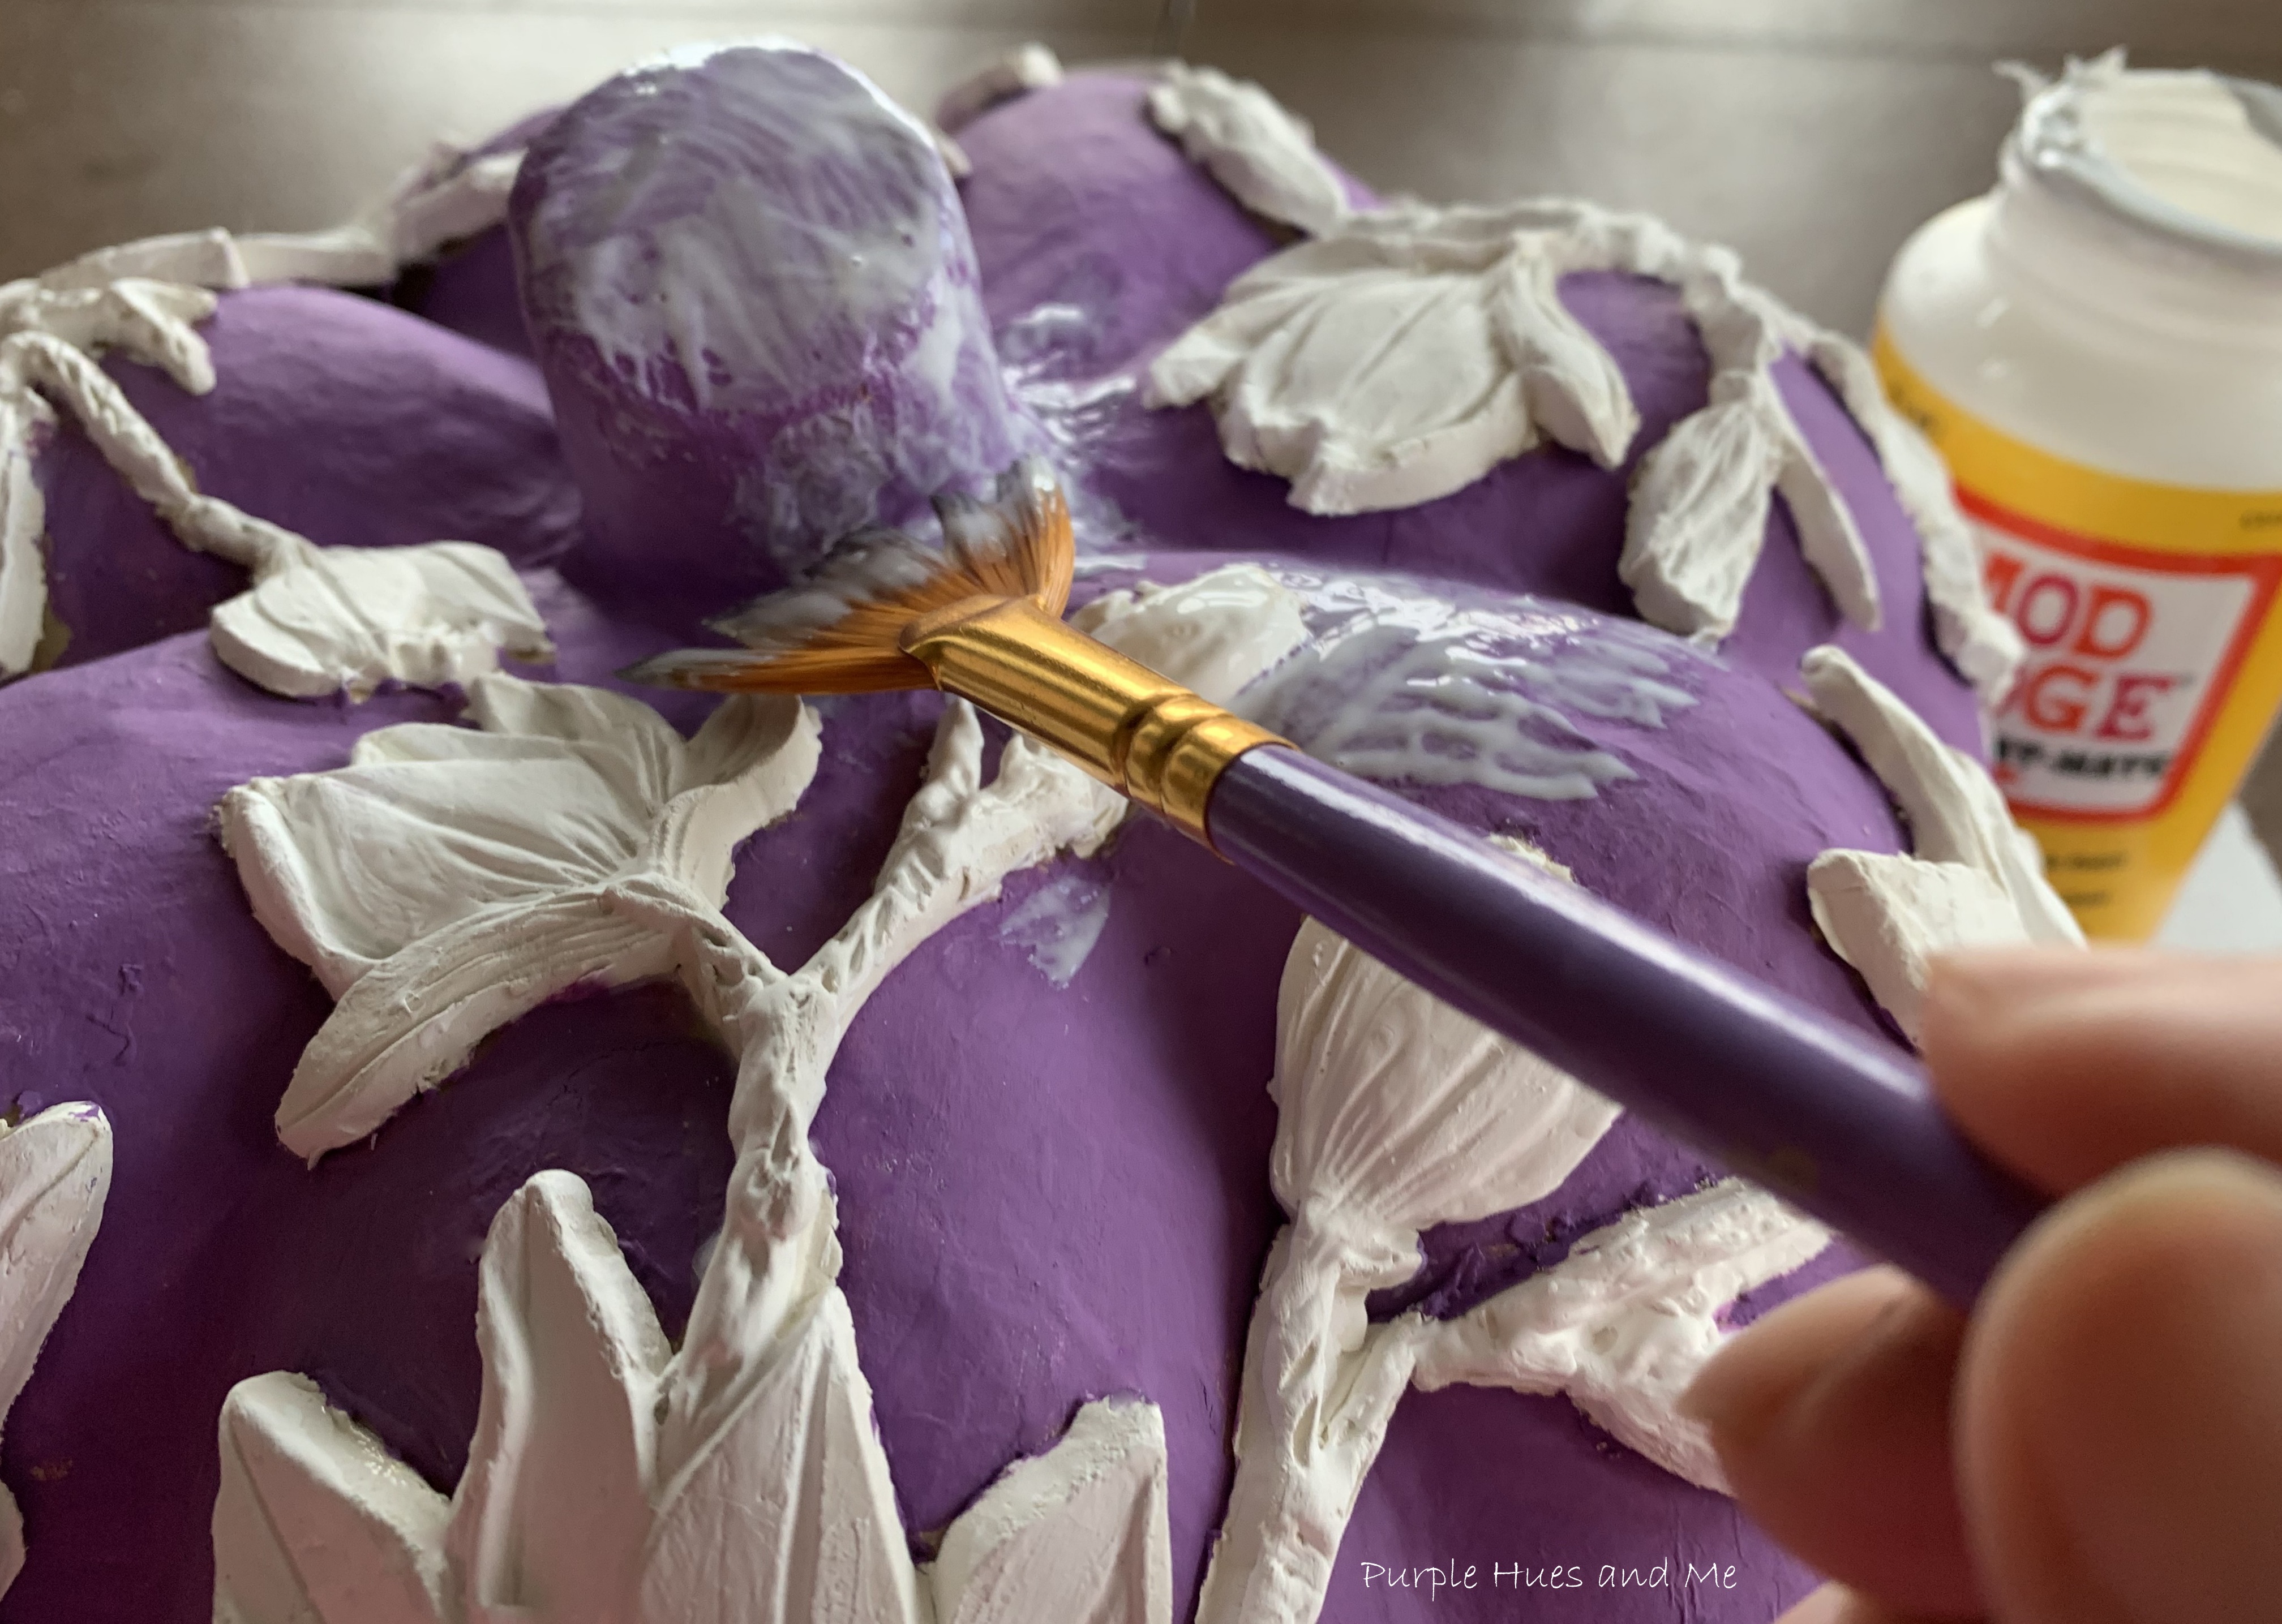
Doesn't this look awesome and I haven't finish it yet!Next, painted the clay flowers using FolkArt Wicker White. Let dryAnd finally, sealed it all using Mod Podge Matte.Let the mod podge dry for several hours . . .to a clear finish.I can't wait to decorate for Fall with this lovely pumpkin!
 I hope you enjoyed how I embellish a pumpkin with clay flowers and inspired you to make one, too! Up next is Ann @Apple Street Cottage sharing her beautiful Milkweed Pod Wreath! Be sure to stop by each and everyone in our creative group listed below to check out their exciting and inspiring projects! And don't forget to pin, too!

.png)


.png)
 I hope you enjoyed how I embellish a pumpkin with clay flowers and inspired you to make one, too! Up next is Ann @Apple Street Cottage sharing her beautiful Milkweed Pod Wreath! Be sure to stop by each and everyone in our creative group listed below to check out their exciting and inspiring projects! And don't forget to pin, too!


What a fun way to dress-up a plain pumpkin, Gail! I've never worked with molds and now I see I'm missing out.
ReplyDeleteWow Gail, this is awesome! The flower mold is so neat, as is the air dry clay! Very creative and amazing!
ReplyDeleteJenna
Great job Gail! I have seen those molds before and think that they would be a lot of fun to use, but haven't tried them. Plus, you get extra stars for being able to paint the purple without it getting on the white and the white on the purple. I would have made a total mess! Thanks for sharing!
ReplyDeleteYour pumpkin is so cute. I never used air clay or the molds before, I need to I have seen a lot of cute items made with them. Thanks for sharing your cute pumpkin Gail!
ReplyDeleteWow! I've seen clay mold projects here and there, but I must say yours is the most impressive by far. Awesome job! Pinned.
ReplyDeleteOh Gail, what a pretty purple pumpkin! The clay mold details are beautiful!
ReplyDeleteOh my, this is beautiful! I absolutely love it! I saw embellished pumpkins in Hobby Lobby the other day, and they cost a pretty penny. This is a great way to save money & have custom pumpkins to fit your style. I have lots of pumpkins around, but none are paper mâché. I'll have to try and see if they work for this. I haven't yet used air dry clay or molds, but my pumpkins are small. I wonder if you could fill the molds us only slightly, so the embellishments are thin for tiny pumpkins? Guess I could find thin molds too, if they're available. This was such a great inspiration, Gail! Thanks for sharing! Pinned.
ReplyDeleteNiki | Life as a LEO Wife
Gail, you always come up with the most unique projects. I have those paper mache pumpkins and some air dry clay. What a great project to use them on.
ReplyDeleteSO elegant AND creative, Gail!
ReplyDeleteWe have more than 70 Varients of Antiviruses, Microsoft Windows & Microsoft Offices products available
ReplyDeleteclick here - MACbook Microsoft Office
Very nice post. Very informative
ReplyDeleteThanks
motorcycle accident maryland
ReplyDeleteThis text describes a creative and charming fall decor idea that involves incorporating pumpkins with flower molds. The author shares their experience of creating stunning centerpieces using this technique, highlighting its ability to blend rustic autumn vibes with delicate floral beauty. The author also praises the ability to showcase their artistic flair and transform ordinary pumpkins into exquisite pieces of art, making it a fantastic DIY project for adding elegance to any fall gathering.
Traffic Lawyer Suffolk VA
ReplyDeleteFlower molds are a creative way to enhance traditional fall decor by adding a visually stunning touch to pumpkins. The intricate details elevate the pumpkin's appearance, making it a beautiful centerpiece or outdoor display. This creative approach offers endless possibilities for customization, allowing individuals to experiment with various flower shapes and sizes. However, ensuring the pumpkin's smooth surface is essential for the best results. Overall, flower molds provide a fresh and captivating look for any autumn setting.
Your dedication to your blog is truly commendable. It's evident that you have a genuine passion for your chosen subjects, and your writing is a delightful blend of knowledge and entertainment. Keep up the fantastic work, and I can hardly wait to dive into your future posts. Here's to your continued success! Cheers
ReplyDeleteCómo Presentar Documentos de Divorcio en Nueva York
This comment has been removed by the author.
ReplyDelete"Purple Hues and Me's" tutorial on embellishing pumpkins with flower molds is a creative masterpiece. The step-by-step instructions, coupled with vibrant visuals, make it easy for readers to replicate this artistic project. The use of flower molds adds an elegant and intricate touch, transforming ordinary pumpkins into stunning decorative pieces. The blog's attention to detail and passion for crafting truly shine through in this post. Kudos to Purple Hues and Me for sharing this inspiring and visually captivating DIY idea!
ReplyDeletedivorce center new york ny
Great post, love to read.
ReplyDeleteVisit - microsoft office 2021 professional plus
Wow, this is absolutely beautiful! I never thought of using flower molds on pumpkins. The finished look is so elegant and unique. What a fantastic idea for fall decor!
ReplyDeleteThis is a brilliant tutorial! I'm definitely going to try this for my autumn display. Quick question: Does the lightweight clay dry hard enough to resist minor bumps, or should I be extra careful with them?
ReplyDeleteI'm so inspired by this! Not just for pumpkins, but I can imagine using this technique on so many other craft projects. The possibilities are endless. Thank you for sparking my creativity!
ReplyDeleteThe result looks amazing, but I'm a bit worried about how well the clay flowers will adhere to the pumpkin over time, especially if displayed outdoors. Any tips for making sure they stay put in different conditions?
ReplyDeleteThis reminds me of a similar project I did with air-dry clay! Using molds definitely makes it so much easier to get intricate details. I love how you incorporated different colors – it really makes the flowers pop!
ReplyDeleteNice! Try this 24 game
ReplyDeleteA fun and creative seasonal craft idea! Using flower molds to embellish pumpkins adds a unique decorative touch that blends autumn vibes with floral elegance. It’s a simple way to make fall décor more artistic, personalized, and eye-catching. Minecraft APK Download
ReplyDeleteNice! Try this https://minecraftdownloadapk.com/
ReplyDelete