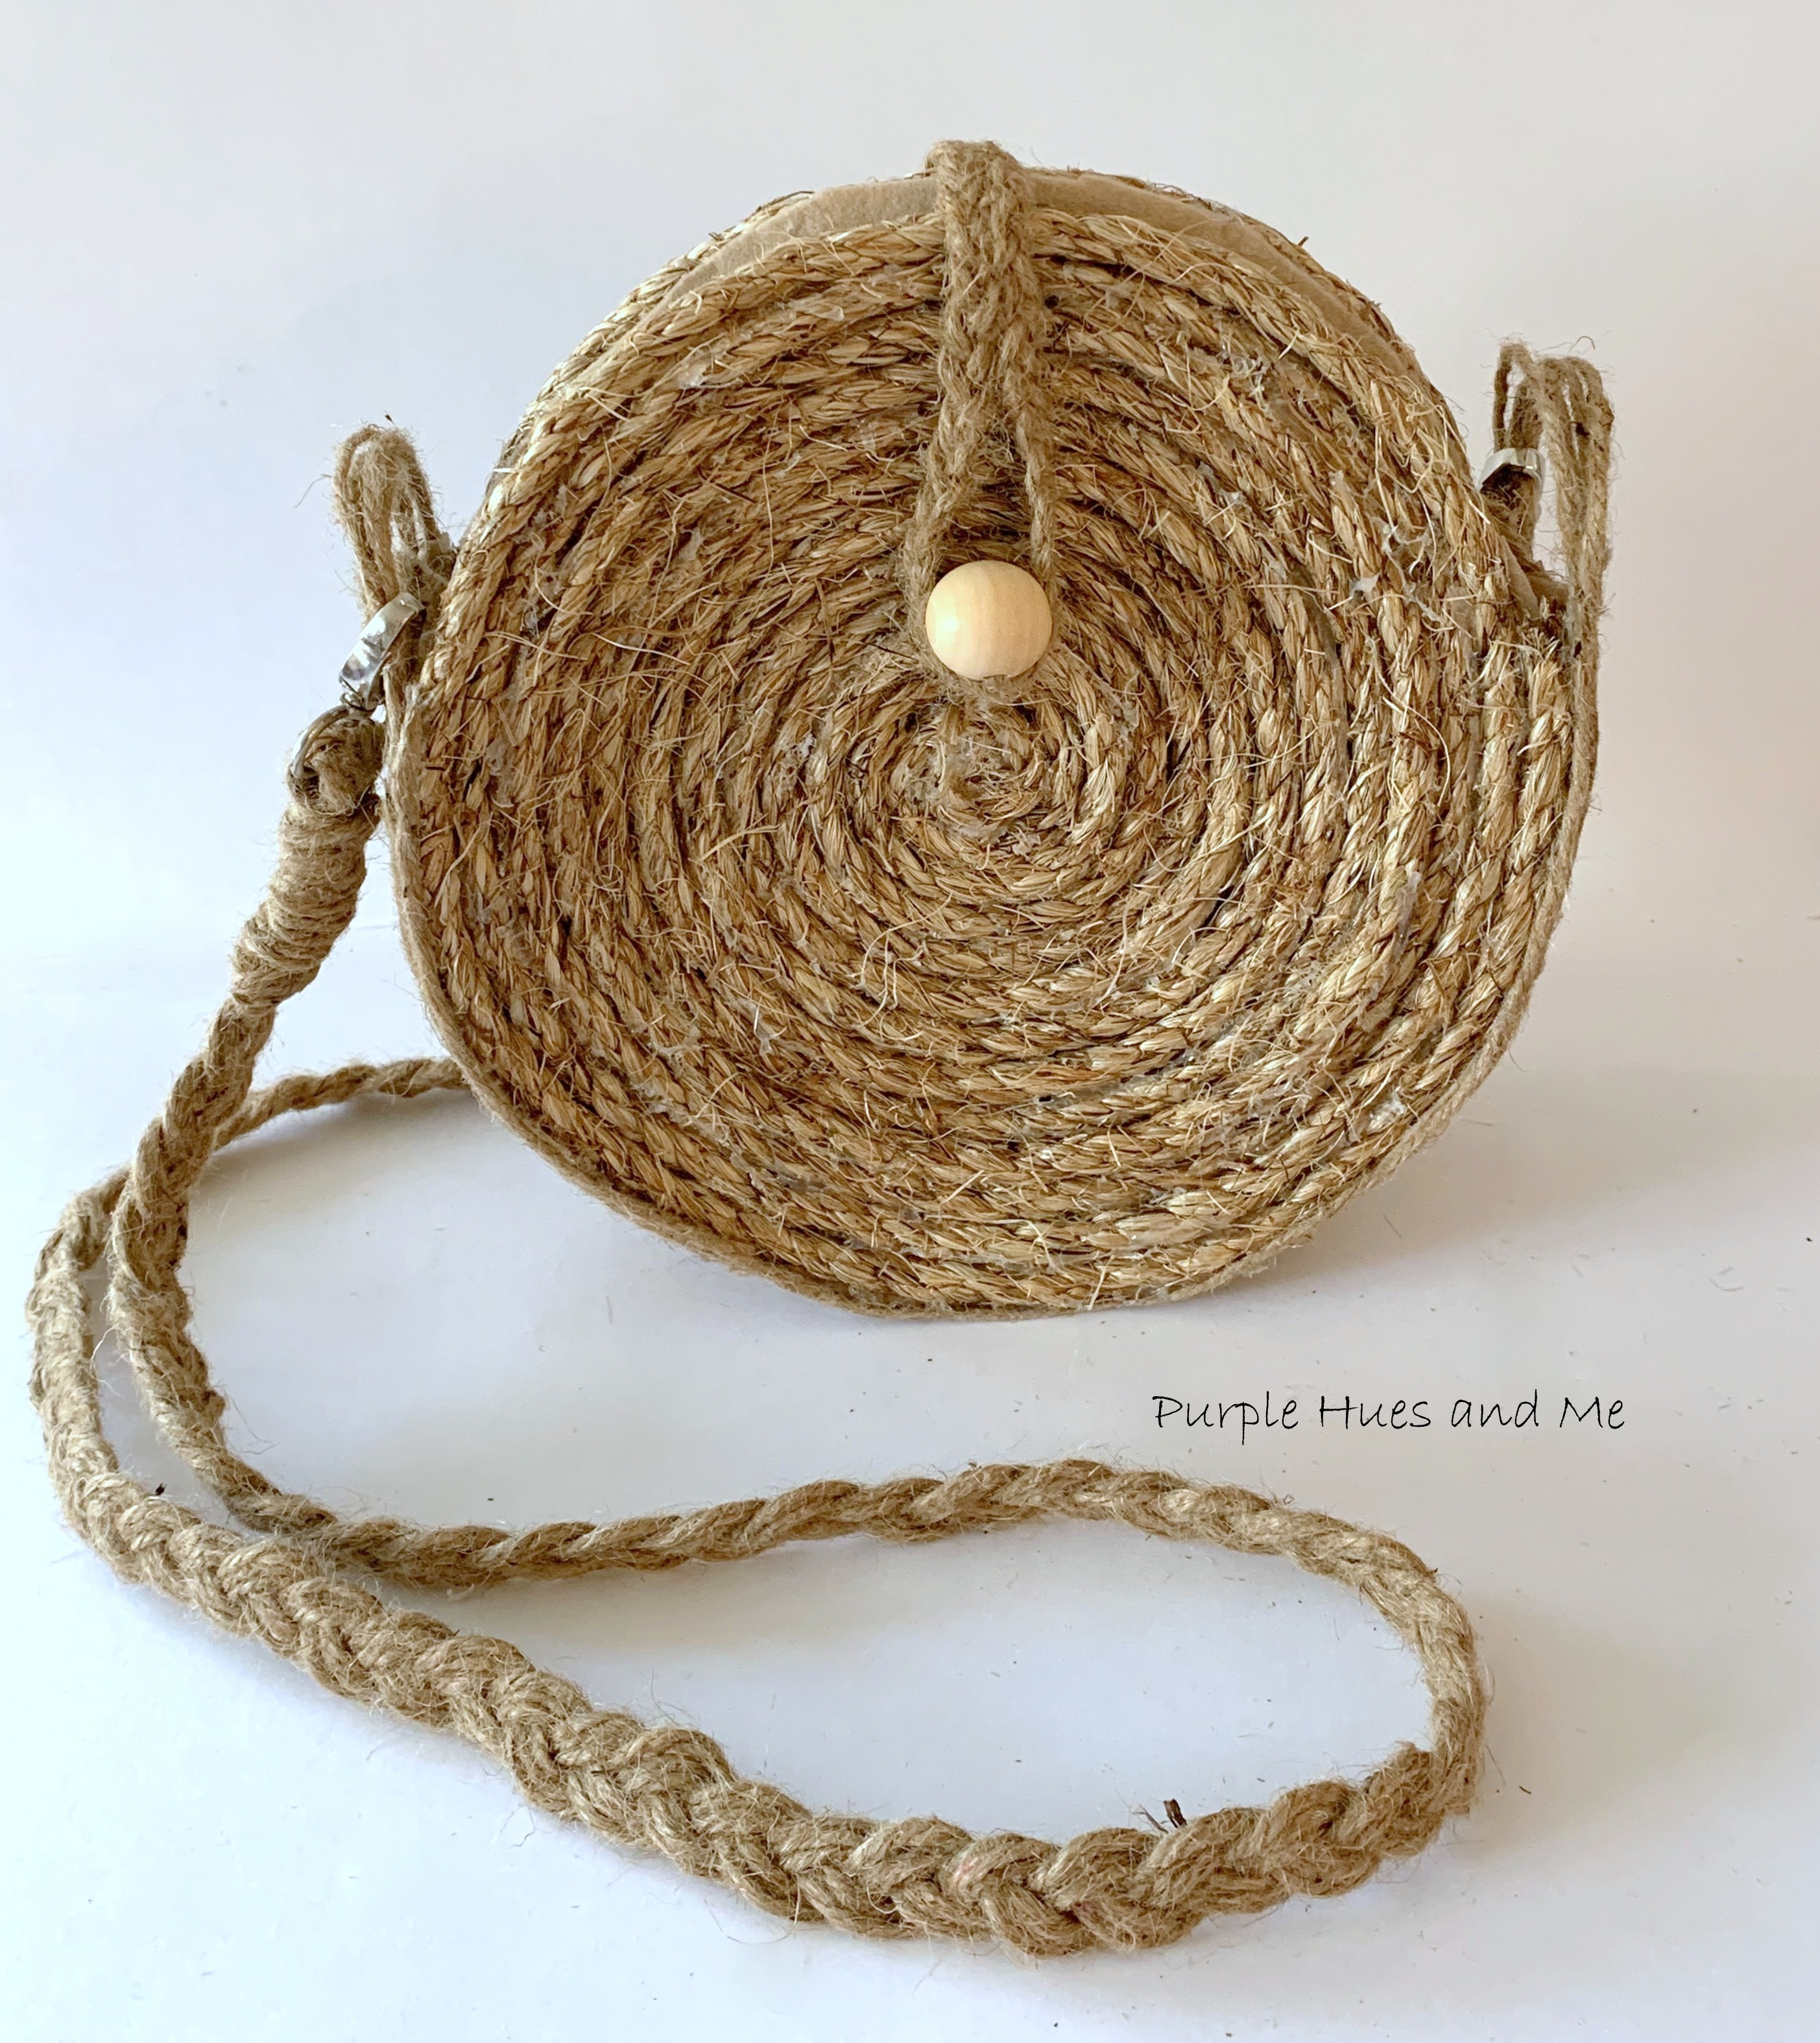
Welcome It's that time again for our Creative Craft Hop hosted by Sara @Birdz of a Feather! If you're coming over from Jenna @ The Painted Apron, WELCOME! Wasn't Jenna's pedestal serving tray gorgeous! Jenna never fails to have the most amazing creations! Summer is almost here and if you're like me, I'm looking at my summer clothes and deciding what to keep, what to get rid of and what I need or want to wear! If you want a great addition to your wardrobe that offers both style and function that's the perfect statement piece for warm and summer months then you might want to make your own coiled rope shoulder bag! I love the casual look of a summer bag - one you just grab and go! And this type of bag fits the need!
You will need:- Manila Rope - 3/8" 50ft. roll
- 9" template (plate)
- Parchment paper
- Marker
- Hot glue gun/glue sticks
- Self adhesive felt
- Scissors
- Measuring tape
- Twine
- Swivel bag hooks
- Clamps
- Large eye needle
- Wood ball
Disclosure I am a participant
in the Amazon Services LLC Associates Program, an affiliate advertising program
designed to provide a means for us to earn fees by linking to Amazon.com and affiliated
sites, this post may contain links. I may receive a very small commission at no
cost to you! The affiliate money I earn helps pay my crafting expenses. Thanks
so much for your support!
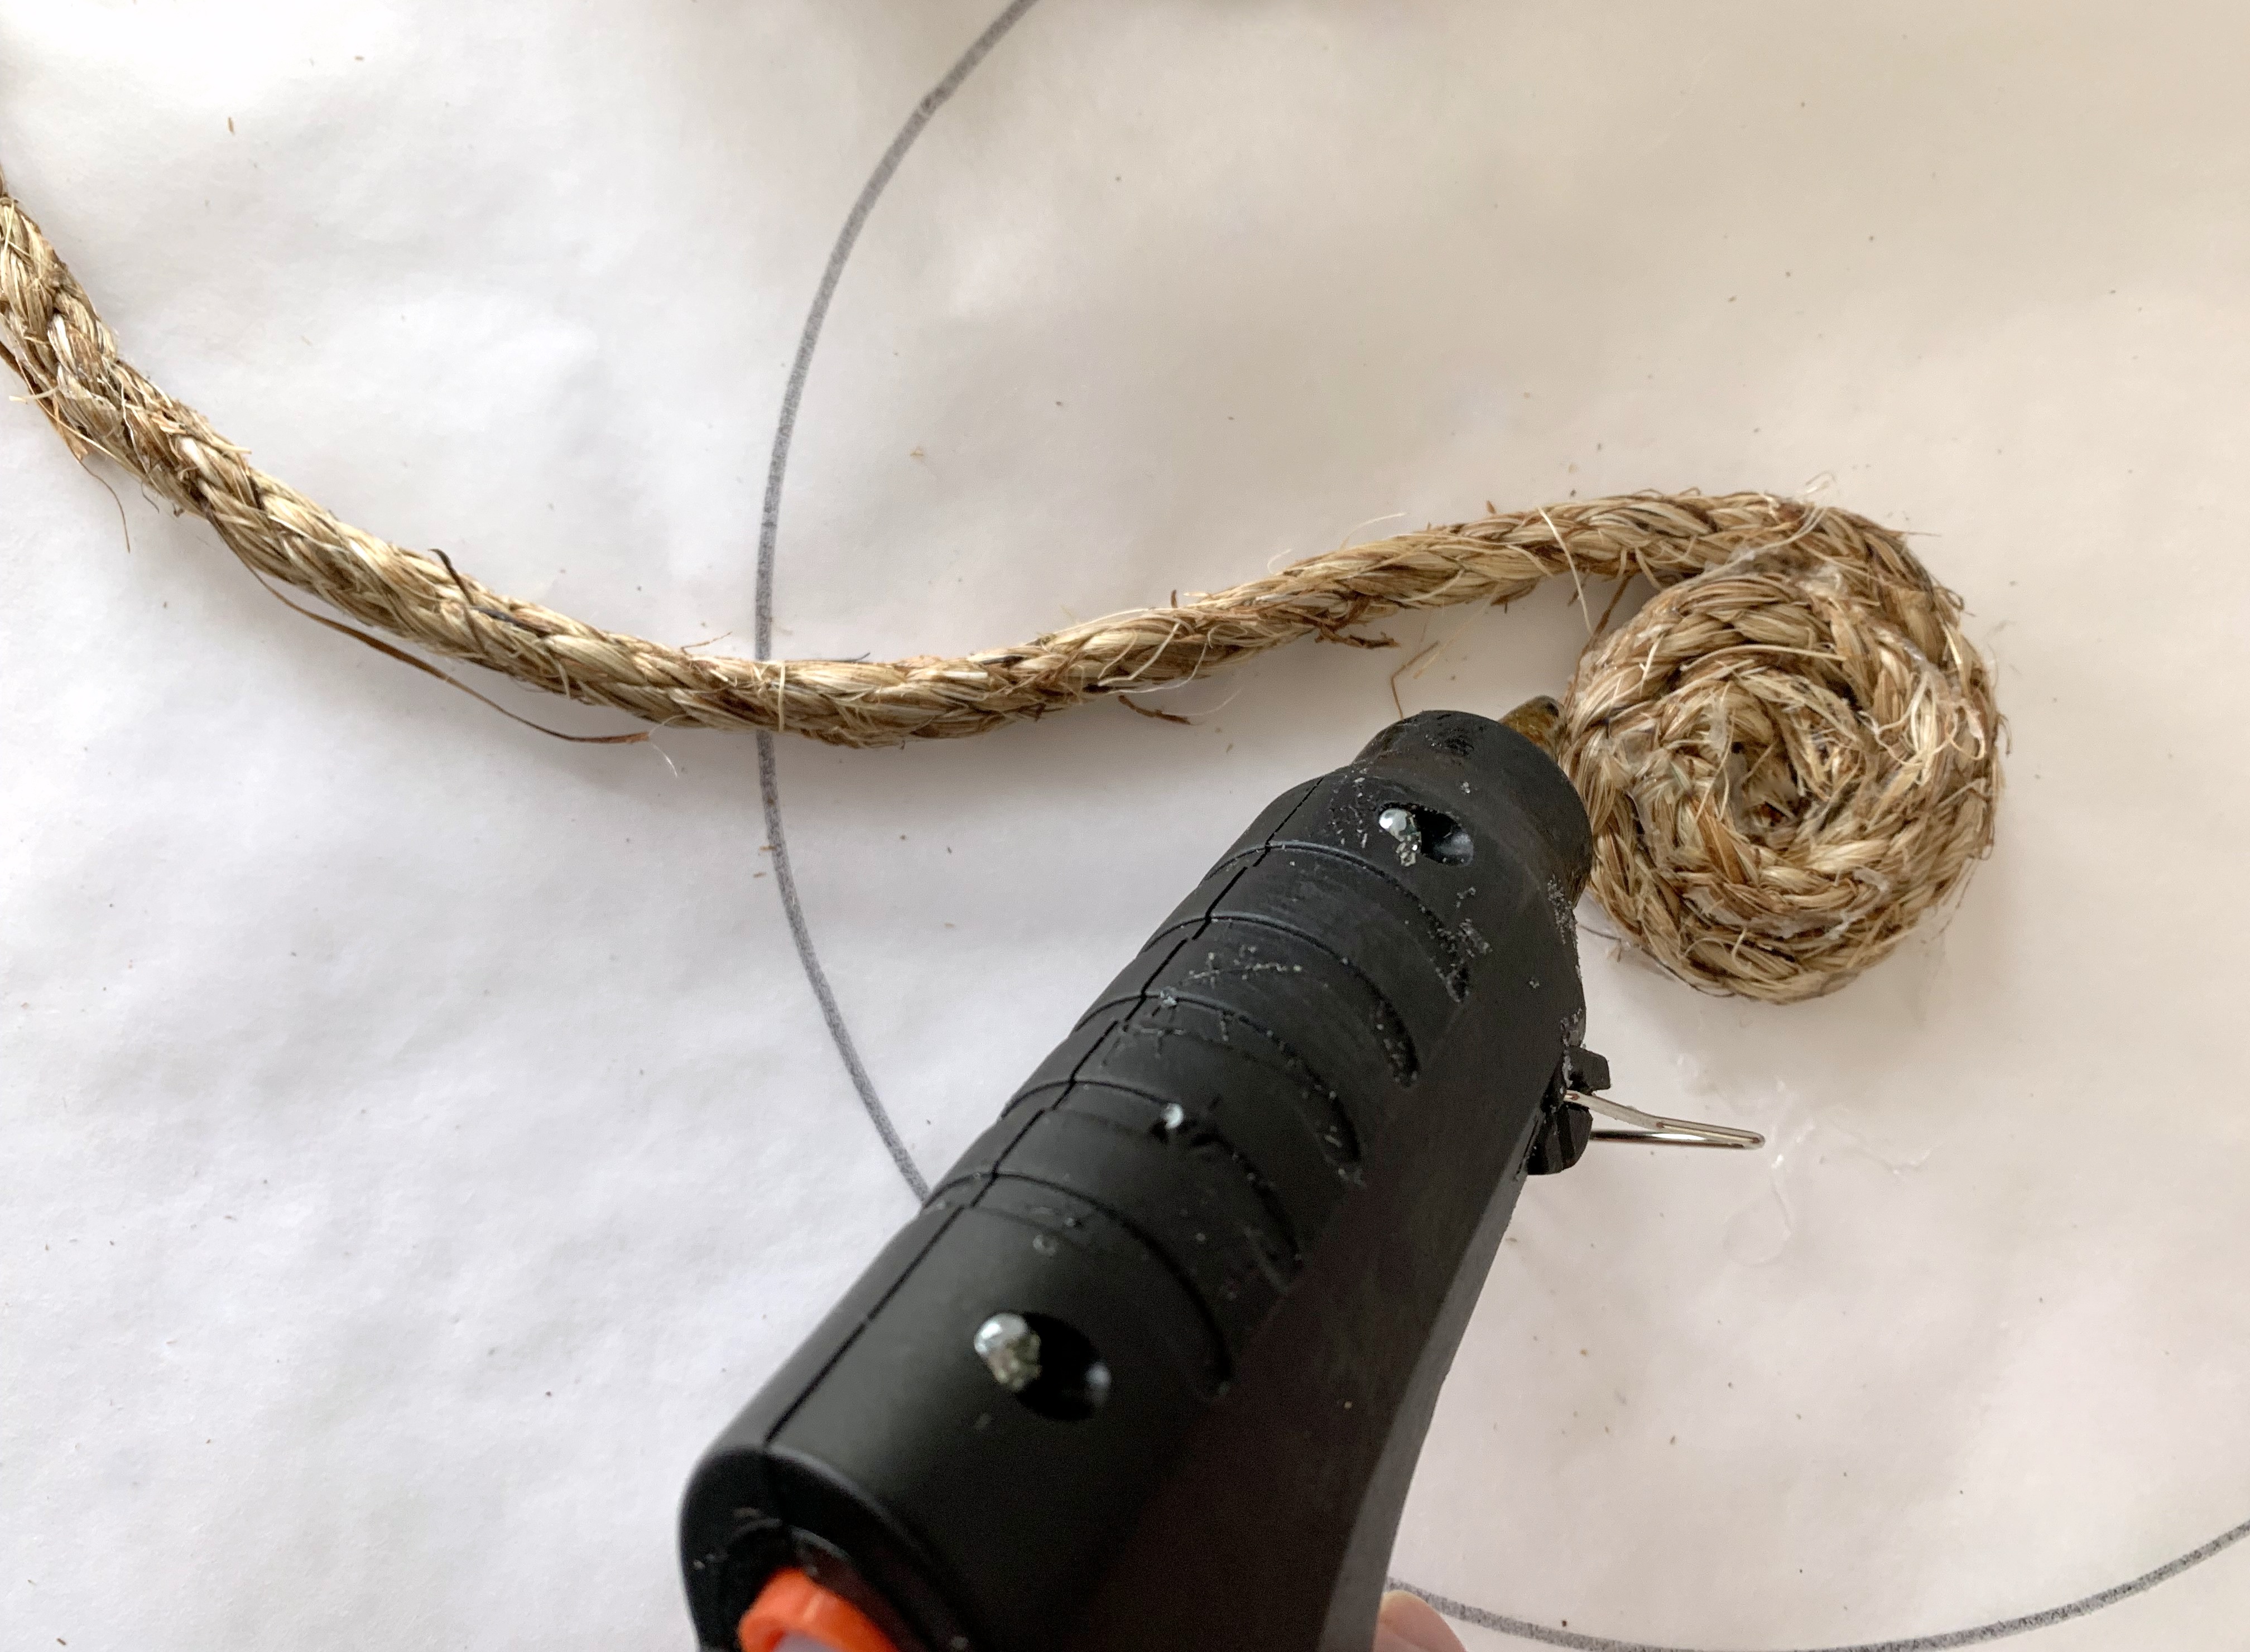
Let's begin by drawing a 9" round template on parchment paper.
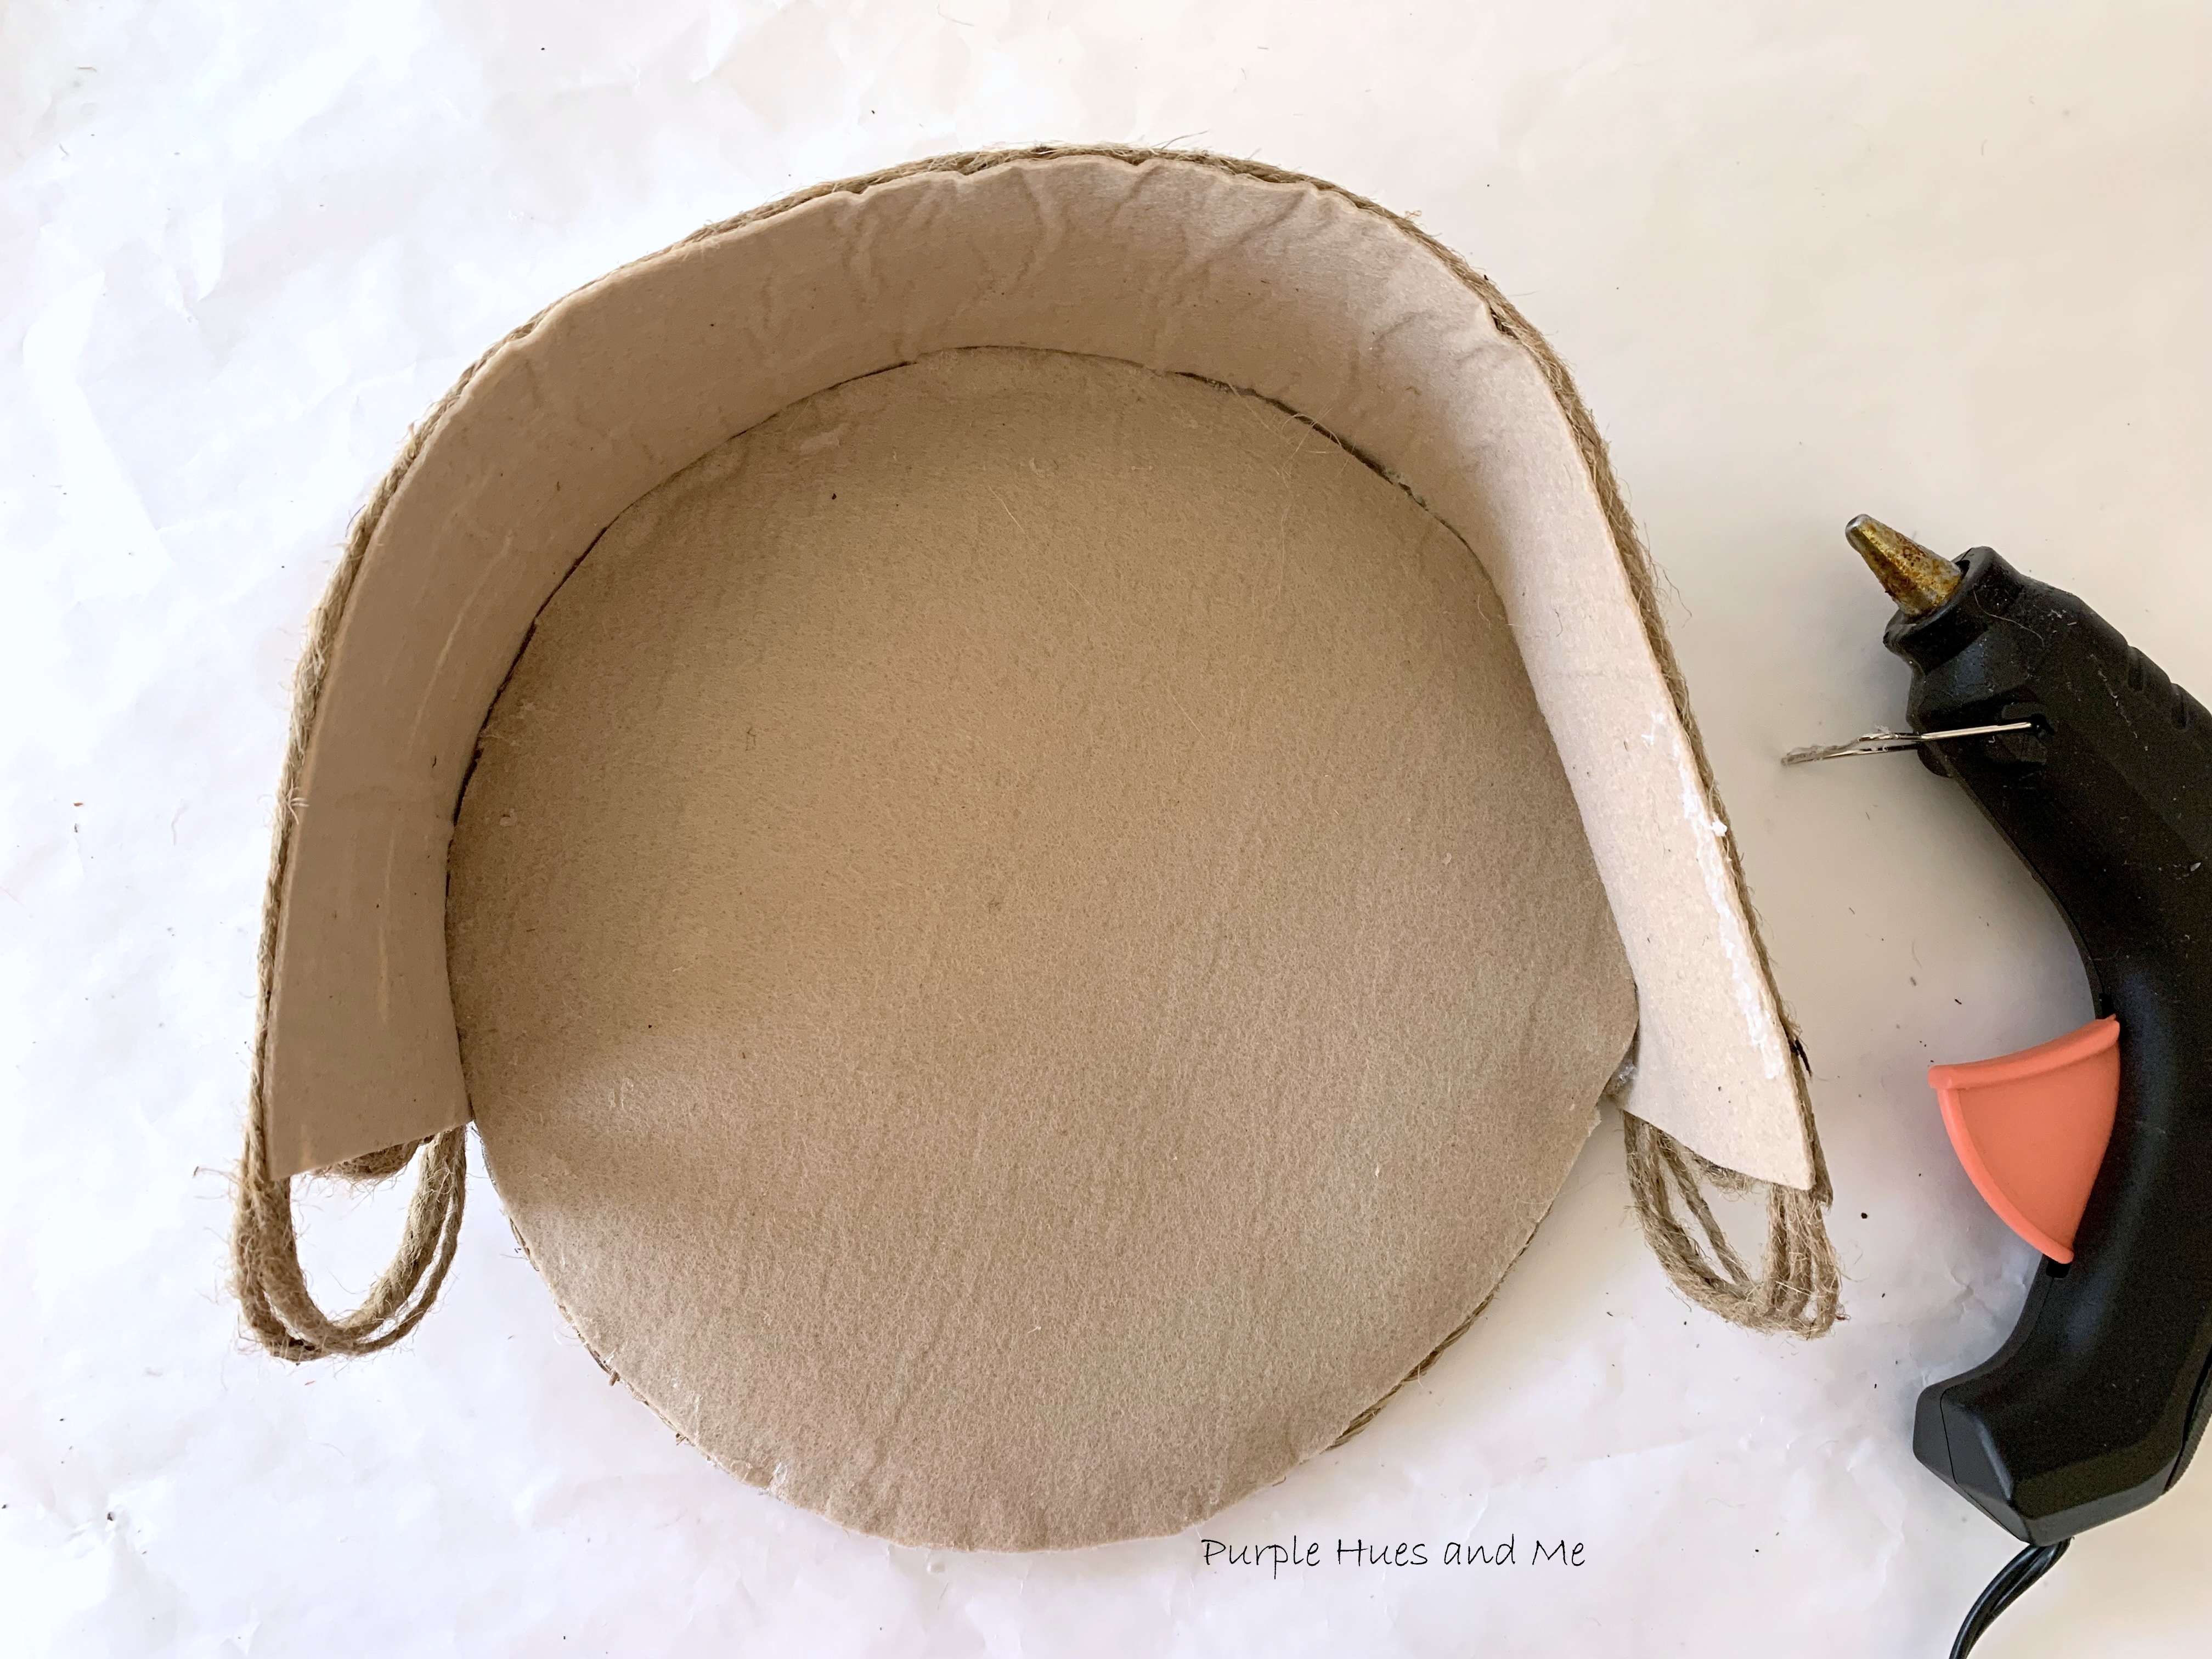
Leave the rope on the roll and begin by hot gluing the rope end onto itself and begin coiling the rope. Continue adding hot glue on the side of the rope as you coil . . .round and round until reaching the drawn circle edge. Cut the end of the rope at an angle using scissors and . . .hot glue the end in place.Repeat making another rope circle the same size.Next cut out a section of self adhesive felt and lay the rope circle on top, pressing down to seal the rope all over. Trim the excess felt fabric around the rope edges so you have a lined circle on one side and coiled rope on the other side.
 The attached self adhesive felt will be the lining of the bag.
 Next, measure around the coiled rope to determine how much self adhesive felt to cut for the middle side. (17")
 Then cut out a piece 17"x3.5" long and wide. Because the manila rope is so stiff, I will use twine to cover the self adhesive felt for the middle side of the bag.
I wrapped the loops four times on each end to make them sturdy.
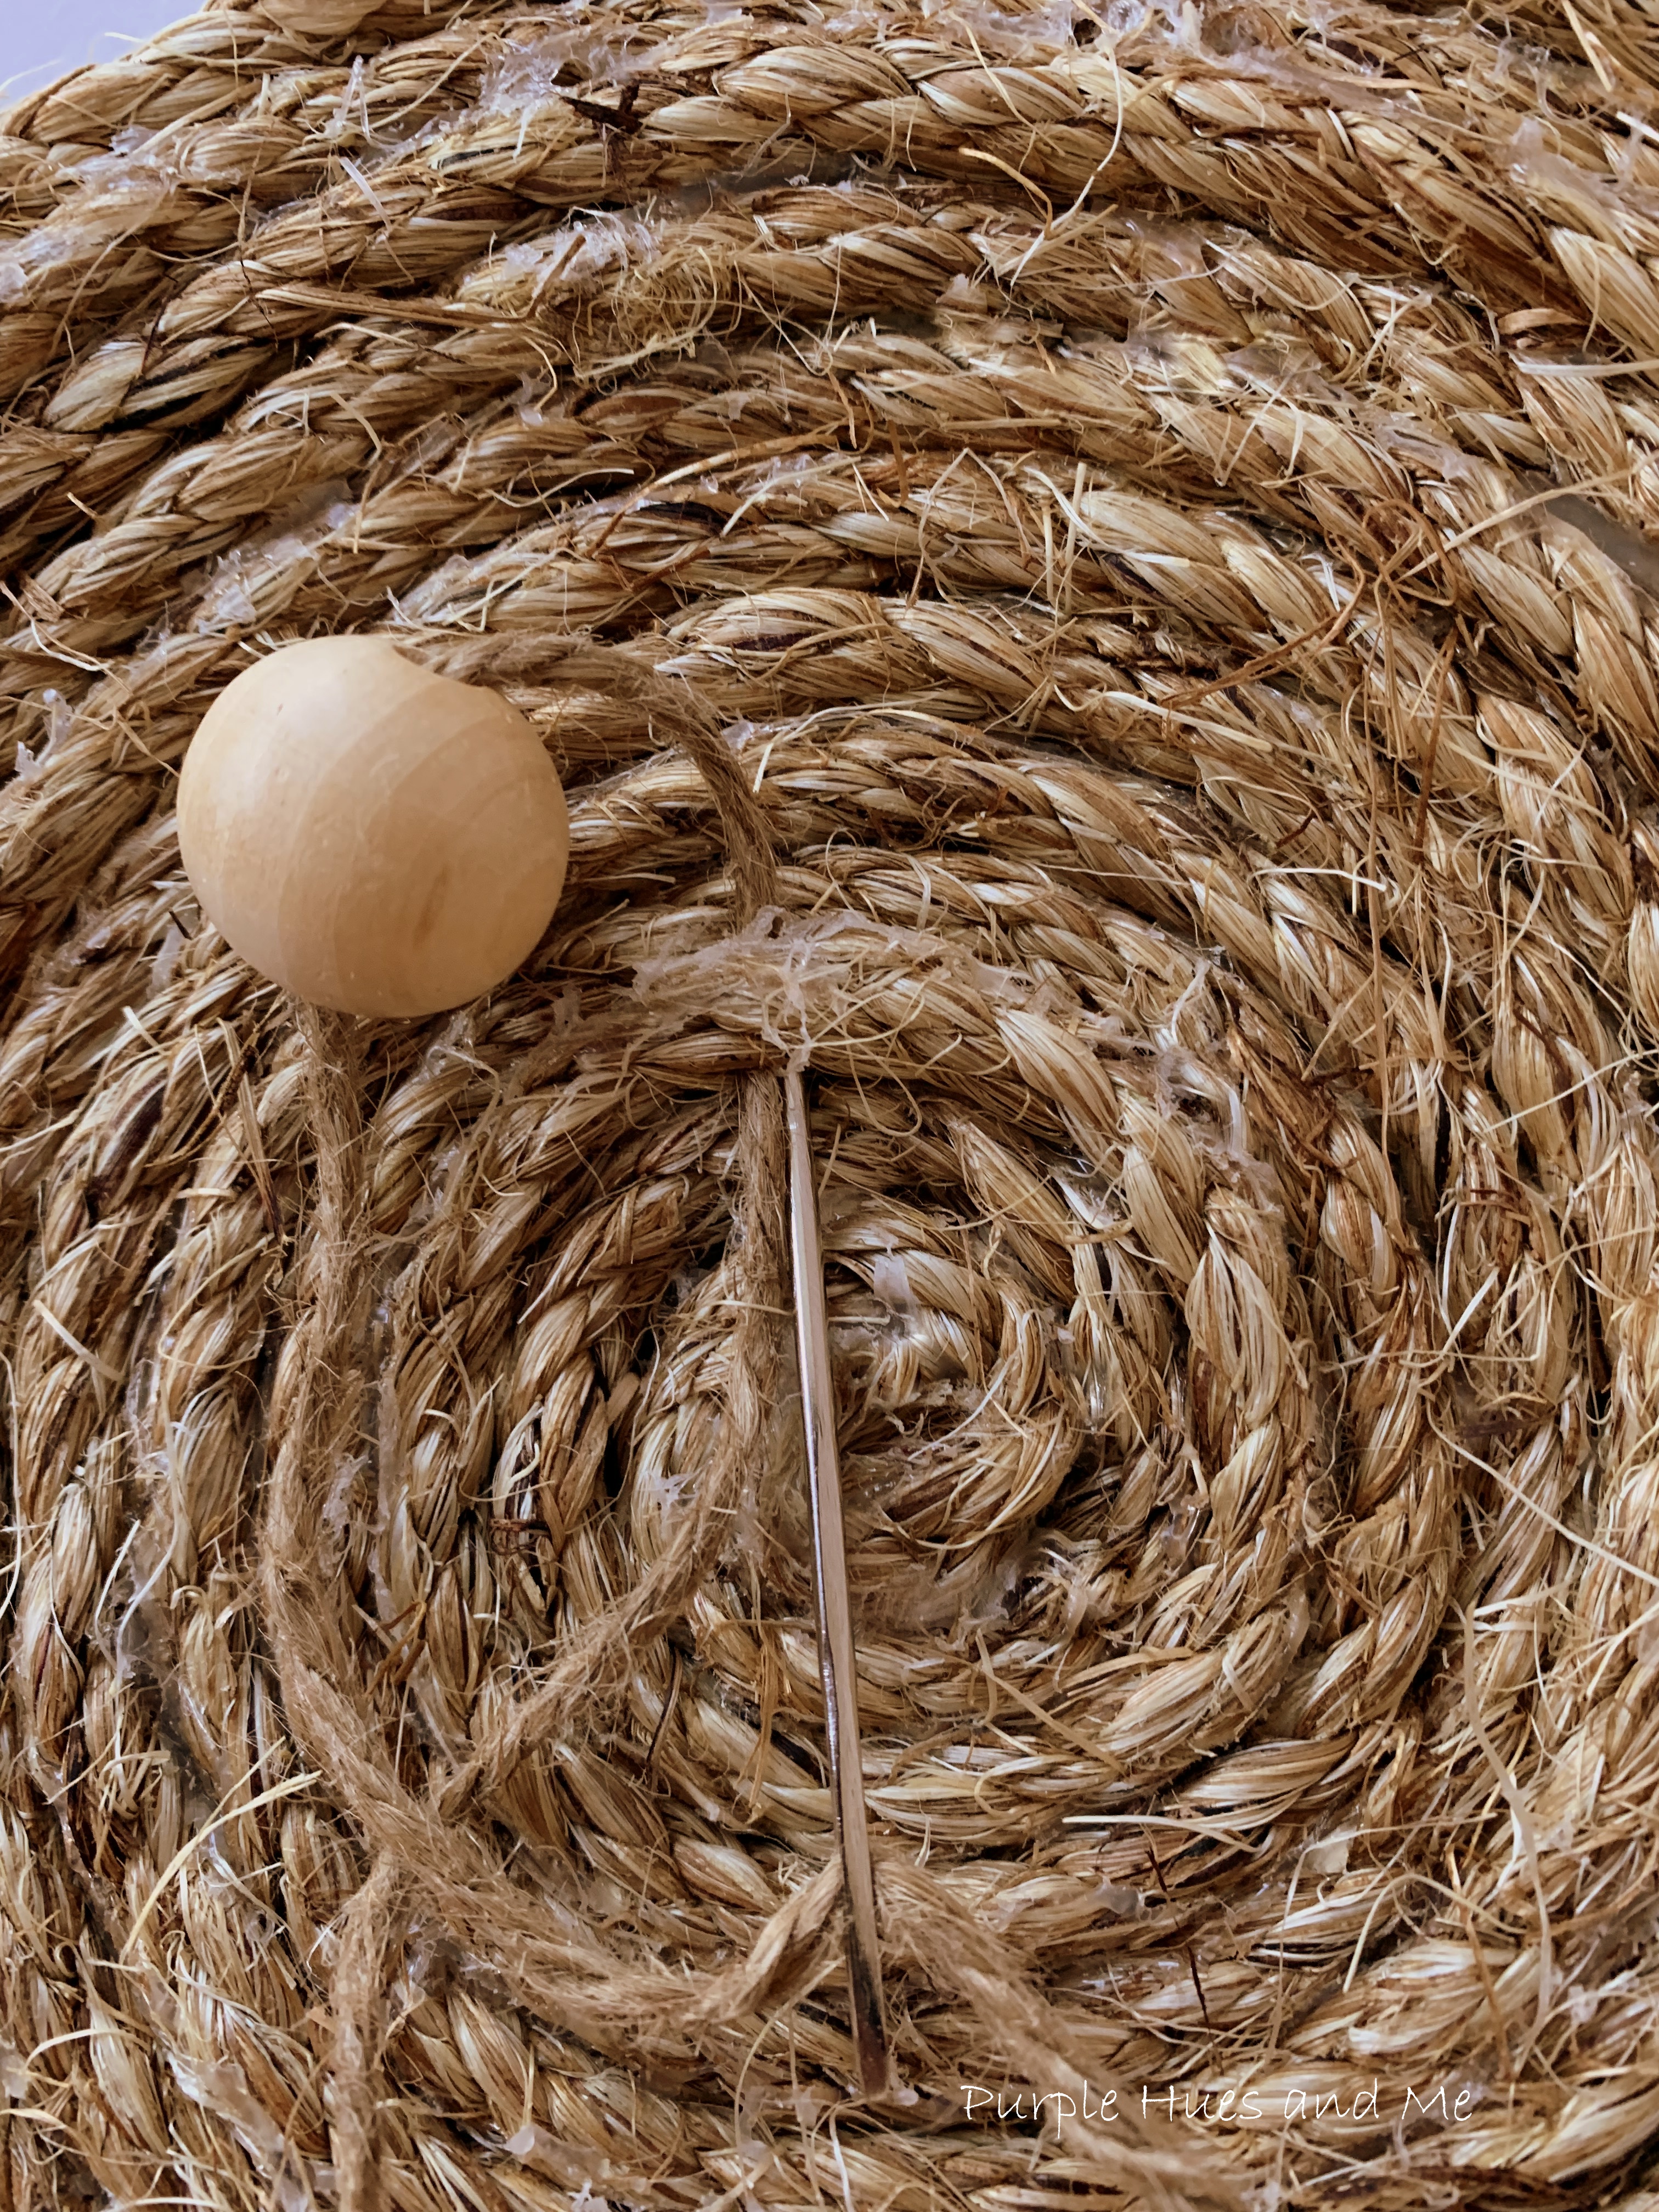
Then attach the middle of the bag to the edge of the rope circles using hot glue. First one side and . . . then the other side.To make the shoulder strap, I cut off nine 60" lengths of twine to braid.Then wrapped each end around the bar on the swivel hooks (which I removed from an old bag)and wrapped the ends with twine and sealed with hot glue.Use a heavy duty wide eye needle and twine to . . .attach the ball closure.
Then braid a three strand twine strip into a loop to . . .attach to the back of the bag.And there you have it! A beautiful boho type bag for summer!
Up next is Cecilia @ My Thrift Store Addiction sharing her beautiful birdie for the garden! Be sure to stop by each and everyone in our creative group listed below to check out their exciting and inspiring project! And don't forget to pin, too!
DIY Patriotic Star Door Hanger | Terri | Decorate and More with Tip
Seaside Serenity: Crafting Your Own Coastal Farmhouse Lantern! | Niki | Life As a Leo Wife
Dollar Tree Stencil Craft on Canvas | Allyson | Southern Sunflowers
Pedestal Serving Tray | Jenna | The Painted Apron
DIY Coiled Rope Shoulder Bag | Gail | Purple Hues and Me
Blah to Blue-tiful Birdie Upcycle for the Garden | Cecilia | My Thrift Store Addiction
How to Make a DIY Patriotic Pillow | Carol | Bluesky at Home
Homemade Gift for Dad | Sara | Birdz of a Feather
Easy Painted Rocks | Ann | The Apple Street Cottage
Re-cycled Patriotic Sign | Tammy | Patina and Paint


 The attached self adhesive felt will be the lining of the bag.
 Next, measure around the coiled rope to determine how much self adhesive felt to cut for the middle side. (17")
 Then cut out a piece 17"x3.5" long and wide. Because the manila rope is so stiff, I will use twine to cover the self adhesive felt for the middle side of the bag.


Fabulous summer project Gail! Just the perfect size to hold all the summer essentials!
ReplyDeleteThanks Sara! It's been on my list to make for summer for awhile now. I can now cross it off, lol! Thanks for hosting this awesome hop! I truly enjoy it!
DeleteYou neve cease to amaze me Gail. How neat is this tutorial on making a cute hang bag. Love it. You are so creative!!!
ReplyDeleteThanks so much for your sweet comments, Terrie! I've been wanting to make this for sometime now. Glad I did!
DeleteThis is truly amazing Gail! Only you could take a roll of rope and twine and create a fashionable purse! The way you did the bottom with the strap hooks and the way you did the fastener are just genius! Thank you for the shout out and very sweet words :) Happy Crafting!
ReplyDeleteJenna
Thanks, Jenna! You're so sweet! You know I always look forward to your creations!
DeleteGail, what a darling bag! You are so talented, my friend!
ReplyDeleteThanks so much Cecilia! It's always fun coming up with a craft for this hop! All of you are so creative!
DeleteThis is fabulous, Gail! I never could have come up with this idea. Very clever!
ReplyDeleteThanks so much, Ann! Making this bag was on my to-do list for so long. I'm glad I finally made it!
DeleteWow, Gail you made such a pretty handbag for summer. You did a great job making it. I hope you enjoy using this bag for the summer.
ReplyDeleteThanks, Julie! I've already tried it out and it works for summer. Just enough room for my small amount of stuff! Have a great weekend!
DeleteYou always amaze me in your precision on all of your crafts but this one is perfect! Thanks for sharing. Great job!
ReplyDeleteThanks for your sweet comments, Tammy!
Deleteso clever and you make it look so easy - what a fashion statement!! well done!
ReplyDeleteWhat a great DIY! I've made rope trays with handles, but never a purse! This is so creative. I always love all of your baskets and containers and now purses! Pinned.
ReplyDeleteNiki
Very ingenious project, Gail. I know you’ll get such enjoyment out of using your unique purse.
ReplyDeleteWow, your shoulder bag is very impressive!! It looks like it should be sold in a fair trade type of shop. Perfection!
ReplyDeleteThis is such a creative and hard work article. Making a bag with rope is such a difficult work. I am really impress by your work. Thanks for sharing with us. Now its time to avail Limo service West Palm Beach for more information.
ReplyDeleteThis is a nice post. Thank you for sharing. Appliance Removal
ReplyDelete