
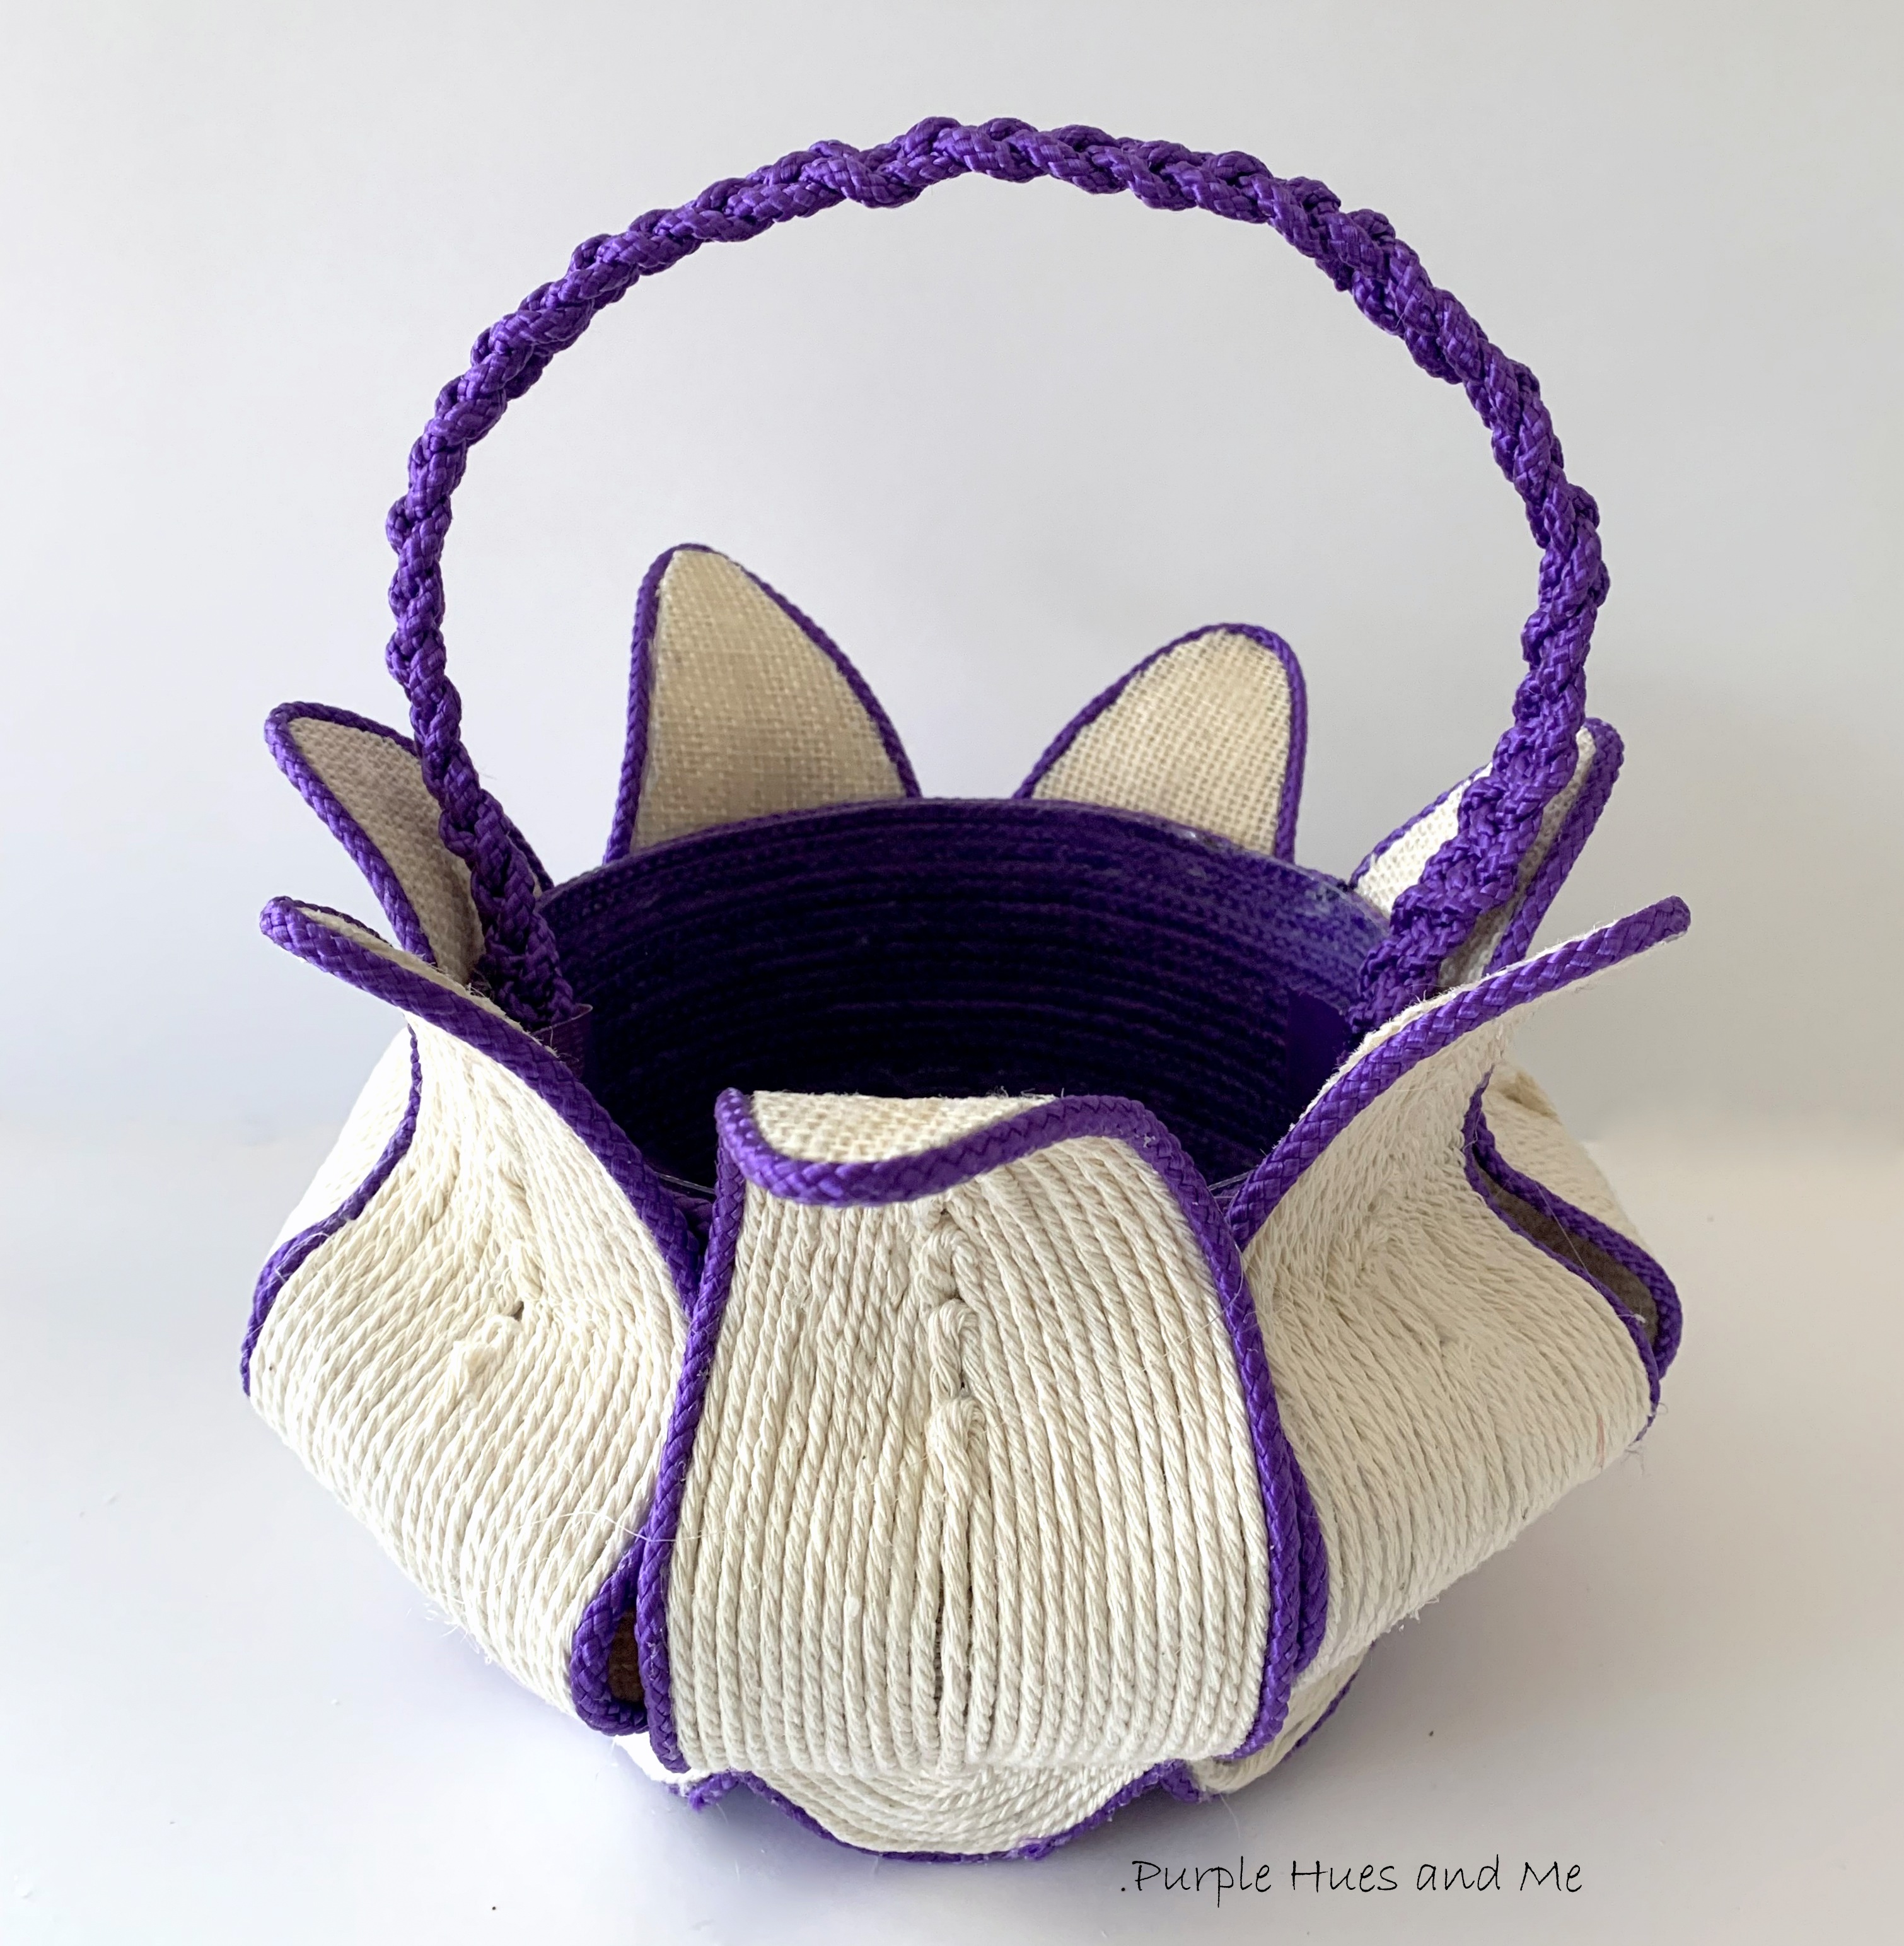
Here's a fun and quite unusual looking DIY basket that's ideal to make for spring, Easter or just about any decorative theme! Perfect to share on this month's Creative Craft Hop hosted by Sara @Birdz of a Feather! If you are visiting from Terri @Decorate & More with Tip, WELCOME! Wasn't Terri's Texture Bunny Wall Plaque adorable! Getting back to my basket, don't you just love the cool effect of the curved "flower leaves" that enhances the basket! Want to know how I made this? Just follow along with me!
Materials used:
Recycle plastic container
Hot knife/marker
Poly cord (5/32" 75ft)
Leaf template/pencil
Burlap
Macrame cord 3mm 109yds
Starbond super glue/Fabri-Tac glue
Parchment paper
Hot glue gun
Duck tape
Disclosure I am a participant
in the Amazon Services LLC Associates Program, an affiliate advertising program
designed to provide a means for us to earn fees by linking to Amazon.com and affiliated
sites, this post may contain links. I may receive a very small commission at no
cost to you! The affiliate money I earn helps pay my crafting expenses. Thanks
so much for your support!
I started with a seven inch tall clear pretzel container that I washed and removed the label and let dry. I don't know what happened to the top.

Anyway, I wanted to remove a portion of the container to make it shorter. So I got out my hot knife and marker - plus a jar to hold the marker in place while I twirled the container around - marking the area to cut off.


This is already looking cute, especially done in purple, lol!

Now we need to make large flower leaves to add around the cord wrapped basket. Here is a lovely leaf template that you can copy and paste in any size that you like. The leaf pattern I'm using is 7 3/4" tall and 2 3/4" at its' widest part. Next I measured around the container - 19" - and divided that by 2.75 and got 6.9 which is almost 7.

So I drew seven leaf patterns following the template onto burlap and . . .

 I started out using hot glue since I didn't have enough of the Starbond super glue. Then I switched to Fabri-Tac fabric glue after burning my fingers more than I cared to say! Ouch!


How cool does this look. Flex the leaf to make it more pliable since it will be glued down in sections on the container..


Then make a four cord braided handle by taping down (duck tape) four cords long enough to make a handle. Straightening the cords, look at them as groups of two. For the first group of two, take the far right cord over the left cord - which is right next to it. Then take the next group of two, right over left.


Continue right over left, right over left and . . .


The wrap the ends of the handle with extra cords and glue them in place on the inside of the basket. Make sure to use a lot of glue to keep the handle attached. Glue on a group of short strips of cords across the ends of the handles for extra hold.

I am loving how this basket turned out and hope you are too!

Up next is Allyson @Southern Sunflowers sharing her adorable Easter Photo Frame Craft with Bunnies. Be sure to stop by each and everyone in our creative group listed below to check out their exciting and inspiring project!

Carol, @Blue Sky at Home - 2 Cute DIY Planters for St. Patrick’s Day
Cecilia, @My Thrift Store Addiction - Mini Mushroom Garden Sign Makeover
Terrie, @Decorate and More with Tip - DIY Texture Bunny Wall Plaque
Gail, @Purple Hues & Me - Flower Leaf Cord Wrapped Basket
Allyson, @Southern Sunflowers - Easter Photo Frame Craft with Bunnies
Jenna, @ The Painted Apron - Spring Bunny & Ribbon Carrot
Donna, @Modern on Monticello - Tile Marbled Magnets using Nail Polish
Sara, @Birdz of a Feather - How to Remove Rust From Metal
Niki, @ Life as a Leo Wife - St. Patrck’s Day Garland
Leanna, @Pretty DIY Home - Spring Bunny Mantel Decoration
Tammy, @Pantina and Paint - DIY Riser


You always bring the wow factor Gail! What a fun basket; I'd use this year 'round!
ReplyDeleteThank you so much for your sweet comments, Sara! I would use it year round, too!
DeleteGail, this basket is absolutely amazing! Who knew you could make something so beautiful out of a plastic container and cords! This is beyond creative, how did you ever dream this up?? I love the purple and white, so pretty! Your patience with intricate crafts like this is so impressive. I've not heard of that Starbond glue, I need to look into that. Your tutorial is so thorough, it was fascinating to see all the steps. Enjoy this special creation, it is beautiful!
ReplyDeleteJenna
Thanks so much for your sweet comments, Jenna! I'm glad you like it! That means a lot! I can get carried away with making something not realizing how time consuming they can get.
DeleteYou always intrigue me on things you create Gail. Your tutorials are clear and easy to follow. Thanks for sharing this adorable basket. I can see my grand daughter carrying this to find her Easter eggs. Thanks for the inspiration!
ReplyDeleteYou are quite welcome, Terri! And thanks! Yes, I can see your adorable grand daughter carrying this for Easter! She's a cutie!
DeleteGail, you are so talented at creating beautiful crafts--pinned!
ReplyDeleteMany thanks, Cecilia!
DeleteOh my goodness! You are one talented lady! This basket is so cute and I know took some time and a lot of skill. GREAT Job Gail!
ReplyDeleteThank you so much, Tammy! I had it in my mind to make this and glad I didn't quit before finishing it!
DeleteThis is so talented Gail. I love how creative it is. The perfect basket for a fairy garden, full of whimsy and flare.
ReplyDeleteGee thanks so much for you kind words, Leanna! Yes, it would be perfect in a fairy garden!
DeleteGail, the detail of your projects always amazed me. This project is another winner, for sure. Thanks for sharing how to use cording and make flower petals.
ReplyDeleteYou are quite welcome and thanks for your sweet comments, Carol!
DeleteWow, this turned out so good! I love the 3-D leaves. I never thought about placing a marker on something while rotating the object you're marking. Thanks for that tip! Pinned.
ReplyDeleteNiki | Life as a LEO Wife
You are quite welcome, Niki! And thanks! I was quite pleased how the leaves turned out. And that marker technique is the only easy way I know how to draw a even line around objects. The idea is really old, lol!
DeleteYour basket looks wonderful and is so creative and unique! You sure had a creative vision to see a basket from a plastic container. Love how you always think outside of the box!
ReplyDeleteYour basket is fantastic and your tutorial is very clear and easy to follow. After innumerable glue gun burns, I invested in the hot pink finger protectors at Dollar Tree--but still usually end up burning a finger that doesn't have one!
ReplyDeleteThanks so much, Kathy! I do have some finger protectors, but as usual, couldn't find them!. I have a knack for hiding things from myself!
ReplyDeleteUn maravilloso trabajo Gail!!
ReplyDeleteGracias por tus explicaciones.
BESOS
¡Gracias por visitarnos y por tus dulces comentarios, MJ!
DeleteWowza, that is so clever, so intricate looking and yet made from such simple materials.
ReplyDeleteI am visiting from Handmade Monday. Wow, this turned out beautifully! These would be adorable as Easter baskets, I really like the way you were able keep that plastic from the landfill! Thank you for sharing.
ReplyDeleteVery cute basket Gail. So clever and so pretty. I am pleased to feature your Flower leaf cord Wrapped basket at Love Your
ReplyDeletecreativity.
Wow, really great blog. I like this blog and you put a great effort into this blog. I really appreciate your effort. I am gonna be sharing this blog with my friends. Now it's time to avail airport transfers manchester for more information.
ReplyDeleteYour tutorials are clear and easy to follow where's the closest suntrust bank
ReplyDeletethanks for sharing this adorable basket. I can see my carrying this to find her.
Modern and hard ships are quoted for the apprehension for the goals. The nature of the Annual USDOT Permits is filed for the options. Matter is fit for the terms for the width for the ideal paths for the partnerships in this ambit.
ReplyDeleteNice post. Thank you to provide us this useful information.
ReplyDeleteBring unforgettable comedy fashion to life with our Dumb and Dumber suits , inspired by the cult-classic Dumb and Dumber. Designed with premium fabrics and eye-catching colours, this suit offers the perfect balance of comfort and standout appeal. Ideal for costume events, parties, or viral moments, it’s more than just a suit it’s a conversation starter.
ReplyDelete