Sunday, April 14, 2019

Friendship Tea Gift Jar


I came across the Friendship Tea recipe many years ago in a newspaper column, "Hints from Heloise!" Heloise was extremely popular and continues to be right now with lots of lifestyle hints including recipes like Friendship Tea. 

2 1/2 C - Tang
1 3/4 C - Instant unsweetened tea
1/2 C - CountryTime instant lemonade
1 1/2 teaspoon ground cloves
1 1/2 teaspoon ground cinnamon

There are so many variations of the original recipe, like the one above.  Back then, sugar intake wasn't that much of a concern and the original Heloise recipe called for up to 2 cups of sugar. Yikes! In making mine, I eliminated adding any kind of extra sugar - The powdered orange flavored breakfast drink (Tang) and instant lemonade (CountryTime) contains more than enough sugar. Plus, you can also make a version using sugar free substitutes.

Once you've gathered all the ingredients, mix them together really well. I made sure that they were - by dumping the ingredients from one bowl to another, stirring together to make sure the ingredients were blended.


Once mixed together, place into a glass jar and seal tight! That's it! So simple!

The recipe makes the perfect gift for friends and family! Who doesn't love sipping tea with friends!  So I decided to decorate the jar by making a couple of labels to place on top of the lid and on front of the jar.

I found a design here which I tweaked for size, and added special wording.
For the lid label I printed out how much to mix for a drink:  Add 1-2 rounded teaspoons to 6-8 ounces of water. 

Then cut out the labels, adjusting to fit, and Mod Podge them on the jar and lid.


Next, braided baker's twine and .  .  .


glued in place starting at the center around the lid.


For a decorative effect!  Aren't the colors pretty!


The perfect friendship gift to share - so tasty to drink, hot or cold!


 I am a participant in the Amazon Services LLC Associates Program, an affiliate advertising program designed to provide a means for sites to earn advertising fees by advertising and linking to Amazon.com. This post also contains affiliate links.  I may receive a very small commission.  It does NOT result in additional charges to you or cost you anything extra.  The affiliate money I earn per month helps pay my crafting expenses. Thanks so much for your support!

I'm part of the Creative Crafter's Group hosted by Janet @Try It, Like It, Create It, on Facebook where we are challenged to create  themed projects on the 15th of each month.  The theme for April is Mother's Day or Friendship.
Can you guess which one I picked?

Be sure to check out all the participants to see what awesome projects they created!

You are invited to the Inlinkz link party!
Click here to enter

Wednesday, April 10, 2019

Twine Wrapped Egg Holder DIY - Not just for Easter


Here's a great way to make something adorable out of those cheap plastic eggs you see at Easter time - a twine wrapped egg holder! How cool is this! Perfect to use in your table settings for Easter breakfast, brunch or celebration. And the best part, you can use a variety of colorful threads - jute, baker's twine, hemp, yarn and even embroidery floss - plus ribbon and trim for any season or holiday! Who doesn't love a pretty egg holder!

You will need:
Pkg of plastic eggs 
Twine 
Fabri-Tac fabric glue
Clamp 
Ribbon
Hot glue 


 I am a participant in the Amazon Services LLC Associates Program, an affiliate advertising program designed to provide a means for sites to earn advertising fees by advertising and linking to Amazon.com. This post also contains affiliate links.  I may receive a very small commission.  It does NOT result in additional charges to you or cost you anything extra.  The affiliate money I earn per month helps pay my crafting expenses. Thanks so much for your support!

Let's begin by making sure your plastic eggs are large enough to hold an egg inside when open. I found a nice pack of 6 for $1 at the dollar store. 


 First, open the plastic egg into two pieces.
Place a hefty amount of Fabri-Tac glue in the center bottom of one of the half eggs. You'll need a quick-grab glue that dries clear.  Hot glue can get very messy and might seep through or melt the plastic. Grab the end of the twine and begin twirling it around in a circle, placing down on top of the glue. Hold in place until it's secure and doesn't move. 
Begin twirling the twine around the egg, adding glue along the bottom of the twine and plastic. 
Be sure to wrap the twine as close together as possible, while keeping the rows evenly pushed together.  You'll get the hang of it!
Add glue along the bottom of the twine and plastic periodically as you wrap. 
Continue wrapping and gluing the half egg until reaching the end. Then cut the twine at an angle to blend in and secure the end with more glue.
Repeat the same steps for wrapping the other half egg.
For the braided trim, measure around the widest top portion of one of the halves, doubling the amount plus three-four inches extra. Cut six strands of twine the measured length and tie one end into a small knot and clamp. I used the handle on a drawer to wedge the clamp and twine strands.
Divide the strands into two's - you will have three, two strands to loosely braid together, for the trim. 

Add glue to the braid ends (saturate both sides) and let dry.  

Measure braid around the egg end and add more glue to the finished braid where it ends on the edge to keep it from unraveling when cut. Let dry. Cut braid at an angle to fit and glue in place for both pieces. Let dry.

Place the smaller egg portion on a flat surface, bottom up, and hot glue the larger egg portion centered on top, as pictured, for an adorable egg holder!

 Tie a ribbon around the middle into a bow for a decorative look!

Have fun decorating eggs to match your egg holders!

What a fabulous way to dress up a holiday table setting!
But you can keep it plain, too! It still looks quite lovely!
Thanks for stopping by and take a little time to enjoy,
Happy Crafting!

Monday, April 8, 2019

Thrift Store Tray Re-Make


Hey there! It's that time again for our 
Monthly Challenge Blog Hop!
I've joined a group of creative bloggers to bring you a monthly challenge blog hop. On the 2nd Monday of each month we share our themed creations for the month. 
 
The theme for April is Thrift Store Find Makeover Challenge where we upcycle/repurpose an item we found at the thrift store for twenty dollars or less!
You can never have too many trays, so it was a no-brainer when I found this one at the Goodwill for $3. Almost everyone loves to use trays in their decor including me!

Let's begin by removing any stickers, cleaning off dirt and residue using a mild cleaner like liquid Dawn dish soap mixed with water and a rag. Gently rub while removing debris and do not soak the wood. Let dry.

I had a wood stain in my stash that I've wanted to use for a while now called Rust-oleum Sun Bleach.  I had to go outside to paint it on the tray because of the smell.  Thank goodness it was a nice day!  

 I don't know if the stain was too old or what, but I was surprised how thick it went on and how long it took to dry!  I should have dry brushed it on. So, once it did dry, I sanded the wood to expose some of the darker areas a bit.
Then I found a free floral image online, sized it to fit the inside tray and printed it out using a laser printer. 
Next, applied a heavy coat of Matte Mod Podge to the inside bottom .  .  .
smoothing out the paper design and let dry. Applied another coat of Mod Podge and let dry, again.  You can also apply a sealer to protect the paper and design if you plan on using the tray a lot.
And there you have it!
 A unique and inexpensive decorative tray to use just about any where in your home! 


Meet this month's co-hosts!

Sum of Their Stories | Sew Crafty Crochet

Be sure to check out all of our hosts creations, ideas and inspirations for this month's Thrift Store Makeover Theme!

See you next month for our Upcycle Challenge using Cardboard, Paper or Wood!

You are invited to the Inlinkz link party!
Click here to enter

Friday, April 5, 2019

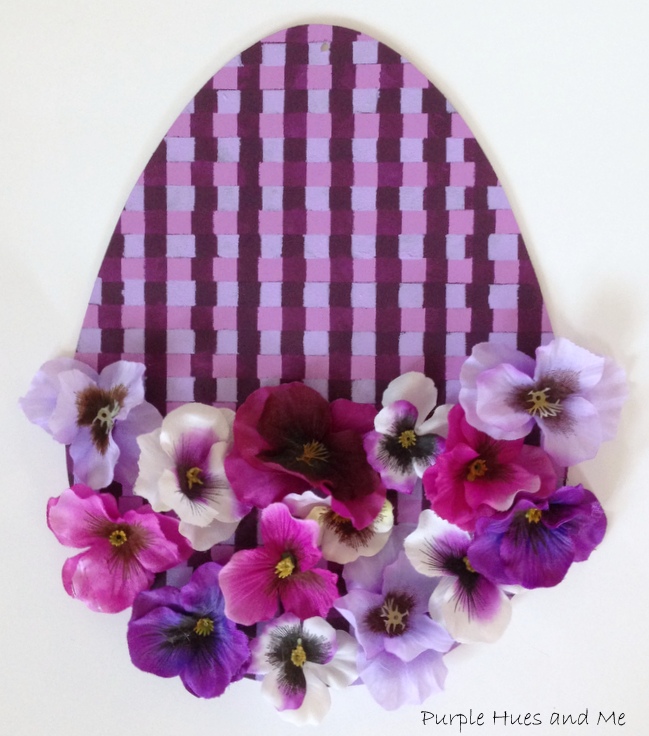
DIY Checkered Plaid Egg with Flowers


It's the first Friday of the month and today's the day I bring you a fun themed craft to share at Bring On the Crafts Blog Hop!
The theme for this month is Flowers!
Flowers are blooming all over! What a great way to celebrate Spring and Easter too by painting and creating  a checkered plaid egg adorned with delicate pansy flowers! How cute and trendy is this!  And plaids and checks continue to be quite popular these days! But flowers always add a special touch to just about anything!

Re-create this look by using:
  • Wood cut-out egg 
  • Acrylic craft paints 
  • Painter's tape 1/2"
  • Sponge brush
  • Faux pansy flowers 
Let's get started with a plain wooden cut-out egg that I found at the Dollar Tree!
Paint on a base color of a multi-surface acrylic craft paint like this pretty Heather color!
Next, find the center or middle of the egg and place the first strip of 1/2" painter's tape down on the egg. Smooth out the tape flat so no paint will seep under.
Then place another piece of tape right next to it. This is what's called a temporary spacer tape.  You can place it down on either the right or left side. The space filler tape provides a guide for making sure the next painter's tape lines are placed down straight and evenly spaced. 

Put down a third piece of tape next to the spacer piece. Then remove the spacer tape.
Continue placing a spacer tape down and placing a new tape next to it, removing the spacer tape, etc. until the egg area is completely covered with painter's tape. Be sure to smooth out the edges of all the painter's tape.

Once all the painter's tapes are in place, begin painting the area not covered by the tapes. Lightly use a sponge dabber to cover this area.I painted on the color Eggplant for this.  

Once the area is painted, remove the painter's tapes and let dry.
For the horizontal stripes - like before - find the center of the egg and begin laying down the first strip of painter's tape. Use the spacer tape next for tape placement and then a strip of painter's tape, etc. the same as before with the vertical painter's tapes.

Continue adding  painter's tape with a spacer next, then another painter's tape, etc. until the egg is covered again with painter's tape. Be sure to smooth down all the edges of the painter's tapes, as before.
Once all the tapes are down and smoothed out, dab paint on the open areas. I used the Eggplant color again for a checkered look.

Next, I removed the painter's tapes and thought the egg was too dark. (Sorry, I didn't take a picture of this) So, I tried putting painter's tape back on following the previous painted stripes.
And painted the open areas using a lighter color called Light Lavender. I needed to apply two coats of this to cover.
Now after removing all the tapes, it looks so much better! But obviously, I didn't quite lay the tape exactly over some of the lines. Do you notice the variations? Looks like a new look for lines, huh? Sorta like a houndstooth design!
A mishap that I'm really loving!!!! But probably will never be able to re-create again! Lol!

And finally, remove the stems from pretty faux pansies leaving the petals intact  and glue them on to enhance the look of the egg and to make it look extra pretty!

Yes,  flowers are blooming all over!


Join us for this month's 

Bring on the Crafts 700 x 550

Bring on the Crafts — A Craft & DIY Blog Hop

On the first Friday of each month, a group of DIY and crafty bloggers join forces. Together with hosts Marie from The Inspiration Vault and Habiba from Craftify My Love, they bring you the #BringontheCrafts blog hop. Each blogger creates a fun craft or DIY project to share that follows a monthly materials theme. April's theme is Flowers! Each blogger chooses their own craft to make as long as they love it and it uses Flowers in the project.

Our April Co-hosts

Jenny @ Cookies, Coffee and Crafts • Heather @ Glitter on a Dime •
 Marie @ DIY Adulation • Michele @ Coastal Bohemian •
 Terri @ LifeOur Good Life • Gail @ Purple Hues and Me

Join in on the fun! If you'd like to participate next month, you can request to join our Bring on the Crafts Facebook Group. Next month's theme is Stamps!
Not a blogger, but a creative mind none the less!? Don't worry, Share your awesome creations in our Craft Cult Facebook Group. This is also a great place to ask craft & DIY related questions and find inspiration for your next project.

You are invited to the Inlinkz link party!
Click here to enter