Saturday, May 24, 2025

Textured Flowers Vase DIY


 For this "Do Over" project I'm going to upcycle a Lysol Wipes container into an adorable textured flowers vase using caulk. It's a fun way to add texture, depth and dimension to outlined or sketched flowers! And you won't believe how easy it is to add character, and interest to those types of flowers giving off a three dimensional appearance.

Welcome to our "Do It Over Designers" Blog Hop! In case you haven't heard, the "Do It Over Designers" is a group of creative bloggers who love to recycle/upcycle/ DIY, hosted by  Anne @The Apple Street Cottage. It happens the 4th Saturday of every other month and it's all about taking something old and/or unused and 'doing it over' into something new. Thanks Anne for hosting this wonderful blog hop!


So let's get started by gathering the .  .  .

Supplies:

  • Lysol Wipes container (empty)
  • Box cutter knife
  • Flower image
  • Pen marker
  • Caulk tubes (Dollar Tree)
  • Scissors
  • Tools to create texture - (palette knife, spoons, small handles, brushes, etc.)
  • Paint/Sealant
  • Paint brush

As an Amazon Associate, and partner with other brands, I earn from qualifying purchases. This post may contain affiliate links, meaning I receive commissions for purchases made through those links at no cost to you.

How to:

First, use a box cutter knife to remove the top of an empty Lysol container.


Then make sure the container is clean inside and out - removing the label and glue residue from the outside and rinsing out the inside. 

Since I can't draw a lick, I found a flower image online and .  .  .


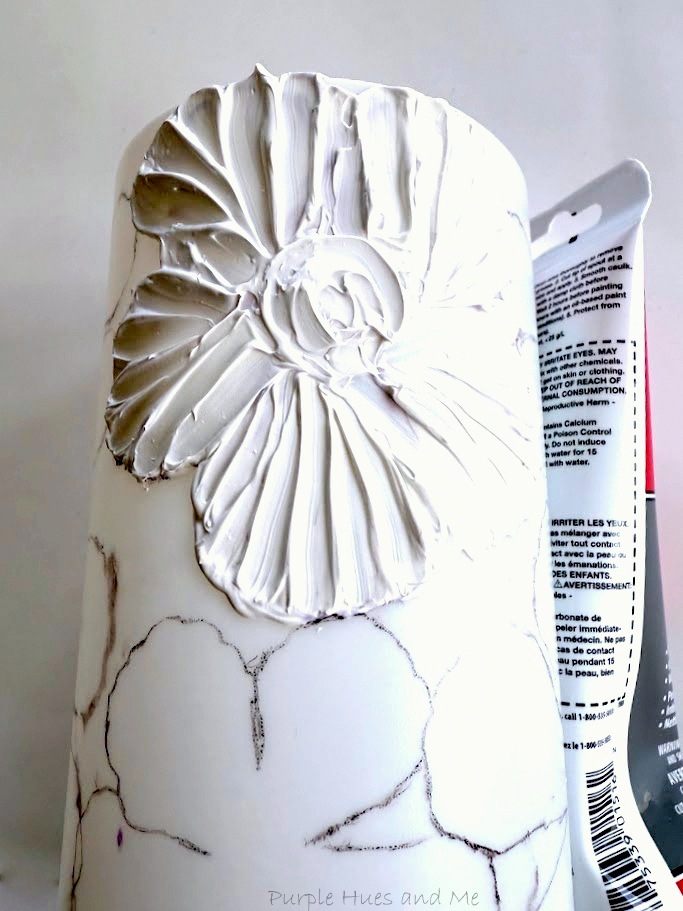
sized it in two different shapes to draw all over the plastic container.

I have to say that I found it difficult to outline the flowers on the plastic. I tried a pencil and a regular pen but those didn't work. And the magic markers I have had very thick tips which I didn't want to use, so I ended up using a rollerball pen. I was able to draw fine lines but it was prone to smudging, as you can see. 
And instead of mixing paste into a piping bag to use like most textured flowers are made from - I'm using caulk tubes from the Dollar Tree to outline, sculpt and fill-in the flower petals - creating a unique floral design using different types of tools.

It's truly a very inexpensive and easy way to add three-dimensional detail to craft projects! 

  Once happy with the design, wait for the caulk to dry - from a few hours to overnight.


Then have fun adding color (paint) to finish the flowers! Paint can also be used as a sealant for the caulk, too! I'm using paint I had on hand called Light Plum which is an outdoor gloss acrylic paint by FolkArt. 

I didn't realize the paint was a gloss finish until after it dried. And that turned out to be great for a glossy look!

I love how the gloss paint enhances the lines and shape of the caulk!

Continue painting all of the caulk flowers .  .  .
until they're all painted!
Once the paint is dry, the pen smudges can be cleaned up with a damp paper towel or wipe.
Then have fun adding flowers of your choice into this unique 
textured floral design vase.

I hope you enjoyed how I created my textured flowers vase! But don't stop here or forget that this is a blog hop!  

Be sure to visit all of this month's creative projects by the  "Do It Over Designers"  listed below:           


Tuesday, May 13, 2025

Beaded Wire Floral Candleholder


 Hello and welcome to our Creative Craft Hop for the month of May! We are delighted to have two hosts - Donna @ Modern on Monticello and Sara @Birdz of a Feather! They each take turns hosting every other month! Thank you ladies for hosting this awe-inspiring Creative Craft Hop! The lovely and talented Sara is our host this month!  


Today, I'm going to show you how to enhance your decorative space with a lovely unique candleholder craft idea! A beaded wire floral candleholder! Made in the shape of flower petals surrounded by purple beads that look like pearls around the top of a DollarTree candleholder! It's surely a great embellishment to make for home decor! One with a color changing feature that's perfect for adding a vibrant look and touch to your color scheme - inside or out! And the best part, it's a super fun project to create - so gather the supplies listed and let's get started!

Supplies

Disclosure I am a participant in the Amazon Services LLC Associates Program, an affiliate advertising program designed to provide a means for us to earn fees by linking to Amazon.com and affiliated sites, this post may contain links. I may receive a very small commission at no cost to you! The affiliate money I earn helps pay my crafting expenses. Thanks so much for your support!


How To:
Start by cutting the wire 24" long. Because the wire is a thin 26 gauge from DollarTree, I'm folding the wire in half to make it stronger to thread the beads onto it.

 It's easier to put the beads in a plastic bowl and gather them up from there - counting out 29 beads per petal.
Once you have 29 beads on the wire, fold it in half in the shape of a flower petal, twisting the ends together to close using needle nose pliers.
For this project, you will need to make 16 beaded petals. 

Once all the petals are made, begin adding glue along one side of the beads (one petal at a time) .  .  .


and press each one down on top of the clear plastic film to dry. You may have to lay a heavy flat surface on top to make sure the beads are completely adhering to the plastic while drying. Not shown: I used a large cutting board placed on top of the petals that was weighted down with a huge book until dry.

Once the petals were dry, the clear plastic was cut off around the outside of the beaded petals.
 Then give the petals a bit of curvature by slightly bending!  
Measure the petal's wire on the side edge of the candleholder and cut off excess wire using wire cutters. Then begin gluing the petals onto the candleholder in a clockwise positions using hot glue first

pressing the petal wire into the hot glue. Once the hot glue has dried, use a more reliable, permanent glue like Quick Hold glue by the makers of E6000 to hold the petals in place. Take my word that hot glue Will NOT hold the petals in place for any length of time. They will fall off if a permanent type holding glue is not used.

Continue adding the petals onto the side of the candleholder using clockwise positions 12, 6 .  .  .

3 and .  .  .
9 positions.

Plus the remaining clock positions of 1, 2, 4, 5, 7, 8 and in between too, for a cool open petals or flower look!

Once done, cover the petal stem wires with double-sided tape around the side of the candleholder.


A decorative purple and gold trim was added to cover the double sided tape.
What a gorgeous look!
With the colorful flameless tealight in place!
Giving off beautiful colors .  .  .
especially at night!
You know I'm especially loving this in purple!

I hope you enjoyed how I made this beautiful beaded wire floral candleholder!

Up next is Carol @Bluesky at Home sharing her easy and amazing paint project you don't want to miss!   

And be sure to visit all of the talented bloggers sharing their awesome creations listed below: