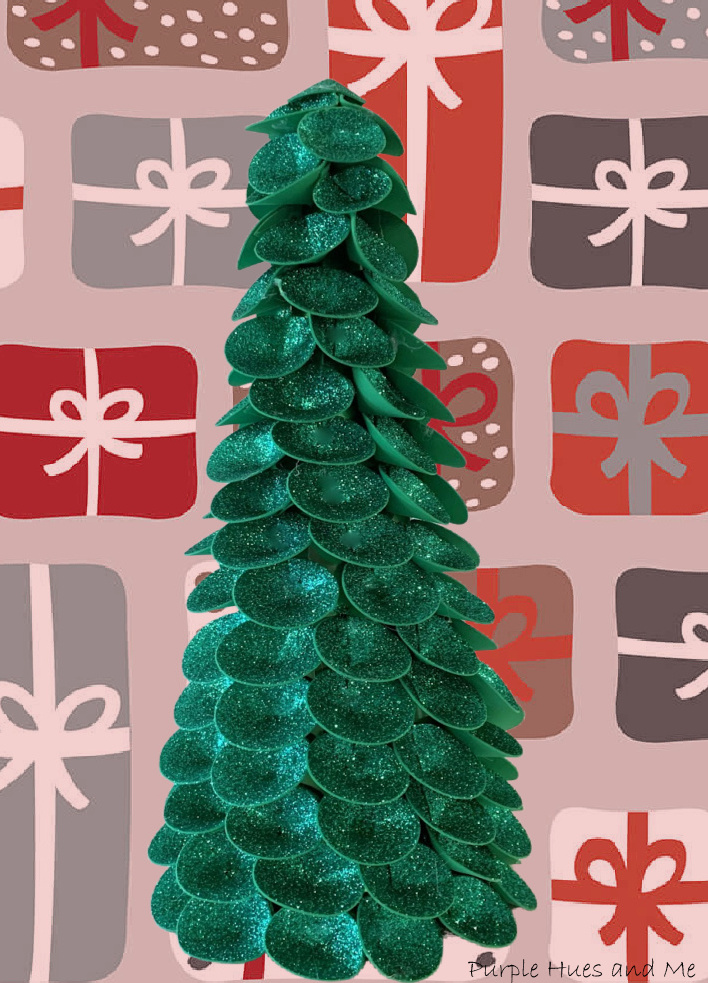
Showing posts with label Christmas Craft DIY. Show all posts

Monday, November 14, 2022

Tuesday, November 1, 2022

Glitter Foam Christmas Tree Ornament


 Eva Foam sheets is one of my favorite craft mediums. I love using it because you can twist, pull and even heat it to form amazing craft items. Just take a look at a couple of  Christmas decorations I made several years ago here and here. And I love making flowers of eva foam, too! 

There are lots and lots of diy glitter foam ornaments on Pinterest. I love using glitter foam sheets, as seen here and here. It's such a versatile and easy material to work with, that's why I chose it to make a darling eva foam tree ornament similar to one I first saw on Pinterest for this month's Christmas Pinterest Challenge, hosted by Julie @Sum of Their StoriesThe purpose of this Pinterest Challenge is to motivate all of us to create a project that a) is inspired by a pin on one of our Pinterest boards and b) have some sort of a sustainable element to it. This could be an upcycling or recycling element, or something that reduces waste, uses leftovers, etc.


Did you know that eva foam is used in a range of everyday products, "from the soles of your athletic shoes to your flip-flops." It can also be found in certain adhesives, packaging, medical equipment, and plastics. And a "diverse range of industries uses EVA-based materials in their products, including: athletics, automobile manufacturers, construction, electronics, footwear, healthcare, leisure and recreation." It's basically everywhere.

Eva foam is recyclable but it takes special equipment to recycle it. Recycling of EVA foam is not only environmentally friendly, but also help businesses to control and reduce production costs. Which is a good thing! 

So let's get started with this fun and easy to make glitter foam Christmas tree ornament! 

Materials:
  • Glitter eva foam sheets
  • Compass or circle punches
  • Scissors
  • Hot glue gun
  • Bowdabra bow wire/twine (hanger)
  • Embellishments

How To:
To begin, I actually had circle punches to punch out two of each size starting at one inch, and increasing in half inch increments - 1", 1.5", 2" and 2.5 inches. And if you don't have circle punches, you can use a compass to draw two of each size and cut out. If you don't have a compass, look online for free circle templates in those sizes or just improvise using graduated round containers. 

Once the circles are cut out, fold each one in half.

Then take the two smallest circles and place a dab of hot glue in the upper right corner of one of the circles and .  .  .

place the left hand side of the second circle on top of the dab of glue to secure, making sure the circles are evenly placed. Fold a 9" strip of bow wire or twine in half, placing the ends in the center of the circles. Place a dab of hot glue on top and .  .  .            
close the left side of the circle. Then place a dab of glue along the top right side of the circle .  .  .
and close to form a cone shape.

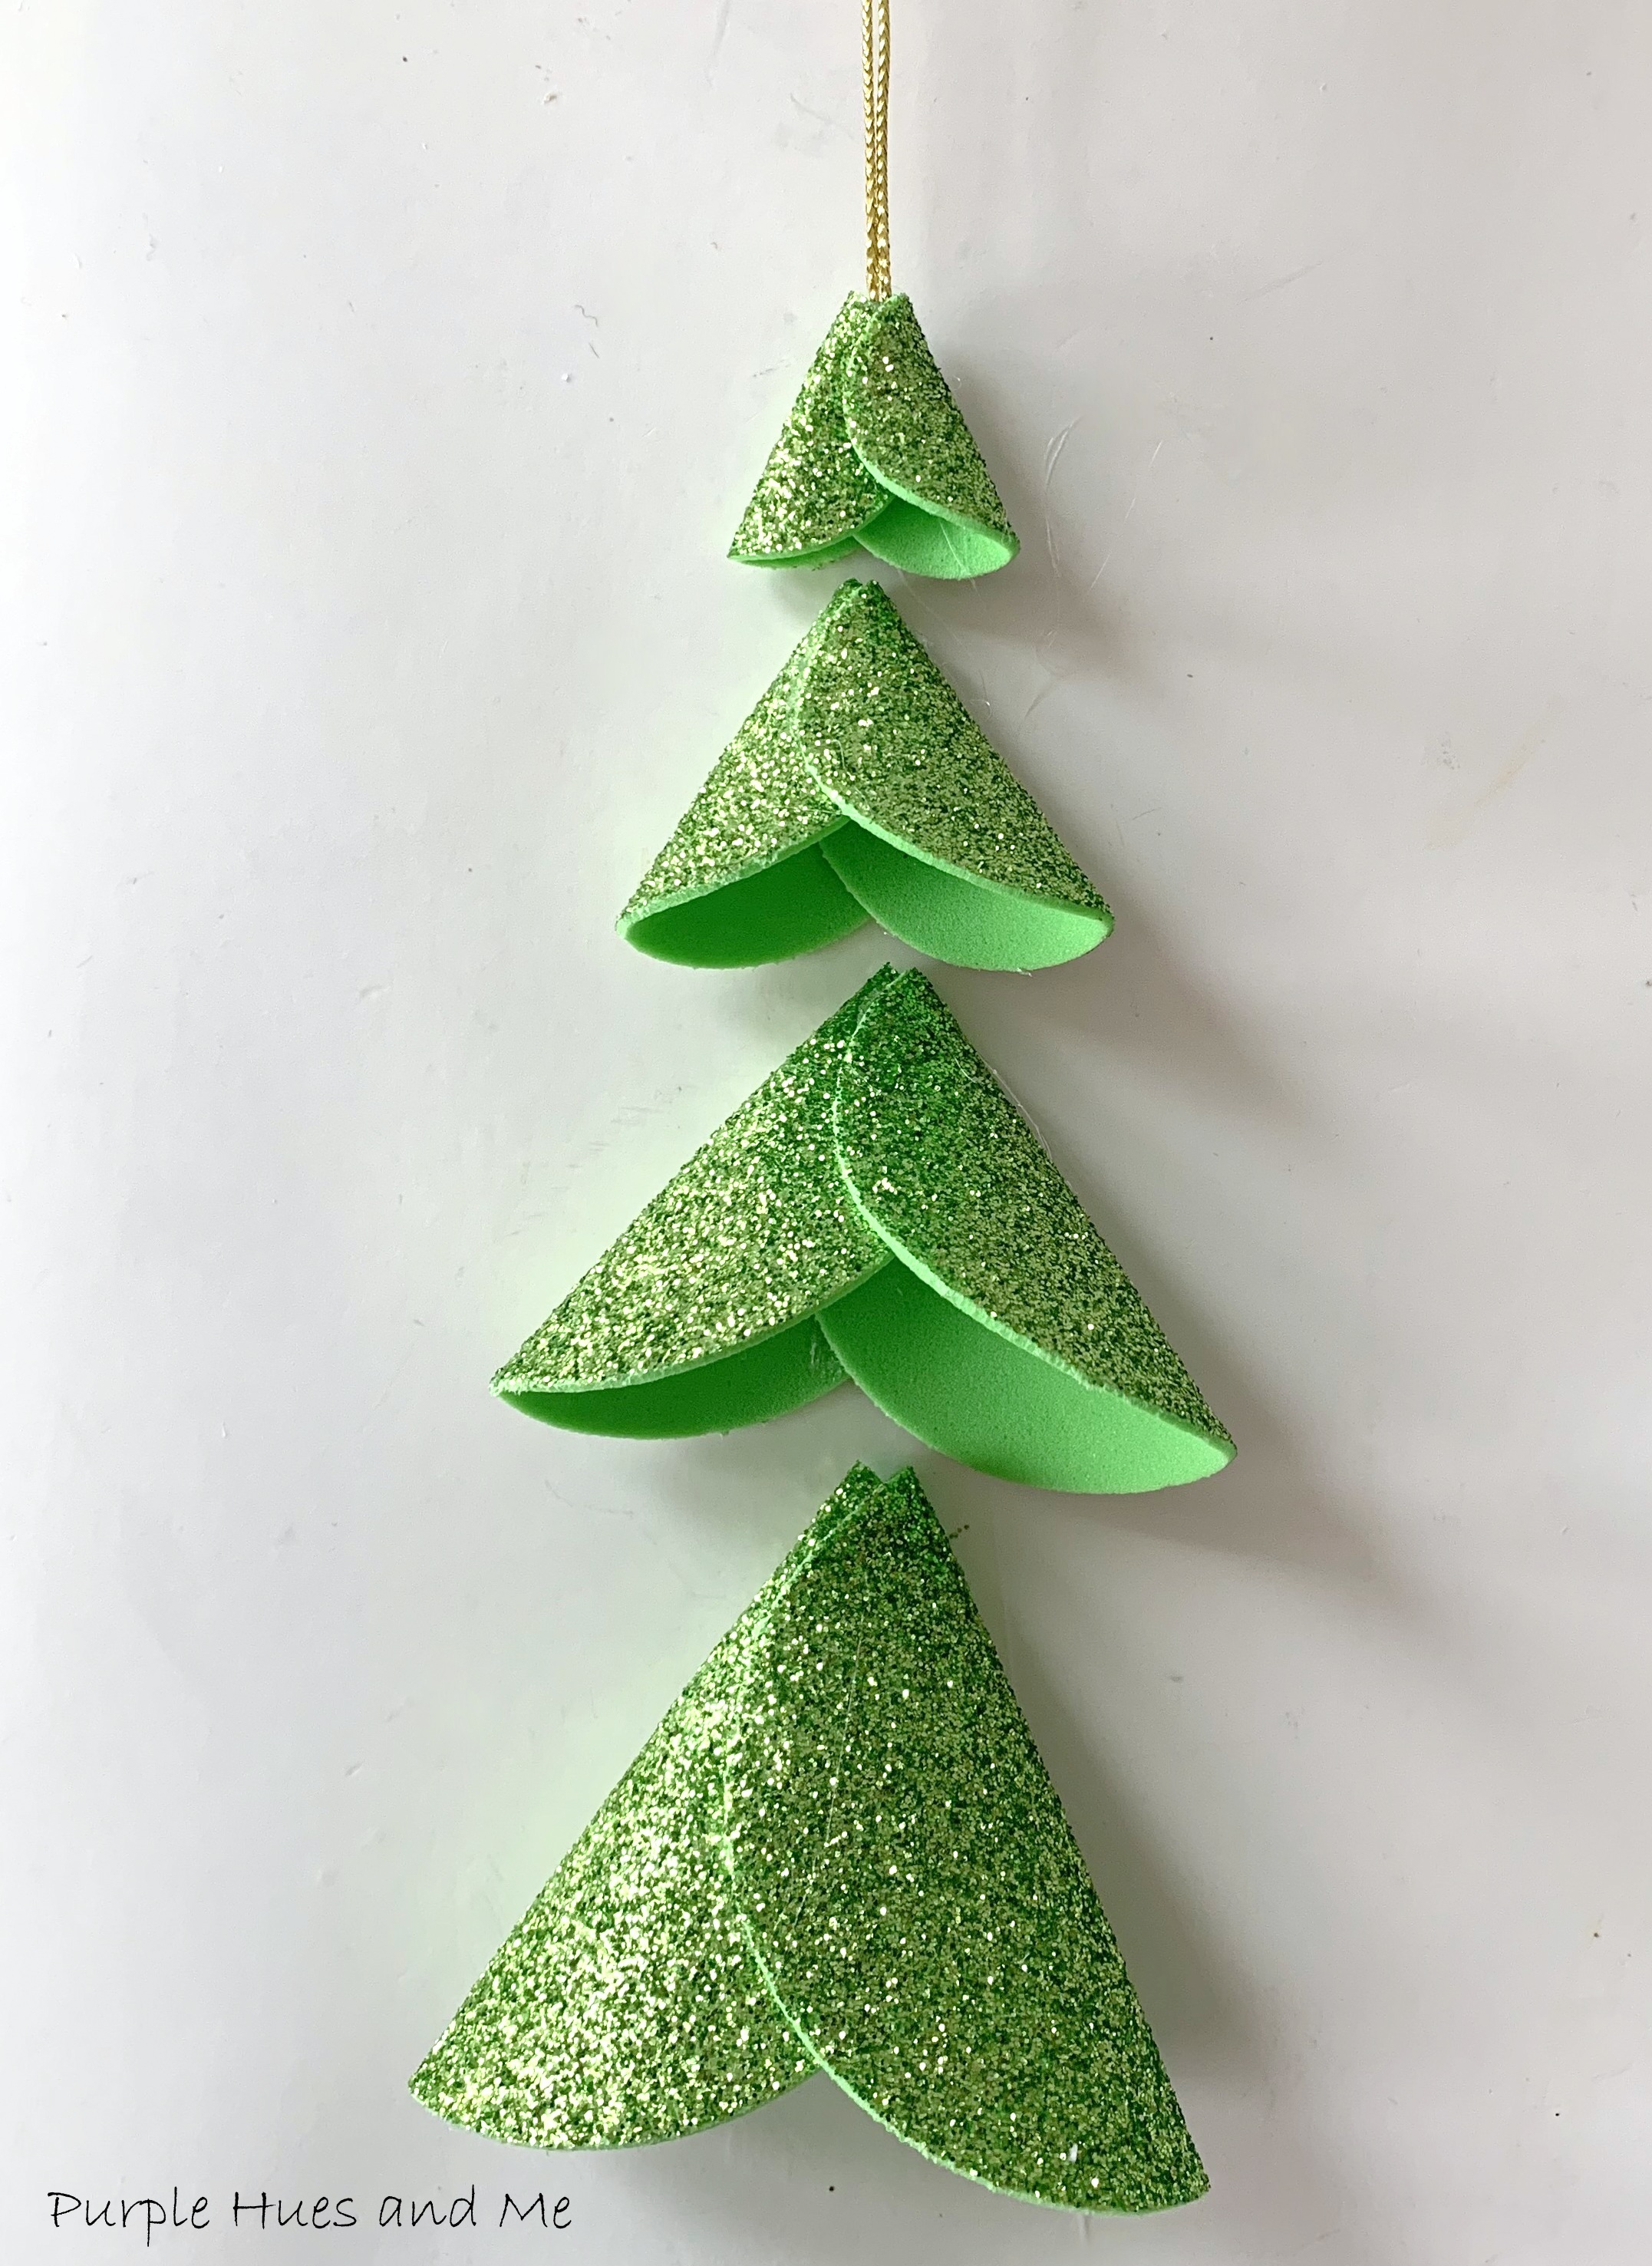
Repeat gluing the circles together to form a cone shape for each of the three remaining sets of circles.  


Once all the circle cone shapes are formed .  .  .

begin adding glue to the top of the next smaller size cone .  .  .
and insert into the smallest cone shape (with hanger).

Glue the other cones on the top tip, one inside of the other, in ascending order of size to make the Glitter Foam Christmas Tree Ornament.

And finally, glue on embellishments like tiny rhinestone stars to decorate the glitter foam tree ornament.
Wouldn't it look pretty with a tree filled with these!
The fun thing about making this glitter foam Christmas tree, the size can vary just by using different size circles - from a small ornament to a decorative centerpiece! Imagine how cool that would be! 

Now, it's time to meet the other Sustainable Pinterest Challenge participants and their awesome Christmas projects:

Julie | Sum of their Stories - How to Make Festive Gift Tags from Old Business Cards 
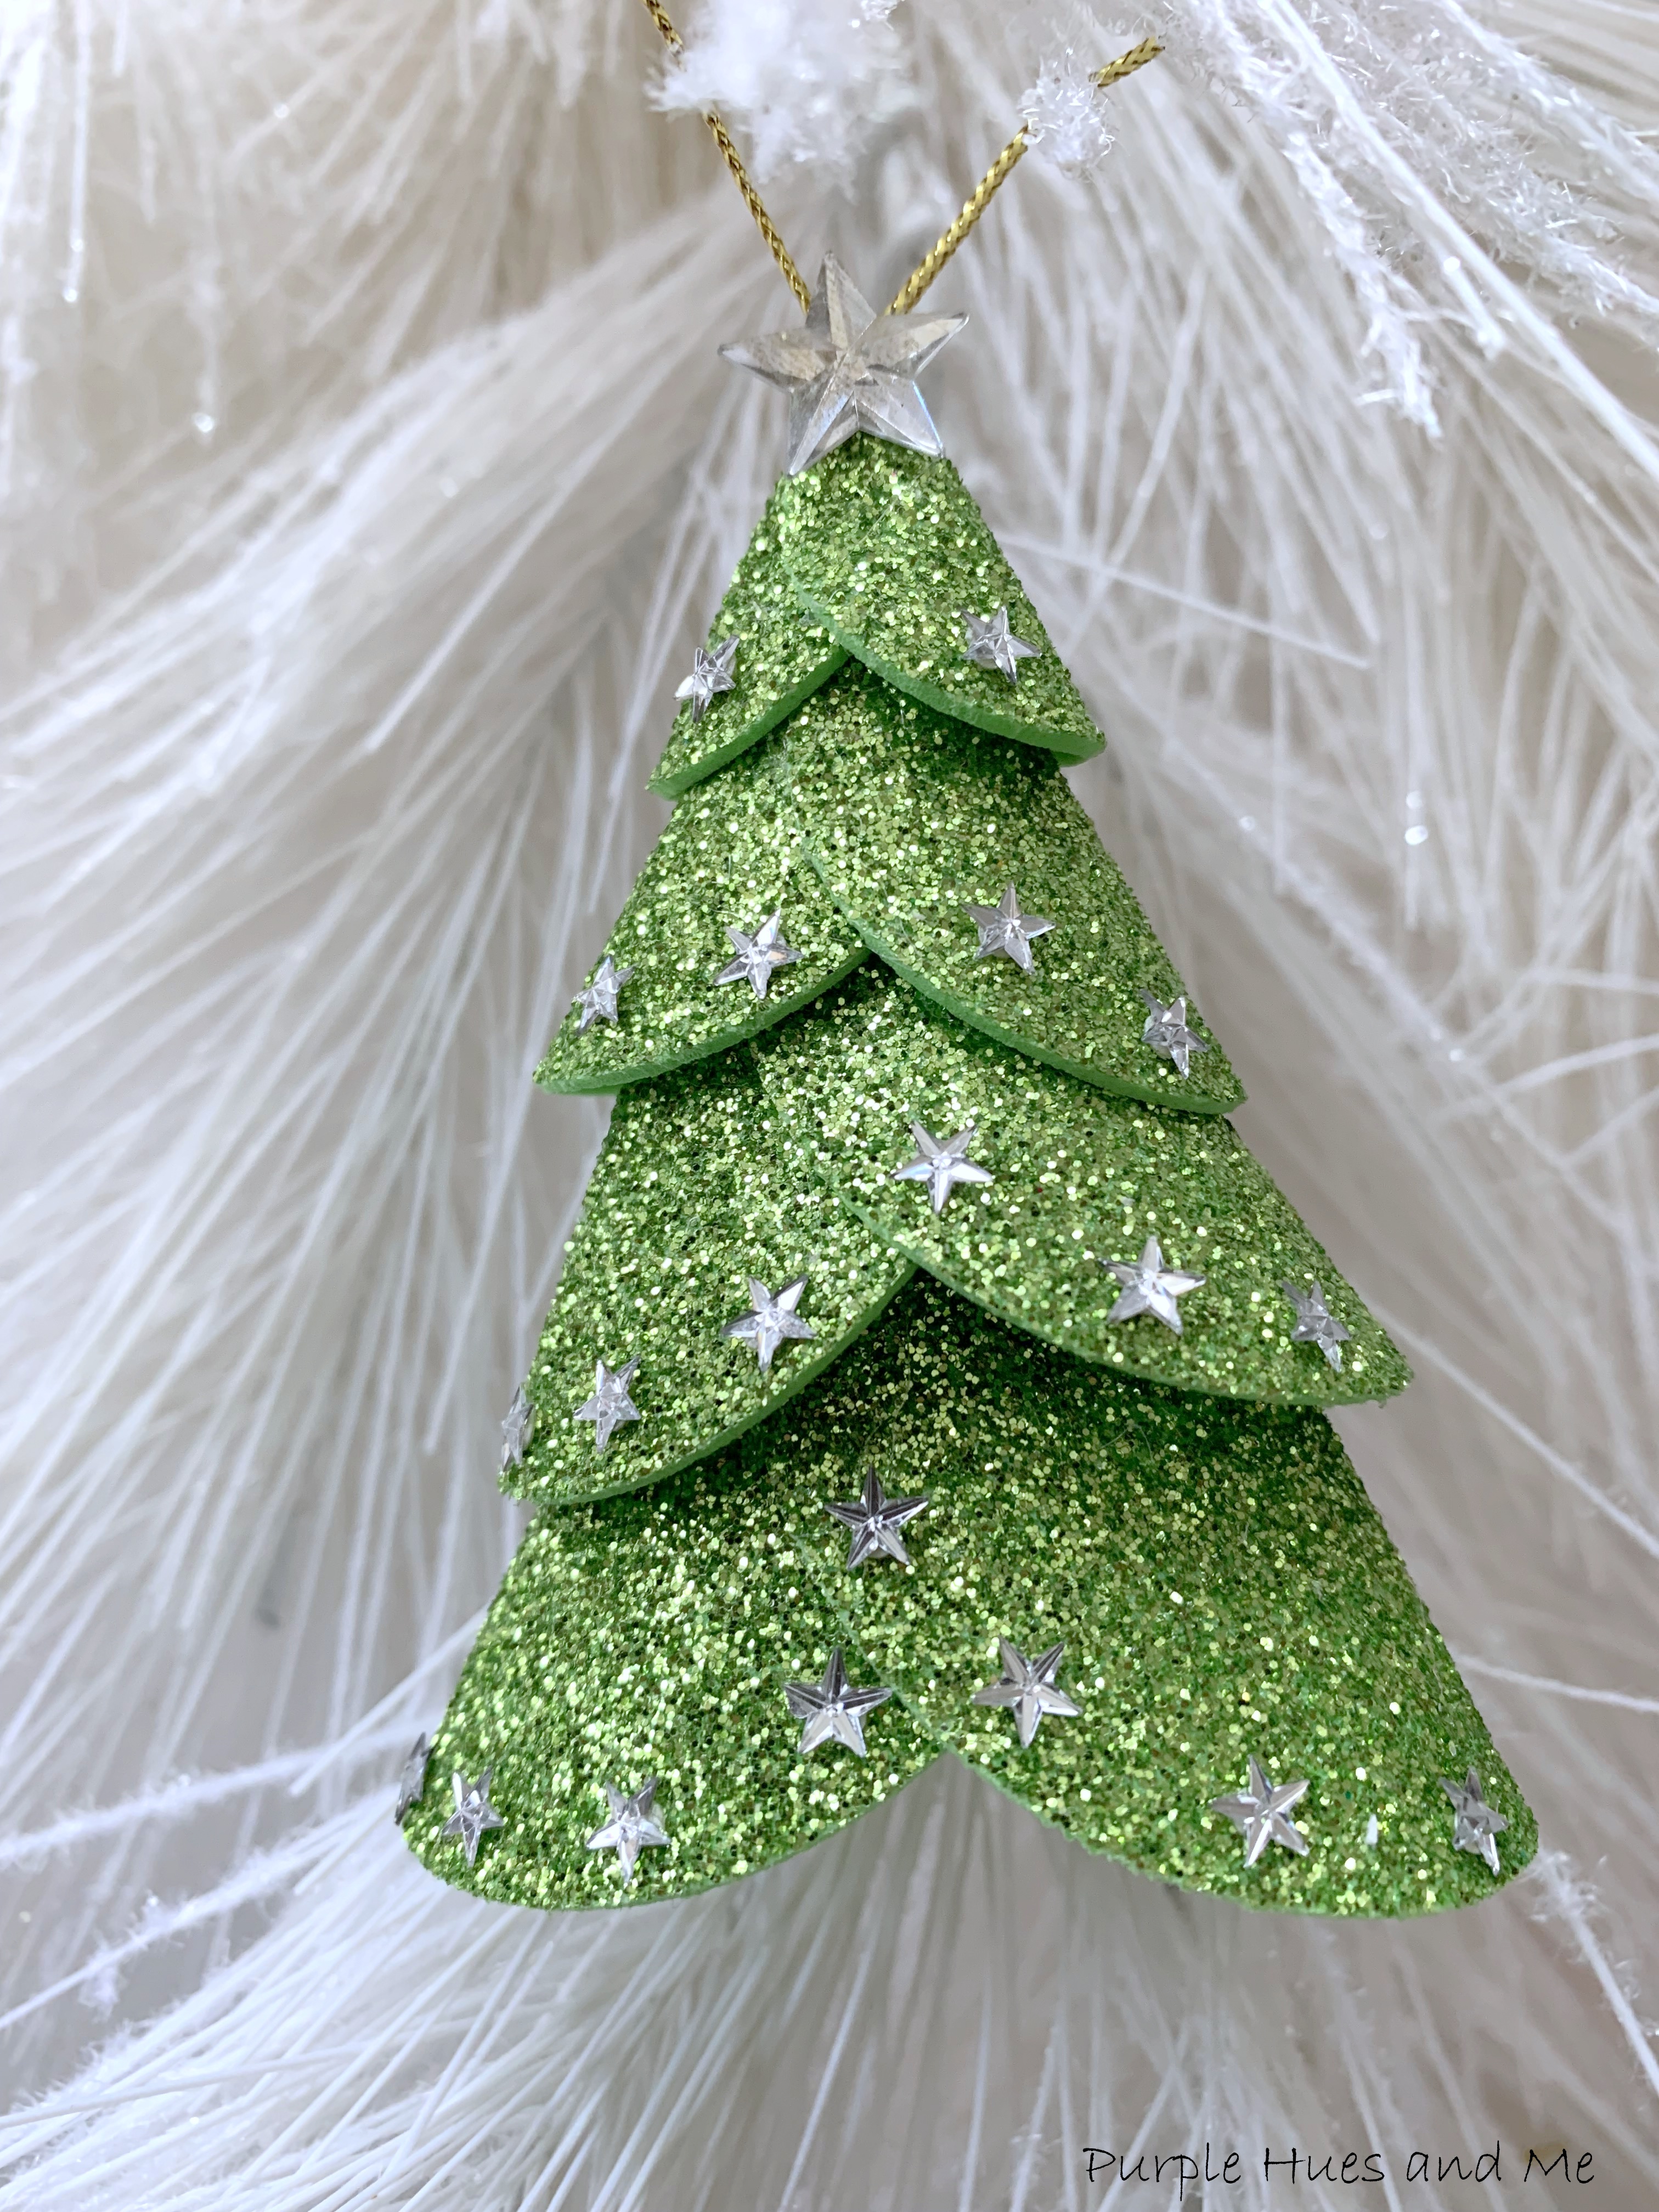
Gail | Purple Hues and Me -  Glitter Foam Christmas Tree Ornament
Julie | Treasures Made From Yarn - Knitted Gift Bag
T’onna | Sew Crafty Crochet - Easy Upcycled Crochet Christmas
Niki | Life as a LEO Wife - Christmas Card Holder
Mel | Decor Craft Design - DIY Christmas Can Holder
Christine | Christine’s Crafts - Easy Kids Crafts Christmas Tree Decoration
Vicky | Vicky Myers Creations - DIY Candy Christmas Decoration
Donna | Modern on Monticello - DIY Toilet Roll Gnomes
Allyson | Southern Sunflowers - Christmas Burlap and Denim Wreath
Ann | The Apple Street Cottage - Vintage Satin Ornament
Jo | A Rose Tinted World - 
How to Make a Toilet Roll DIY Advent Calendar

You are invited to the Inlinkz link party!

Click here to enter

Wednesday, December 1, 2021

DIY Chunky Glitter Glue Ornaments

Hello and Welcome! It's the first Wednesday of December and you know what that means - it's time for our monthly DIY Challenge hosted by Terrie @Decorate & More with Tip! In case you don't know about this DIY Challenge, on the 1st Wednesday of each month, a group of talented bloggers create something based on a theme or material that's selected by Terri! This month's theme is a Christmas Challenge - make anything pertaining to Christmas! How easy is that!
I love making my own Christmas tree ornaments each year! To my excitement this year, I got a purple flocked tree! I'm loving this tree - although I wish it was taller. 

It's only 4.5 feet tall and needs to sit on a table.  I wanted to do something different from my usual purple decorated white trees that I've done in the past like here, here, and here.  So I came up with the color theme of using rich purple and lavender hues. But finding different or unique purple ornaments in stores was quite elusive this year. This is not the year for purple ornaments! So I decided to make my own. And you won't believe what I used to make lots of handcrafted ornaments! Super Chunky Glitter Glue!


It's called Fairy Princess and doesn't it look gorgeous! Look at all those purple glitter tones! I found it at Hobby Lobby and bought all that they had from two stores - six bottles! That was more than enough to decorate thirty clear plastic ornaments. That's it! Nothing else was needed! Of course you'll need bamboo sticks and styrofoam to hold them while they dry - but that's a given.
Here's how:
I started with six large 3.27" clear plastic ornaments I had in my stash to see how they would look.  I didn't bother to clean or wipe the ornaments down first. They looked clean to me, lol!  I just started adding about an inch or more of the glitter glue along the middle of the ornament all the way around. 
As I was applying the glue, I began adding 'rays' or extensions of glue along each side. 
All I can say is have fun creating the design along the middle! You can make it as thick as you want! It doesn't have to be perfect!
See how the chunky glitter adds dimension and texture to the surface of the ornament? It's really a cool look and feel once it's dry.  
If you're satisfied with the glitter glue design, hang the ornaments up to dry. I used a rod to hang these ornaments over an empty plastic container.
Once these were dry, I loved the look so much that I bought a box of 24 smaller ornaments to make more!
 

And when I finished decorating them, used bamboo sticks stuck in packing styrofoam to hold them up while drying.


It took a good 24 hours for the glitter glue to dry!

Don't they look pretty on my purple flocked tree!


Oh, and you can check out how I made these lovely velvet wrapped ornaments here!


Be sure to visit  all the creative bloggers listed below to see their wonderful Christmas creations, too:

Decorate and More with Tip

Patina and Paint

Blue Sky at Home

The House House

Blessings By Me

Purple Hues and Me

Sweet Southern Grace

LeCultivateur

Hootshack


Monday, November 8, 2021

Veneer Wood Edging Christmas Star


 One of my favorite Christmas traditions is making new decorations each year. Don't you just love making your own crafts for Christmas!  I recently completed a round-up of ornaments I've made through the years that you can find here. And I love making all types of holiday decorations, too! 

Stars are very popular for most seasons and especially at Christmastime. And guess what?  I've got a unique DIY Christmas star that's amazingly easy to make and quite versatile - which fits in perfectly with this month's Blog Hop Challenge - Christmas Crafts - hosted by Beverly @Across the Blvd

Disclosure I am a participant in the Amazon Services LLC Associates Program, an affiliate advertising program designed to provide a means for us to earn fees by linking to Amazon.com and affiliated sites, this post may contain links. I may receive a very small commission at no cost to you! The affiliate money I earn helps pay my crafting expenses. Thanks so much for your support!

You won't believe how simple it is to make using the following materials


Let's begin by measuring and cutting out ten veneer strips 10.5" long. You can make the star larger just by increasing the length of the strips.
Next, take one strip and cross the left end side over the right end side creating a loop. Cut the left side end at an angle matching the edge of the right strip, as pictured. Glue ends together creating a "V" shape using a quick grab glue such as RapidFuse.  I tried using hot glue, but it didn't stick well and melted the wrong side of the wood veneer which has glue embedded in it since it's a pre-glued iron on veneer edging.

This loop with be the first point of the star.
Then make four more just like the first one to create five points. Next, arrange the points into a star shape and glue together at the sides. Use clamps to hold in place until glue dries.
Glue together the remaining veneer strips for a second layer to add dimension and let dry. Then arrange one star on top of the other, staggering points between. Glue together where edges meet in the center.
Add a decorative embellishment to the center if you want.
Not sure where I'll be using this star for Christmas. But there're so many possibilities!

And the star reminds me of the mid-century modern design (1945-1969) or art retro look which is typically characterized by clean, simple lines. 
Don't you just love it!
          Attach, hang or use as a centerpiece for a stunning holiday display!
For more lovely handcrafted Christmas crafts, be sure to check out all of the links below:

Beverly Across the Blvd  Easy Dollar Tree Spoons Craft for Christmas 

Gail Purple Hues and Me Veneer Wood Edging Christmas Star

T'onna Sew Crafty Crochet Crochet Christmas Table Runner

Marci   Stone Cottage Adventures Re Vamping Old Ornaments for a New Theme 

Michele Coastal Bohemian Copper Pick Up Truck w/ Christmas tree

Allyson Southern Sunflowers Cheap and Easy Christmas Joy Craft

Julie Sum of Their Stories Upcycled Cotton Reel Table Place Setting

Vicky Vicky Myers Creations Christmas Star Craft

Terri Christmas Tree Lane Mason Jar Christmas Candles