Friday, April 26, 2024

How to Make a Mesh Goody Bag for Teacher

Teachers do so much to make sure our kids do their best, so why not give them a little appreciation at the end of the school year with an adorable handmade gift! This DIY mesh goody bag gift for teacher is a great way to put a little bit of yourself into a thoughtful gift for the teachers in your life. It's a great way to say "thank you" to a teacher. And the best part, it's so easy and simple to make! This post first appeared on bowdabra.com where I'm on the design team. 
 
Materials Needed:

Disclosure I am a participant in the Amazon Services LLC Associates Program, an affiliate advertising program designed to provide a means for us to earn fees by linking to Amazon.com and affiliated sites, this post may contain links. I may receive a very small commission at no cost to you! The affiliate money I earn helps pay my crafting expenses. Thanks so much for your support!

Let's begin by cutting 18 inches of 10" wide mesh ribbon. 

Once cut, lay the mesh on parchment paper and fold the mesh ribbon in half, matching all the side edges and top edges evenly. Begin gluing the right side edges together starting at the top. Apply glue on one edge and press down both edges together on top of the parchment paper.

Continue adding glue along the edges and pressing them together until .  .  .
reaching the folded mesh bottom.
Use the side ends of the parchment paper to press down the glued edges to make sure the edges are secure and seal together. Let dry.                                                                                 
Once dry, turn the goody bag inside out and .  .  .
straighten the bag out. 
Then find a free printable tag online to express your sentiment. Or, you can copy and paste this one on cardstock and cut out.
Use Bowdabra Bow Wire to attach the tag to the mesh goody bag after you fill it with Hershey Kisses or goodies of your choice!

To Make the Bow using the Mini Bowdabra: Insert an 18″ piece of bow wire folded in half into the Mini Bowdabra, tucking ends under. Leaving the wired ribbon on the roll, pinch the ribbon in the center and twist down into the Mini Bowdabra, leaving six inches for the tail. 
Create a loop by folding over the ribbon at the 3″ mark on the ruler.  Twist the ribbon down into the Mini Bowdabra smoothing the ribbon out.
On the opposite side, fold over the ribbon at the 3″ mark creating another loop, twisting the ribbon down into the Mini Bowdabra.                                  
Next, make another loop, folding over at the same mark, as before, twisting the ribbon down into the Mini Bowdabra and .  .  .
making another 3" loop on the opposite side for a total of four loops (two on each side) Use the Mini Bowdabra wand to crunch down the bow, using scissors to cut off the excess ribbon. 
Dovetail the ends by folding each end together and cutting at an angle from the end up to the fold at an angle.

While the bow is still in the Mini Bowdabra, thread the two loose ends of the bow wire through the loop, pulling tightly while gently pulling the bow out.
And finally, tie the bow around the mesh goody bag using the Bowdabra bow wire, and then fluffing the bow and mesh top for a gorgeous look!

Thanks for stopping by

and take a little time to enjoy,

Happy Crafting!


Saturday, April 20, 2024

How to Make the Cutest Bow Napkin Ring

 
Celebrations like Mother's Day, Graduations, Father's Day, etc., are in the air and the perfect time to get creative and decorate your table setting with adorable bow napkin rings. There is nothing that makes a table setting look more glamorous than adorable napkin rings, especially one that's made out of bows! This is the sweetest looking bow napkin ring and is so easy to make using your Mini Bowdabra. And the fun part is that you can use any type of one inch ribbon to match your decor, the celebration or table setting! This post first appeared on Bowdabra.com where I'm on the design team.


Materials:

Disclosure I am a participant in the Amazon Services LLC Associates Program, an affiliate advertising program designed to provide a means for us to earn fees by linking to Amazon.com and affiliated sites, this post may contain links. I may receive a very small commission at no cost to you! The affiliate money I earn helps pay my crafting expenses. Thanks so much for your support!

Let's begin by showing you how to make an adorable bow using the Mini Bowdabra! First, cut an 18″ piece of Bowdabra bow wire, folding in half and placing down into the Mini Bowdabra, tucking ends under. Next, pinch the end of the ribbon on the roll, placing it down into the Mini Bowdabra.


Then create a loop by folding over the ribbon at the 2" mark on the Mini Bowdabra measuring tool. Insert the ribbon down into the Mini Bowdabra smoothing the ribbon out. You don't have to twist the ribbon since it's the same on both sides.


On the opposite side, fold over the ribbon at the 2" mark creating another loop, inserting the ribbon down into the Mini Bowdabra.

Continue making eight more loops on each side for a total of eighteen loops.


Use the Mini Bowdabra wand to crunch down all the loops on the bow.
To finish the bow, make a button (small) loop to cover the bow wire, then scrunch all the loops down with the Mini Bowdabra wand and cut off the excess ribbon. 
While the bow is still in the Mini Bowdabra, thread the two loose ends of the bow wire through the loop, pulling tightly while gently pulling the bow out.
Tie the bow wire in a double knot and cut off the excess bow wire. Then fluff the bow for a fabulous look!
Next, take the acrylic napkin ring and apply a dab of glue on the top center.
Place the end of the ribbon on top of the glue, centering the ribbon.

Wrap the ribbon around the napkin ring to where the ribbon began, cutting off excess ribbon and gluing in place. 
Once dry, glue on the bow where the ends of the ribbon strip are glued to the napkin ring.

How adorable is this bow napkin ring! Now make as many 
bow napkin rings as needed.
The perfect choice for setting a gorgeous holiday table


Tuesday, April 16, 2024

Upcycle Plastic Container Into Basket


If you're like me, you probably have bags full of different types of recycled containers. You just never know when you might need one for a project. Well the time has come when I do need one for a project for our Creative Craft Hop hosted this month by Donna @ Modern on MonticelloWelcome All! We are so glad you're here! Looks like I'm starting the hop off sharing my Upcycled BasketPlease don't forget to check out all of the stunning creative craft projects listed at the bottom of my post!

                                       
So I started looking at some of the containers that I have accumulated. I came across a good size clear plastic one - about seven inches tall and seven inches wide. It didn't have a top and I haven't a clue what was in it before. I just know it was nice and clean. And had a reflective look as if it was glass. But it wasn't. It was all clear plastic! So I decided to make a pretty basket - one for everyday use where I can store whatnots and catchalls! But I must say that it turned out rather pretty so it goes perfect with my decor, too!


Materials Used:
  • Utility knife
  • Snips
  • Measuring tape, ruler
  • Chalk pen
  • Microfiber cloth
  • Twine - 3mm 109yds
  • Fabri-Tac Glue
  • Clamps
  • Plastic top (flat, large)
  • Plate (template)

Disclosure I am a participant in the Amazon Services LLC Associates Program, an affiliate advertising program designed to provide a means for us to earn fees by linking to Amazon.com and affiliated sites, this post may contain links. I may receive a very small commission at no cost to you! The affiliate money I earn helps pay my crafting expenses. Thanks so much for your support!

And who doesn't love transforming trash into something useful and beautiful! So let's get started by removing the rim around the plastic container using a utility knife.
The plastic rim was quite difficult to remove. But I finally did it after the hubs saw me struggling with it - he recommended using a pair of snips which really got the job done.
               
Next, I used a tape measure to mark off the container in 1/2" increments using a chalk pen.
Then used a ruler to draw lines on the container every 1/2" to cut out 1/2" strips ending with an odd number of strips. Having odd number of strips helps to make the weaving even.
The strips were a bit hard to cut, too, but thank goodness for the snips! 
Once all of the strips are cut, use a dry microfiber cloth to wipe off all of the chalk marks.
Once done, turn the container upside down to begin the weaving process.
Attach the end of the twine just inside of one of the strips at the bottom using Fabri-Tac glue or any quick grab and dry glue. I am not a fan of using hot glue on plastic. With the twine still attached to the roll, start weaving it over and under each plastic strip. 
Continue going over one strip, under the next, over, under, over, under and so on, working your way around the container .  .  . 
pushing the twine together for a neat and uniform look .  .  .

until you have nearly reached the top. Then cut the twine off on the backside of a strip, adding glue to the end and sealing it to the strip.
Using a clamp, braid three pieces of twine 1.5+ times the length around the container to attach the braided twine to the top of the container. 
Once the strips are braided, glue on in increments using clamps to hold in place until dry. Be sure to cut off excess braiding to use later for the lid.
Now it's time to cover the plastic bottom!
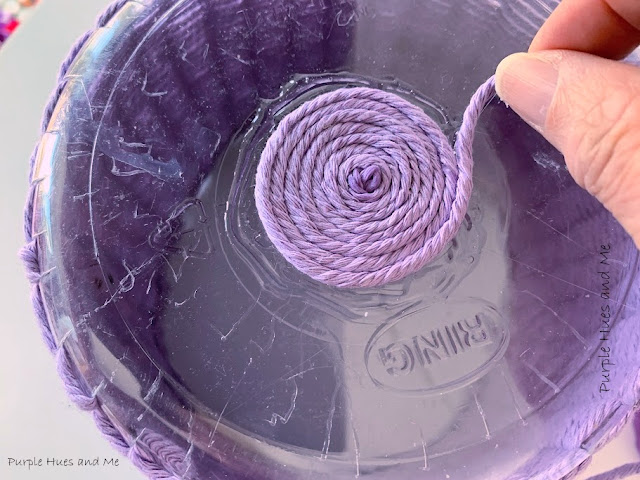
Place a large dab of glue in the center of the plastic on the bottom. There was already an indentation there so it was not hard to find the center.
Then begin coiling the twine around in a circle on top of the glue .  .  .
adding more glue around on the plastic as you coil the twine .  .  .
coiling and gluing round and round until .  .  .
reaching the end.
How cool to see the coiling and weave when looking down into the 
clear container!

To Make the Lid:
Use a small plate, just the size that would cover the opening to draw a circle using a chalk pen on a plastic top for the lid. Cut out. 
Then begin coiling the twine on glue starting in the center of the plastic lid.
Continue coiling the twine, adding glue as you coil until .  .  .
the lid is completely covered with twine.
Then braid another strip of twine to glue around the edge of the lid.
Use the excess braiding twine to make a loop handle by gluing the ends together for the basket lid.
To attach the loop to the lid, place a large dab of glue in the center .  .  . 
and around the base of the loop on top of the lid. Add twine to base of the loop and begin coiling it around. Continue adding glue and coiling the twine until the loop until satisfied with the look to secure in place. 

What a lovely upcycle craft!

A basket .  .  .

for storage or .  .  .

 decor!

I hope you've been inspired to upcycle your trash to something you will treasure! 


Up next is Sara, @Birdz of a Feather, who happens to be one of our fabulous co-hosts! Sara is a very talented artist and today she is sharing her Dinosaur Wall Art which is amazing! And be sure to check out all of the talented bloggers sharing their awesome creations below:   

Upcycle Plastic Container Into Basket -  Gail @ Purple Hues and Me

Dinosaur Wall Art  - Sara @ Birdz of a Feather 

A Wine Bottle Gets a New Life - Ann @ The Apple Street Cottage

Embroidery Hoop Pocket Wreath - Niki @ Life as a Leo Wife

Paper Mache Bowl DIY - Terri @ Decorate and More with Tip

Hammered Flower Art Gift - Rachel @ Tea and Forget Me Nots

DIY Cooking Utensils - Tammy @ Patina and Paint


Special Occasion Blooming Wine Glass - Jenna @ The Painted Apron