Showing posts with label Christmas ornaments. Show all posts

Tuesday, November 1, 2022

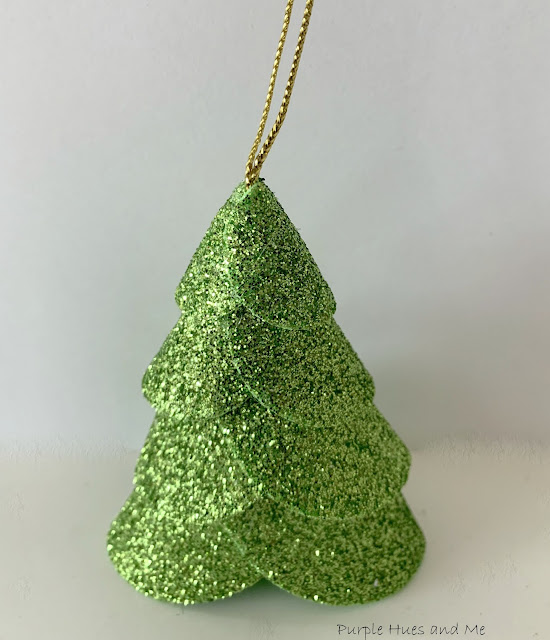
Glitter Foam Christmas Tree Ornament


 Eva Foam sheets is one of my favorite craft mediums. I love using it because you can twist, pull and even heat it to form amazing craft items. Just take a look at a couple of  Christmas decorations I made several years ago here and here. And I love making flowers of eva foam, too! 

There are lots and lots of diy glitter foam ornaments on Pinterest. I love using glitter foam sheets, as seen here and here. It's such a versatile and easy material to work with, that's why I chose it to make a darling eva foam tree ornament similar to one I first saw on Pinterest for this month's Christmas Pinterest Challenge, hosted by Julie @Sum of Their StoriesThe purpose of this Pinterest Challenge is to motivate all of us to create a project that a) is inspired by a pin on one of our Pinterest boards and b) have some sort of a sustainable element to it. This could be an upcycling or recycling element, or something that reduces waste, uses leftovers, etc.


Did you know that eva foam is used in a range of everyday products, "from the soles of your athletic shoes to your flip-flops." It can also be found in certain adhesives, packaging, medical equipment, and plastics. And a "diverse range of industries uses EVA-based materials in their products, including: athletics, automobile manufacturers, construction, electronics, footwear, healthcare, leisure and recreation." It's basically everywhere.

Eva foam is recyclable but it takes special equipment to recycle it. Recycling of EVA foam is not only environmentally friendly, but also help businesses to control and reduce production costs. Which is a good thing! 

So let's get started with this fun and easy to make glitter foam Christmas tree ornament! 

Materials:
  • Glitter eva foam sheets
  • Compass or circle punches
  • Scissors
  • Hot glue gun
  • Bowdabra bow wire/twine (hanger)
  • Embellishments

How To:
To begin, I actually had circle punches to punch out two of each size starting at one inch, and increasing in half inch increments - 1", 1.5", 2" and 2.5 inches. And if you don't have circle punches, you can use a compass to draw two of each size and cut out. If you don't have a compass, look online for free circle templates in those sizes or just improvise using graduated round containers. 

Once the circles are cut out, fold each one in half.

Then take the two smallest circles and place a dab of hot glue in the upper right corner of one of the circles and .  .  .

place the left hand side of the second circle on top of the dab of glue to secure, making sure the circles are evenly placed. Fold a 9" strip of bow wire or twine in half, placing the ends in the center of the circles. Place a dab of hot glue on top and .  .  .            
close the left side of the circle. Then place a dab of glue along the top right side of the circle .  .  .
and close to form a cone shape.

Repeat gluing the circles together to form a cone shape for each of the three remaining sets of circles.  


Once all the circle cone shapes are formed .  .  .

begin adding glue to the top of the next smaller size cone .  .  .
and insert into the smallest cone shape (with hanger).

Glue the other cones on the top tip, one inside of the other, in ascending order of size to make the Glitter Foam Christmas Tree Ornament.

And finally, glue on embellishments like tiny rhinestone stars to decorate the glitter foam tree ornament.
Wouldn't it look pretty with a tree filled with these!
The fun thing about making this glitter foam Christmas tree, the size can vary just by using different size circles - from a small ornament to a decorative centerpiece! Imagine how cool that would be! 

Now, it's time to meet the other Sustainable Pinterest Challenge participants and their awesome Christmas projects:

Julie | Sum of their Stories - How to Make Festive Gift Tags from Old Business Cards 
Gail | Purple Hues and Me -  Glitter Foam Christmas Tree Ornament
Julie | Treasures Made From Yarn - Knitted Gift Bag
T’onna | Sew Crafty Crochet - Easy Upcycled Crochet Christmas
Niki | Life as a LEO Wife - Christmas Card Holder
Mel | Decor Craft Design - DIY Christmas Can Holder
Christine | Christine’s Crafts - Easy Kids Crafts Christmas Tree Decoration
Vicky | Vicky Myers Creations - DIY Candy Christmas Decoration
Donna | Modern on Monticello - DIY Toilet Roll Gnomes
Allyson | Southern Sunflowers - Christmas Burlap and Denim Wreath
Ann | The Apple Street Cottage - Vintage Satin Ornament
Jo | A Rose Tinted World - 
How to Make a Toilet Roll DIY Advent Calendar

You are invited to the Inlinkz link party!

Click here to enter

Thursday, November 25, 2021

Crushed Glass and Pearls Ornament

  I wish everyone the best and a warm thank you 
as the holiday season begins! 

I love making all kinds of Christmas ornaments! You can checkout a round up of some of my favorites here! For today's Creative Craft Blog Hop,  hosted by Sara @Birdz of a Feather,  have I got a beautiful and elegant handcrafted ornament you will truly love  It's a very simple craft with a beautiful, and I mean BEAUTIFUL finish! In a nut shell, it's  a styrofoam ball wrapped in crushed velvet and covered with crushed glass and faux pearl beads that are splashed with purple alcohol ink. Sounds complicated? Of course not! And the best part, I'm using everything from my stash to make a few.
If you're coming over from Donna @Modern on Monticello, wasn't her wood slice garland too cute and adorable!

To make a crushed glass and pearls ornament, you will need:
  • Crushed velvet fabric scraps
  • Pan top (9.5")or something round for template
  • Styrofoam ball - 3"
  • Rubber band (small)
  • Bow wire
  • Crushed glass
  • Faux pearls
  • Alcohol inks
  • Parchment paper
  • Plastic cup & spoon
  • Clear silicone glue
How To:
  So let's begin with how to make this lovely ornament! I had a bit of crushed velvet fabric left over from a Christmas tree skirt I made several years ago and I thought the fabric was perfect since it's soft and stretchable to make beautiful ornaments for my recently purchased purple flocked slim tree. I got it with a 20% off discount for $47.99 from Bed Bath and Beyond. It looks tall but it's only 4.5 ft. high. Target has it for $82.99, so I got a good price from BBB, but I digress!

 
First, lay the fabric out and use the top of a fry pan or something that's 9.5 inches round to make a template of a circle .  .  .
that is large enough to cover a 3 inch styrofoam ball. I was able to cut five circles out of the leftover velvet. Next, place the ball in the middle of the circle and .  .  .

pull the edges up and around the ball, gathering at the top. Grab a small rubber band, doubling it around the top to hold the fabric in place. Then fold a 15" piece of Bowdabra bow wire or twine together to make a loop. Wrap the looped wire around the gathered fabric and insert the two loose ends into the loop, pulling the wire ends tightly around the fabric. Separate the wire ends around the gathered fabric, tightening it and tying in a tight knot to secure the gathered fabric. This technique is great when you don't have extra hands available to help with tying.
Next, pull the velvet fabric up through the bow wire to smooth out any large folds or creases and to make the velvet ball as smooth as possible. 

Next, cut off some of the gathered fabric, leaving  about an inch of decorative folds at the top. The excess bow wire can be cut off at the knot.
Let's move on to the crushed glass which was probably left over from projects I did here and here. For this, I'm going to mix the crushed glass with alcohol ink! First, pour enough of the crushed glass to decorate a few ornaments into a plastic cup or throw-away container.
Then place several drops of alcohol ink on top of the crushed glass and stir together, Alcohol ink gives off an intense coloring and is a great way to customize crushed glass into my favorite hues of purple! Hot dang! 
This is what the color looked like after a few drops and .  .  .
then adding a bit more to achieve this lovely effect! I did the same with some of my faux pearls I had left over from this project, too! And it doesn't take long for the alcohol ink to dry, either. Once it was mixed thoroughly to a shade I liked, I poured the colored glass onto parchment paper to dry and there was no staining of the paper to my surprise. Doesn't this color look vibrant!

Next, spread clear silicone glue around the bow wire and below in a decorative effect.
Then use a plastic spoon to spread the colorful crushed glass over the glue.
And use the back of the spoon to press the glass into the glue. Let dry.
The larger pearls can be hand placed with a little glue on one side and placed randomly throughout the crushed glass.

To make the hanging loop, fold a ten inch strip of bow wire tying the loose ends together into a knot. Spread a bit of glue on the knot and place in the middle of the gathered folds at the top. Use the sharp tip of scissors to push the wire knot into the center of the foam ball, straightening the loop and let the glue set.

How pretty is this!


Next up is Terri @Decorate & More with Tip sharing how she made her beautiful Christmas candle holder!

Be sure to have fun and get inspired with all of the wonderful creations offered this month by clicking on the links below!

Donna @Modern on Monticello - Wood Slice Merry Christmas Garland

Gail @Purple Hues and Me - Crushed Glass and Pearls Ornament

Terri @Decorate & More with Tip - Christmas Candle Holder Tutorial

Sara @Birdz of a Feather - Origami Shirt Advent Calendar

Cecilia @My Thrift Store Addition - Vintage Hankie Ornaments - No Sewing or Cutting!

Monday, July 13, 2020

Gimp Braided Trim Wrapped Ornament

 Welcome to our Monthly Challenge Blog Hop!  I've joined a group of creative bloggers to bring you a themed monthly challenge blog hop on the 2nd Monday of each month!  This month it's Christmas in July and time to get a head start on making all things Christmas!

I love making handcrafted ornaments for the holidays, but it can be quite stressful when you're trying to do a hundred other things! So now's the time to  begin creating those pretty ornaments you've had in mind for so long!  Here's an easy way of making gorgeous looking ornaments  -  if you have left over gimp braided trim like I do, how cool would it be to wrap a styrofoam ball around it and then top it off with a beautiful Bowdabra bow for a lovely Christmas ornament! It's definitely easy to make and yet very dramatic in design!

Materials Needed:
Styrofoam Ball
Acrylic Craft Paint
Ornament hanger (from broken ornament)
Gimp Braided Trim
Fabri-Tac Fabric Glue
Mini Bowdabra, Bow Wire, Ruler and Wand
5/8" Sheer Metallic Trim Ribbon 


Disclosure I am a participant in the Amazon Services LLC Associates Program, an affiliate advertising program designed to provide a means for us to earn fees by linking to Amazon.com and affiliated sites, this post may contain links. I may receive a very small commission at no cost to you! The affiliate money I earn helps pay my crafting expenses. Thanks so much for your support!


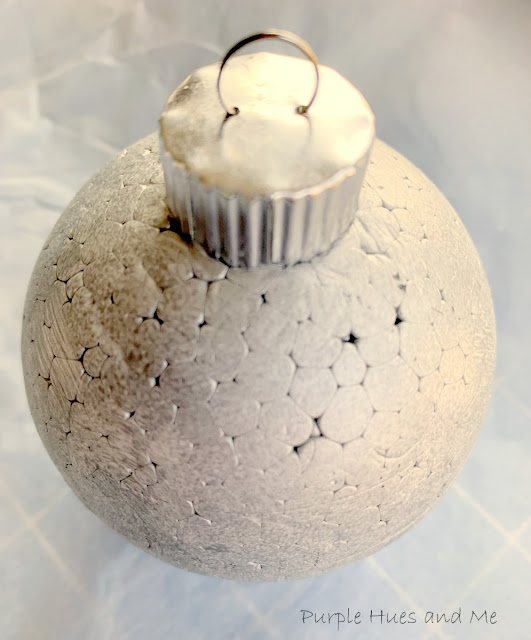
Begin by placing the ornament hanger in the top center of the styrofoam ball. 
But in hindsight, it's easier to paint first using FolkArt Brush Metal to cover the white - let dry and then add the hanger.
Next, apply a generous amount of fabric glue around the base of the ornament and begin placing the trim down following the edge of the hanger, making sure the loops in the design are as close to the hanger as possible.
Continue applying glue in the width of the trim to the ball and then adding the trim  -
Make sure the trim fits as close to the previous row. 
And try to place the loops in the open grooves of the trim as you're gluing it on.
Proceed with wrapping the styrofoam ball with the trim being .  .  .
very careful with placement of the trim as the area gets smaller and smaller. You'll have to tighten it up a bit!
And finally, to finish, squish together the end of the trim in a circle while gluing it down, and then cutting off the excess.
Adorable - isn't it! But to complete the look, add a loopy bow to the top!
Here's how:
Using a Mini Bowdabra, insert a 24" piece of bow wire folded in half into the Mini Bowdabra, tucking ends under. Then, make a crease near the end of the ribbon and place into the Mini Bowdabra. Fold the ribbon at the 2" mark and press into the Mini Bowdabra. This is your first loop.
Next, fold the other side at the same 2" loop width. Continue folding loops one at a time down through the center of the Mini Bowdabra .  .  .
making 13 loops on each side for a total of 26 loops - this happened to be the end of the ribbon that's why 13 loops were made.  Then scrunch down the loops with the Mini Bowdabra Wand.  
While the bow is still in the Mini Bowdabra, thread the two loose ends of the bow wire through the loop at the other end pulling tightly, tie in a knot and gently pull bow out.
Fluff the bow, arranging the loops. Then tie the bow onto the hanger with the bow wire adjusting the wire through the center of the bow.  Make a loop with the two wires for hanging, tying the ends together and cutting off excess wire.
How adorable is this! Perfect for a Christmas in July project!
Now on to our Christmas in July Blog Hop!
Be sure to check out all the amazing Christmas in July projects from these talented bloggers:


You are invited to the Inlinkz link party!
Click here to enter