Welcome to this month's "Do It Over" Designers! In case you didn't know, the "Do It Over Designers" is a group of talented bloggers who love to recycle/upcycle/ DIY, hosted by Anne @The Apple Street Cottage. It happens the 4th Saturday of every other month and it's all about taking something old and/or unused and 'doing it over' into something new. Anything from fabric, old dishes, and decor, to dressers and hutches. Items found in closets, cabinets, barns, garages, yard sales, thrift stores, you name it! 
Usually there is no theme and we're on our own to choose whatever we want to "do over!" But this month Anne decided to switch it up and wanted us to do over anything wood! Oh boy! You don't know how I agonized about doing over something wood. My resolution for 2023 was to use items already in my stash for projects! I rarely use wood. And if I did, it was something very simple! I don't have any carpentry skills and I don't have space or tools to take on a woodworking project, either. So please forgive me for picking something you've probably seen lots of on Pinterest, YouTube, and online! I decided to make a patio lantern! But I think you'll be surprise at how I "do over" something to make it work for this wood theme! So let's get started with what I did!
Materials Used:
- Harvest wood picture frames (2 - DT 5.75"x5.75")
- Square dowels (2 - 1/2"x36")
- Screw driver (flat head) or staple remover
- Acrylic or chalk paint/brush
- Ruler
- Hand saw
- Sanding block
- RapidFuse All Purpose Adhesive
- Craft wood square (5.5"x5.5")
- Wood hoop (5")
- Wood stain and sealer (all in one)
- LED candle
Disclosure I am a participant
in the Amazon Services LLC Associates Program, an affiliate advertising program
designed to provide a means for us to earn fees by linking to Amazon.com and affiliated
sites, this post may contain links. I may receive a very small commission at no
cost to you! The affiliate money I earn helps pay my crafting expenses. Thanks
so much for your support!
For this project, I'm taking two harvest decorative picture wood frames that I got from the Dollar Tree last fall and two square wood dowels that I found in my garage to "do over" into a lantern for my patio.
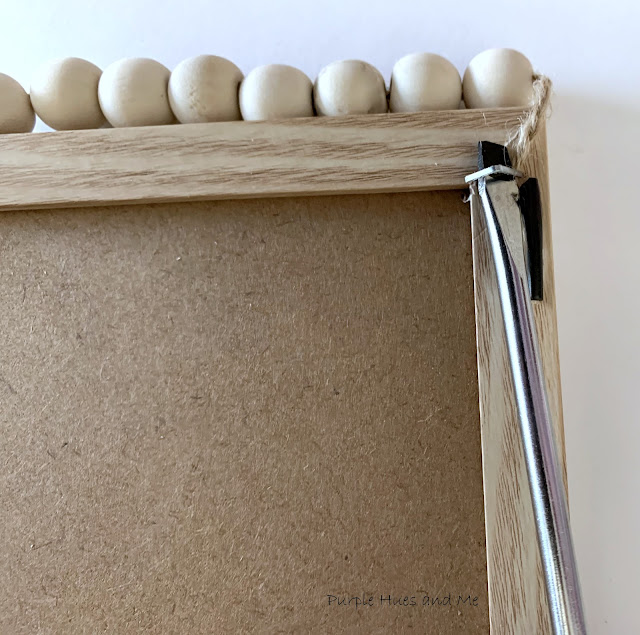
But first, the decorative wood beads on top need to be removed using a flat head screw driver.Then use a sanding block to smooth out the holes from the staples.Next, paint over the wording on both pieces using acrylic paint or chalk paint and let dry. I had to do several coats of acrylic paint to cover up the wording. I was out of white chalk paint.While the paint is drying, cut two 15" pieces from each of the 36" long square dowels using a hand saw, for a total of four, 15" square dowels. I didn't want to cut the dowels in half, which would have made the lantern over eighteen inches tall. I thought that would have made the lantern too tall for the LED candle I planned to use. Use a sanding block to smooth the cut edges. Sorry, I didn't take pictures of this - I was too involved with cutting straight lines on the dowel, lol!
To attach the dowels to the frame, add RapidFuse adhesive in one corner bottom and corner sides of the wood frame and . . . insert the square dowel in the corner, pressing down and making sure the dowel is touching the corner sides of the frame and is straight. Hold in place until the adhesive sets - which is thirty seconds (according to the label). I love how the glue sets in no time!
Repeat previous process for the remaining three dowels.
Once all four dowels are set in place . . .
add adhesive to the top of the dowels and in the corners of the frame, as before, and place the other frame on top. Hold in place until the adhesive sets.
Next, take the flat wood square piece and add adhesive along the edges and in the center and . . .
place down in the center of the top frame - making sure it's centered on the frame.
For a decorative look, take a 5" wood hoop and cut about an inch of it out to open it. Add adhesive along the left center side and on top of the frame edge. Then set one end of the hoop on top of the frame on the left, placing additional adhesive on the side.
Gently stretch the hoop across the wood to the opposite side . . . adding adhesive first and then to the side of the hoop, as before.Make sure the hoop is centered and straight on top. Let adhesive dry.
Once dry, I actually lifted the lantern up by the wood hoop.Gee, I'm really loving the simple lines of this lantern!
Now, it's time to stain the lantern. Staining should be done in a well ventilated area so I took the lantern outside. But shortly after I started staining the lantern, the wind picked up and then it started raining. So I had to finish staining the lantern indoors.
Looking at this now, would you believe it all started with two picture frames and square dowels?Just perfect for the patio!
Be sure to visit all of this month's creative wood projects by the
"Do It Over Designers" listed below:


.png)


