Saturday, November 25, 2023

Woven Christmas Tree Shaped Basket


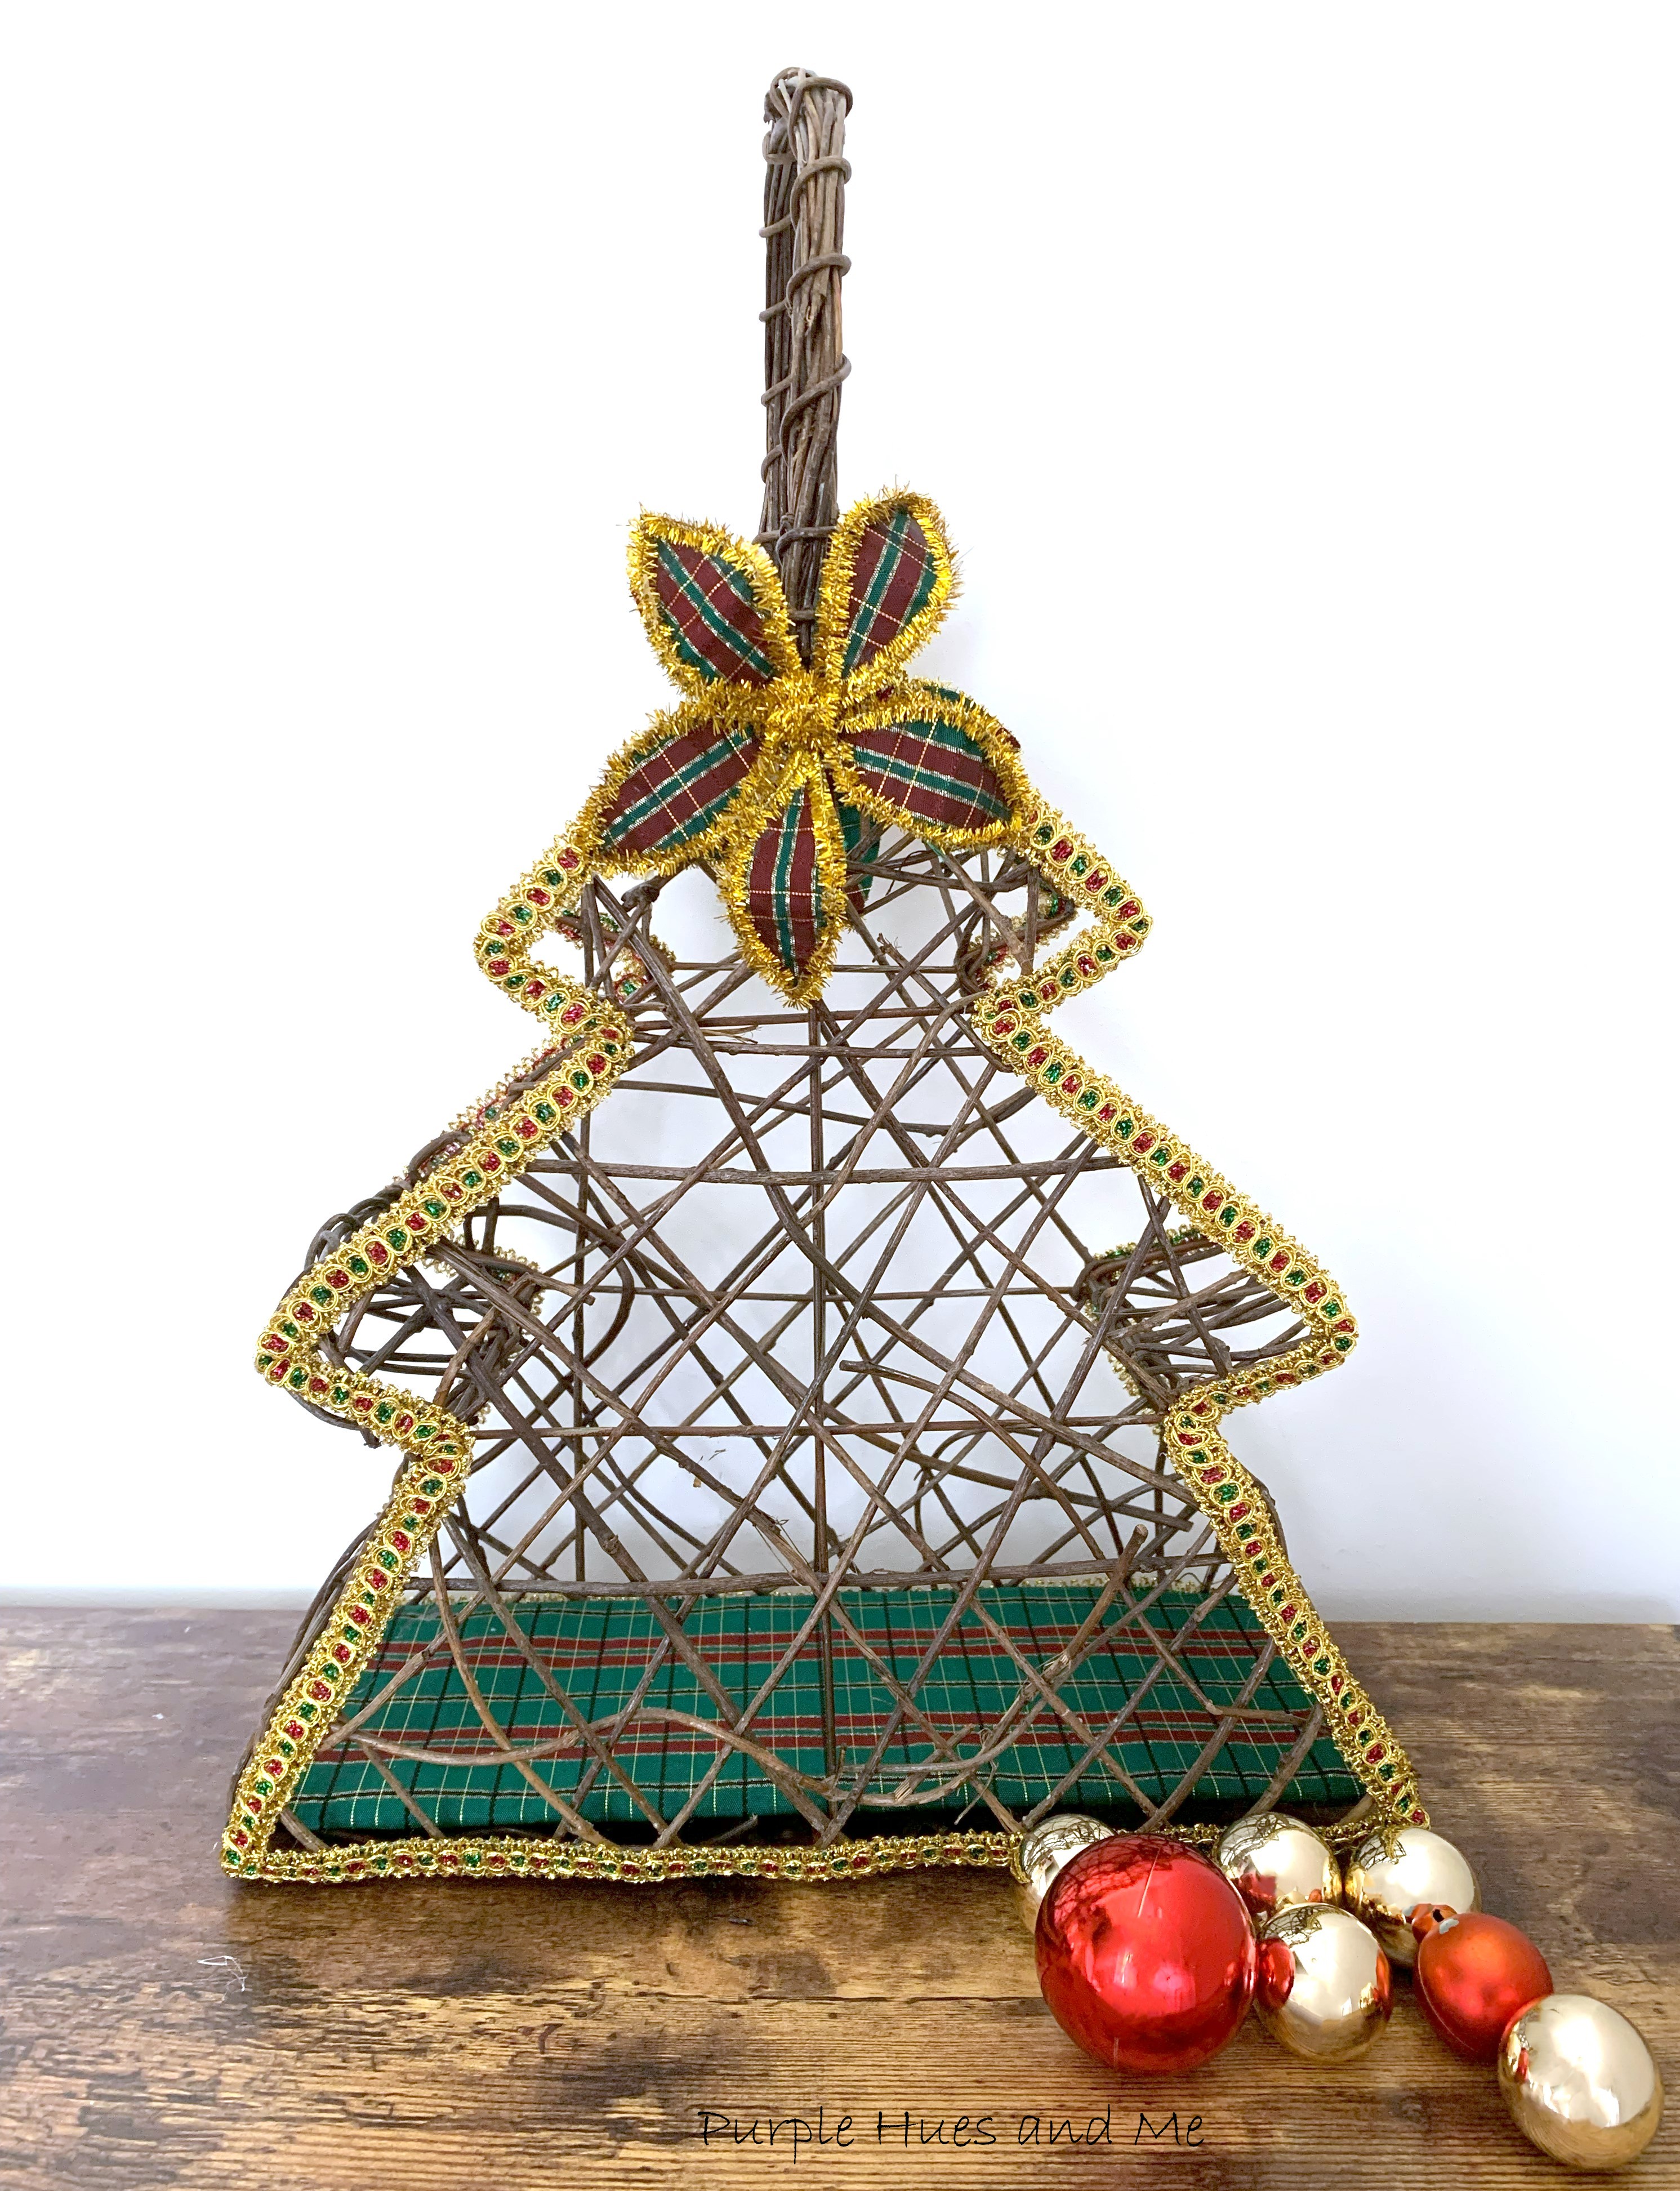
I stopped by the Goodwill this past summer and was pleasantly surprised to find a woven Christmas Tree shaped basket there. I had never seen anything like it before. It was four dollars, which I thought was a bargain so I immediately scooped it up. How often do you find something actually handcrafted! Although it did have a few flaws. The open woven wood vines design was done a bit uneven and then I discovered that the actual tree shape is wire and the vines were used in a somewhat decorative effect. The basket also had a fabric lining ( a bit cruddy) that was attached incorrectly (my thought) with the hem and seams on the outside that you can easily see. Plus the handle was attached to the outside of the basket with a rough, crooked look instead of being attached on the inside. It was as if the woven basket should have been turned inside out, lol! 


Nevertheless, I thought it was the perfect item to "do over" for this month's 'Do It Over' Designers project. Sadly, this will be our last hop for this year!

The "Do It Over Designers" is a group of creative bloggers who love to recycle/upcycle/ DIY, hosted by Anne @The Apple Street Cottage. It happens the 4th Saturday of every other month and it's all about taking something old and/or unused and 'doing it over' into something new. Anything from fabric, old dishes, and decor, to dressers and hutches. Items found in closets, cabinets, barns, garages, yard sales, thrift stores, you name it! Thanks Anne for hosting this wonderful blog hop!

The materials I used to do over this tree shaped basket include:
         Disclosure I am a participant in the Amazon Services LLC Associates Program, an affiliate advertising program designed to provide a means for us to earn fees by linking to Amazon.com and affiliated sites, this post may contain links. I may receive a very small commission at no cost to you! The affiliate money I earn helps pay my crafting expenses. Thanks so much for your support!

The first thing I did was to remove the lining of the basket. I thought I would make a pattern out of the pieces and create a new lining for the basket. But once the lining was out, I liked how the basket looked without it. Although I'm keeping the lining - I might want to use it as a pattern to add a new lining later. 


 Since there were too many wide openings on the bottom of the basket where small items could fall out I decided to make a cover for the inside base. I used a piece of cardboard from a Dell computer box (this type of box is much sturdier than an Amazon box) and drew around the base of the basket.

Then used a ruler to draw straight lines to cut out.
I had to bend the cardboard a bit to get it inside, but it was a perfect fit.

Next, I had some old plaid metallic taffeta fabric I had gotten a few years ago when plaid was ultra popular for the holidays that I used to cover the cardboard. I love the straight lines of the fabric - which is easy to follow in cutting out!
And easy to glue onto the cardboard, too!
I think I made a good choice in covering the bottom of the basket!
Don't you just love this red, green and gold trim to outline the shape of the basket! I followed the design sections of the wire, one area at a time to glue on the trim using Fabric-Tac fabric glue.


It was so easy to bend and glue on the trim around the corners.

Once one side of the basket was done, the other side was next. By the way, did you notice how straight the handle is now? All I had to do was move the handle in place. Silly me!

Once the trim was attached, I wanted to add decorative flowers to the top of the tree design using the fabric and chenille stems. To make two flowers, fold five chenille stems in half and cut at the middle.  

Fold each of the cut stems in half, twisting the bottom stems together. Push up the stem where connected to form a  flower shaped petal, pinching the fold at the tip. Then add glue around one side of the chenille petal. 
And press the chenille stem petal to fabric.
Use parchment paper to smooth the chenille stem petal down. The parchment paper helps in not getting too much glue on hands. Let dry.
        
Five chenille stem petals are used for one flower.
Once the glue is dry, cut out the chenille stem petals around the bottom of the stems.
Then shape each petals by bending slightly.

Use a small round object to cut out a small circle for the center of the flower. Then paint on glue to the fabric circle and edges to avoid fraying (not shown). Let dry. 
Once the fabric circle is dry, glue on the tips of each petal to the circle to .  .  .
form the flower.


Next, roll up a chenille stem tightly into a ball, adding glue to one side and place in the center of the flower. Add glue to the center back of the flower and attach to the center top of the basket, just under the handle. Hold in place (several seconds) until secure. Isn't this adorable!


I'm loving how this Woven Christmas Tree Shaped Basket "do over" turned out and hope you do, too!


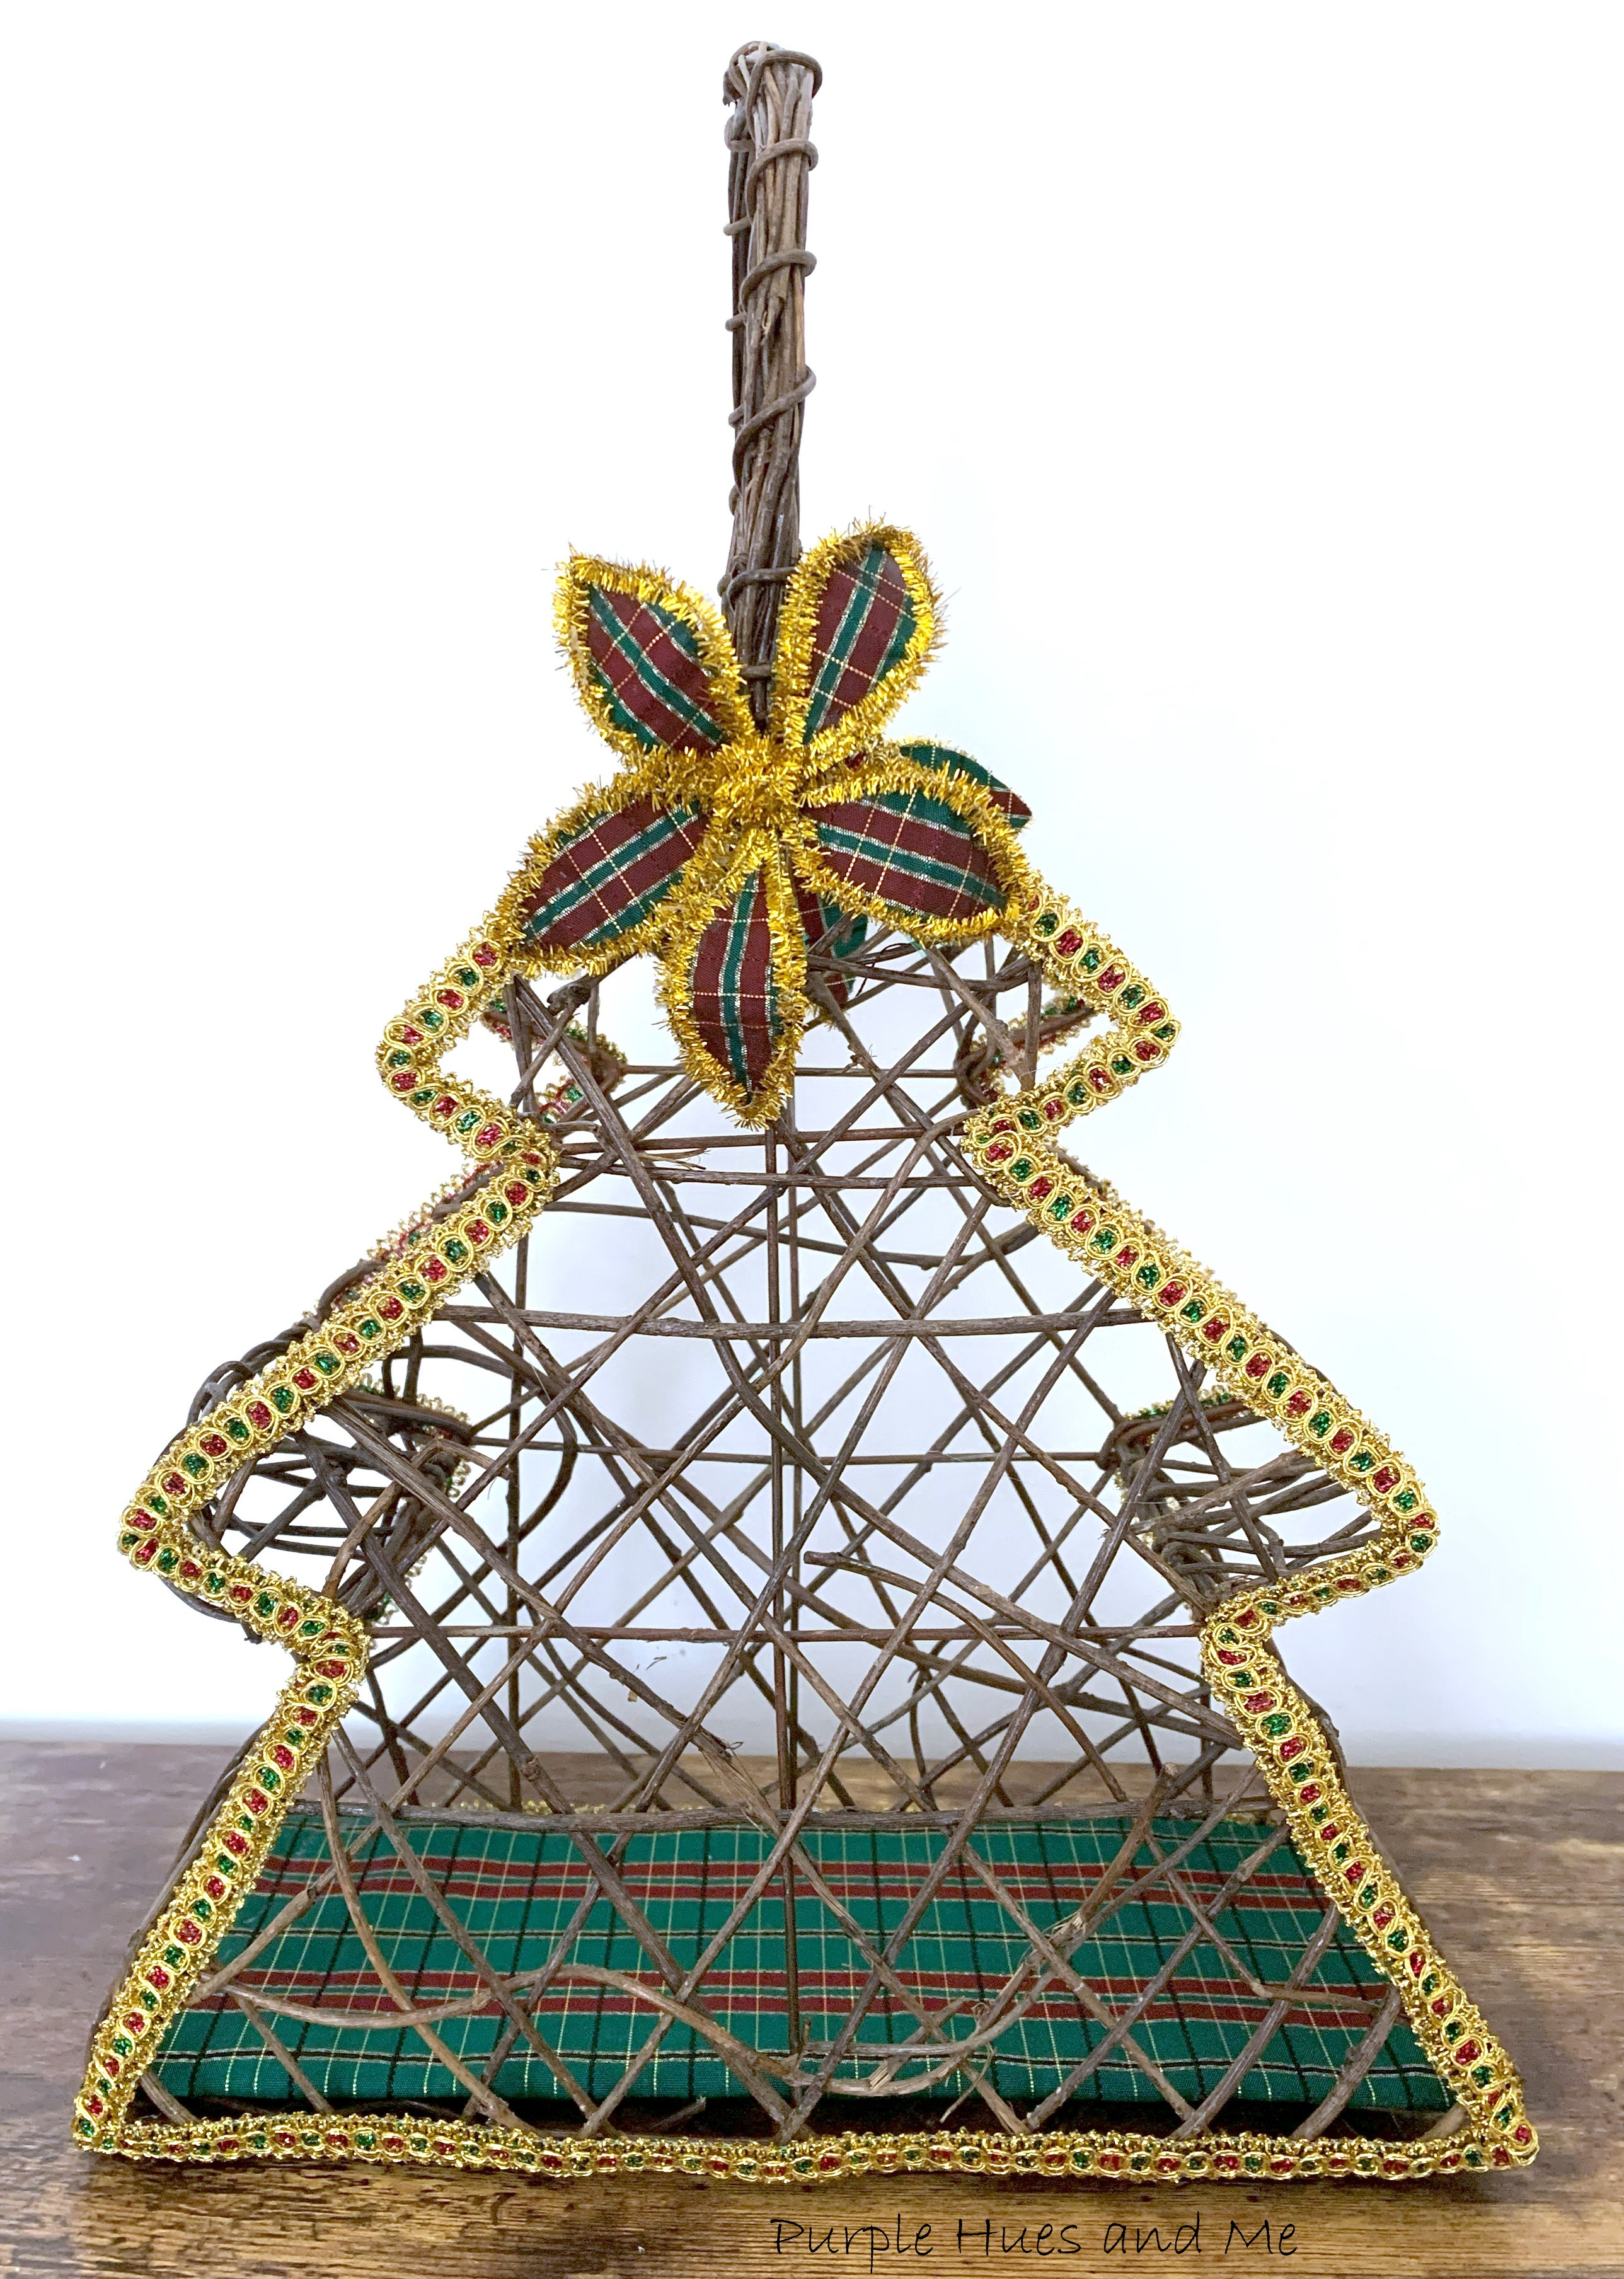
Perfect to hold small Christmas presents or holiday what-nots!


Be sure to visit all of this month's creative Projects by the 

"Do It Over Designers" listed below:

Purple Hues & Me

Sum of Their Stories

Color Me Thrifty

The Apple Street Cottage

Pandora’s Box

Birdz of a Feather

Exquisitely Unremarkable

Little Vintage Cottage

Modern on Monticello


     Happy Holidays!

Thursday, November 16, 2023

DIY Sparkling Holly Tree Centerpiece


Capture the beauty of the holidays with this sparkling holly tree centerpiece! And the fun part about this adorable handcrafted see thru  holly tree is that it lights up to enhance the sparkly hollies! How cool does that sound!
Welcome to this months' Creative Craft Hop hosted by Sara @Birdz of a Feather!

If you're coming over from Donna's @Modern on Monticello, wasn't her beaded Christmas Tree Garland adorable!

You've heard the old Christmas saying - "deck the halls with boughs of holly." Holly leaves and berries at Christmas time has always created a festive touch to any decor! But like everything these days, variations are created. I've always loved the design of hollies and wanted to use it in my Creative Craft project for this month. I hope you enjoy how I made a sparkling holly tree centerpiece!

Materials:

  • Clear Plastic Cone Tree (15")
  • Holly templates/
  • Clear Stencil Sheets
  • Chipboard sheet
  • Rhinestone Mesh Ribbon
  • Fabri-Tac Fabric glue
  • Gorilla Super Glue with brush
  • Twinkle lights

I started with a simple dreamy look using a clear plastic cone tree. Something I've had in my stash since ACMoore closed several years ago. Back then, it was labeled a "doll body" I believe for fifty cents or a dollar. They seem to be hard to find now or available at a ridiculous high price!

Next, I found a holly leaf template online that I copied, pasted in Word and printed out - one 4" long and the other 3.5" long and slightly thinner for the top. Then I cut them out on chipboard (heavy duty cardboard) so that they would stay intact while cutting the hollies out on the transparent sheets. 


At first I thought it would be easier to draw the hollies on the plastic sheets and then cut them out, but after drawing them using a magic marker and then a chalk marker and making a mess on the plastic, I decided it would be much easier to cut the clear sheets in strips and place the template on top and cut them out. Things went much quicker doing it that way.

Once the hollies were cut out, it was time to add the faux rhinestone mesh. That is, after I cut the mesh in strips. Once the strips were cut out, the next step was to measure the strip along the edges of the holly and cut out. Then add glue to the back and apply it to the edge of the plastic leaf - holding in place for several seconds until set.
                                                                         
Continue measuring each holly edge shape with the rhinestone mesh strip, cutting it and  .  .  .    
gluing in place until  .  .  .
all edges are covered.
Then, glue on a rhinestone strip in the middle .  .  . 
leaving a space on the end as a decorative effect for the holly leaf.
Then make lots more. You can imagine that this is a very tedious project. I turned on my music and made nearly fifty hollies.
Starting at the bottom with a bit of overhang on the cone, I used brush-on Gorilla Super glue that's made for clear plastics and has a quick hold of around 45 seconds to attach the hollies. No way can you use a glue that takes time to set up and I was wary of hot glue melting the plastic. 
Gluing on ten hollies for the first row.
Beginning of the second row - overlapping where two hollies meet.
Gluing on ten hollies for the second row.


Adding the third row of 10 hollies.
Fourth row of six hollies.
Fifth row of four and  .   .   .


finally added four, 3.5" hollies to the top. One in front and one in back, and one on each side for a total of forty four hollies.
How cool is this to have the bottom hollies flair out. 
It really does make for a beautiful and unique centerpiece.
Since this creation is more wintry because of the sparking stone mesh edging on clear plastic hollies and not overly Christmasy, you can use it well beyond the holidays! It makes for a striking centerpiece in your decor!

And for a bit of extra sparkle at night, add LED twinkle lights!
I hope you enjoyed how I made this sparkling holly tree centerpiece. Up next is Cecilia @My Thrift Store Addiction sharing her fabulous Mini Wreaths Napkin Rings. 

Be sure to visit all of the wonderful projects listed below for more inspiration!