Monday, January 28, 2013

Jute Wrapped Lamp PB Inspired

Natural fibers such as jute, burlap and hand woven wicker are very trendy right now.  Stores such as Horchow, Pottery Barn and Ballard Designs have jumped on the bandwagon offering fabulous items made out of these once delegated "cheap" textiles.  Even Michaels, a craft store, is offering an array of natural fibers available in pastel colors this spring.  While looking through an assortment of "new" items at Pottery Barn, I came across a couple of hand woven wicker lamps, here and here, that really inspired me to change my somewhat dowdy looking lamp that I've had for years. Instead of woven wicker. I wrapped my lamp in jute and am quite pleased with the results.

See the finished project and the comparison:
                           Mine                                                          Theirs -  Pottery Barn
The Pottery Barn lamps were quite an inspiration, don't you think.

 Pottery Barn describes their lamps this way: "bands of galvanized metal wrap these whitewashed wicker lamps for a pleasing mix of colors and textures.  Each band is accented with nails that have rusted finish for the authentic look of a found object."  The most expensive one on the right sells for $299.00

I covered my ceramic base lamp with continuous wrap of natural jute using hot glue.  I finished the look off with galvanized tab tape that I found in the plumbing dept. of Home Depot and braids of jute that I created.  Since there were holes in the tape, I didn't want to add rusted nails.

  Here is a picture tutorial of the process:


 What was once an ordinary lamp is now a trendy jute wrapped lamp of yards and yards of jute rope trimmed in galvanized metal and braided jute.  


I've created a wonderful whimsical addition to my decor that was totally inspired and copy-catted.


Until next time,

Take a little time to enjoy!


Fox Hollow Cottage


Linking To:    http://debbie-debbiedoos.com/winter-knock-off-decor.html


A Diamond in the Stuff


Chic on a Shoestring Decorating


Shaken Together


Creating with the Stars


Saturday, January 26, 2013

No Sew Frilly Fleece Hat and Scarf

 Brrrrr, it's really cold out! Yesterday we woke up to snow on the ground and nine degrees outside.  And it's snowing this very moment.  In times like this I need to do something other than clean, wash, and cook.  Although my hubby keeps talking about cooking something good, I'm not having it like that. Food is always on his mind.  I'm tired of cooking.  I want to do some crafting  and a project to work on with this type of weather should be quick and easy.  If you've ever made a fleece hat, you know that can be quite easy.  Basically, you just cut out a rectangle somewhat the size of your head, fold and stitch the side and top and BAM, you have a fleece hat.  Even though I sew, I don't feel like pulling my sewing machine out. I really have to be in the mood to sew.  I came across a no sew fleece hat here that looks cute and  you can make in an half hour or less.                               

You only need:
Fleece   (at the most, a 20"x30" rectangle)
masking tape
ruler
scissors

First you must measure your head around (circumference) where you would like to wear the hat to determine the length of fleece you will need. Add three inches for the fringe and you have the length.  In my case, 24" (circumference)+ 3" (fringe) = 27" length
Make sure the length is the stretchy direction of the fleece. 

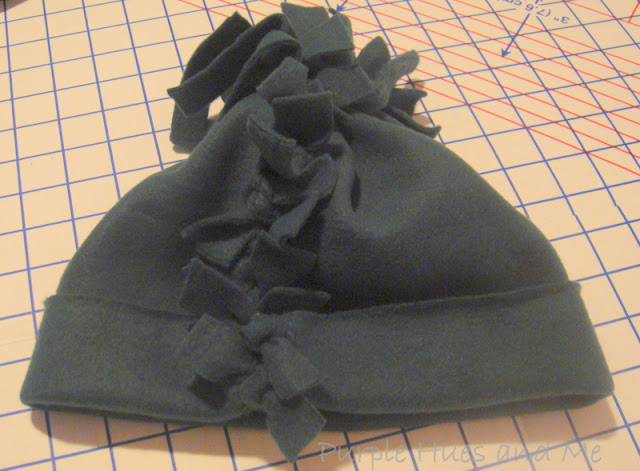
Fleece is green
                                 

Cut a piece of fleece 14"x27".   14 inches is the height of the hat.  You may want to increase this measurement if you want a larger fold or have more on top.   27" is your head circumference (24") + fringe (3").


Place a piece of masking tape three inches from the edge along the length of the fleece.
Fold the fleece in half (masking tape strip on top) and cut fleece in 1/2" strips making sure they are even as you cut.


              Open fleece and bring the two fringed edges together (touching).

 Tie fringes together into double knots, starting at the bottom. Stop tying the fringes together about three inches from top (eyeball it).


Fold bottom of hat to form brim. I like just one fold, but you might prefer folding twice.
Try the hat on and determine the height you like by gathering the top with your hand and tying tightly together with a small piece of fleece. (I used a piece of selvage edge I had cut off earlier)

Make vertical cuts in the top portion of the hat to create a pom-pom, and VOILA!  You have made a very cute no-sew fleece hat!


Now it's time to make the scarf.  I found an awesome tutorial here  that you can make in no time.

This is what I used:
3 strips of fleece - 5 inches wide by 60" long  (you can adjust the length you want)
scissors
needle and thread 

 
I layered one purple strip between two green strips.

Then I did a running stitch using a needle and thread straight down the middle of the layered strips.  This would probably be neater if you used a sewing machine, but I wanted to make a scarf anyone could do, so I used a needle and thread and remember, I didn't want to pull my sewing machine out.

Fold the layered strip together along the stitching line and cut 1/2" slits along the entire length of the layered strip.   Being careful not to cut through the stitched line.

Fluff it up and it's ready to wear along with your hat!


How cute is this! 
And done in less than an hour and ready for the cold weather!


Until next time,
Take a little time to enjoy!


Monday, January 21, 2013

Valentine Word Heart

A few years ago a friend of mine received for Christmas two wall plaques that someone had done into "Word Art." The artist had used all the words that described the personalities and uniqueness of my friends (husband and wife) into a particular shape - in her case, a shoe (she loves shoes) and in his case, a beer bottle (he loves beer)  The words were done into the shape of these items, but there were no lines or borders.  The words were also written vertically as well as horizontally. It was quite amazing how this was put together and to read every word that described my friends was so entertaining and enjoyable.


 I'm thinking I've seen this before, but when I looked on the internet to see if I could make something like this, I couldn't find anything useful.  I concluded that you need special software to achieve this wonderful application. 


However, in my search, I did come across a site called Neoformix where I discovered this  called Word Hearts in celebration of Valentine's Day.

In short, this is a simple tool that automatically fills a heart shape with any words you like.  In my case, I used my name, Gail, my hubby's name, Gerald, my son's name, Adam and the words Love, Hearts and Valentine.  All I had to do was enter the words separated by commas in the text box and press the "enter" key.  I could also choose one of three fonts or change the colors.
 This is a really cool application! The only problem is there is no built-in method to save the image that you create.  Neoformix offers many different tools that can be used to save what you created and then you can paste it into any image editing program to crop, save or print. 

I'll walk you through what I had to do. To begin with, this application requires java to run, so you will have to download java if you don't have it.

After entering all the words I wanted to use and hitting enter, the following is what came up:
 Next, I hit the "Print SCRN" (screen) button and then pulled up my "The Print Shop" program that I've been using for a number of years.  I have Microsoft Office Word and Powerpoint, but I couldn't figure out how to use this on them.  Using a blank page, I hit "Contol V", and the above image came up. The Print Shop has a feature called "Advanced Photo Editor" which I used next. I was able to crop, resize and save the valentine image exactly how I wanted it to look.
There were so many options to use with the photo editor. I was even able to do an "embossed" look for the valentine.

                                             How cool is this?

I love word art!  It can become so personal.  I was able to print out my hearts and put them into frames for Valentines. But you can easily make one into a sweet Valentine card.

                            Sorry about the glass reflection here  .  .  .


                                           Makes for a lovely Valentine's gift, too!

Until next time,
Take a little time to enjoy!