Saturday, March 26, 2022

Upcycled Coffee Can Wall Pocket


I grew up in Washington DC and now live about twenty-seven miles from there. This time of year it's all about the Cherry Blossom Festival!  Nothing signifies the arrival of spring in the nation's capital quite like the blooming of the cherry blossom trees and to honor American and Japanese cultures. The festival is basically promoting the beauty of nature and the international friendship between America and Japan. The festival runs between March 20th to April 17 with the peak blooms happening this week because of the warmer weather we've had earlier.

If you've never been here during this festival, you can't imagine how beautiful the cherry blossom trees look in person. 
Several months ago, I found cocktail napkins with a cherry blossom design at a Wegmans store. I had no idea what I would do with them, but I couldn't resist the pretty cherry blossoms pattern with a chinoiserie border:
And then, recently on a Mod Podge Face Book group I belong to, it seemed like everyone was on a smashed tin can decoupage project rage and kept sharing their creations. So naturally I decided to jump on the bandwagon for smashing and decoupaging my cherry blossom napkins on a tin can and to share it here with the Do It Over Designers!  

In
 case you don't know, the Do It Over Designers is a group of talented bloggers who love to recycle/upcycle/DIY, hosted by Anne @The Apple Street Cottage. It happens the 4th Saturday of every other month and it's all about taking something old and/or unused and 'doing it over' into something new. Anything from fabric, old dishes, and decor to dressers and hutches. Items found in closets, cabinets, barns, garages, yard sales, thrift stores, you name it!

Here's how to make a upcycled Coffee Can Wall Pocket:
Supplies Needed:
  • Coffee can
  • Can opener
  • Quick Hold adhesive glue
  • Chalk paint/paint brush
  • Mod Podge (Matt)
  • Napkin
  • Drill
  • Clothes hanger
  • Wire Cutters
  • Needle nose pliers
  • Cherry Blossom faux florals

Disclosure I am a participant in the Amazon Services LLC Associates Program, an affiliate advertising program designed to provide a means for us to earn fees by linking to Amazon.com and affiliated sites, this post may contain links. I may receive a very small commission at no cost to you! The affiliate money I earn helps pay my crafting expenses. Thanks so much for your support!

How to:
I started with a clean, empty 48 oz. coffee can and .  .  .

removed the bottom and label which came off very easily. 
Then, I placed the can on my rug and stood on the bottom edge to press or smash it together.

Next, I added Quick Hold adhesive between the bottom edges to keep the edges together, creating a pocket. Fyi, hot glue doesn't hold the bottom edges together.
Then, I painted a couple of coats of white chalk paint on the pocket, and let dry between coats.
Next, drilled holes on each side of the pocket for hanging.

To decoupage the napkin on the pocket, I opened the napkin and removed the plain ply layer from the printed one. To do this, lightly touch a bit of Mod Podge with forefinger and thumb. Then gently tap the edge of the napkin to separate the layers.

Next, lightly coat the pocket with Mod Podge in sections, starting at the bottom
and applying the border and portion of the napkin to the mod podged pocket.

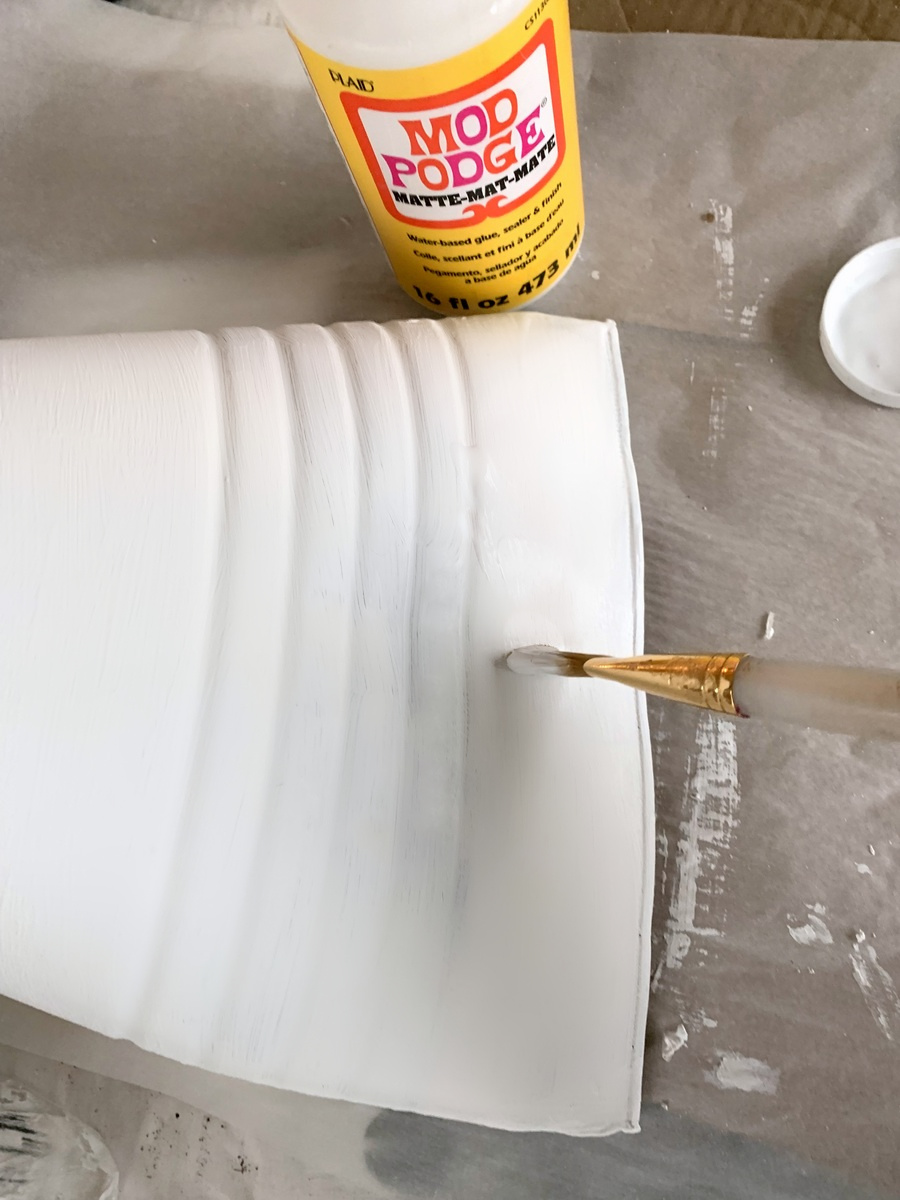
Use clear plastic (I cut up plastic baggies) to help smooth out any wrinkles being careful not to lift the napkin. Paper napkin patterns are very delicate once the white backing layers are removed.  Using clear plastic helps with the adherence and is less messy than the usual technique of applying mod podge first, and smoothing out the material  with a brush. Continue applying mod podge and the rest of the napkin - smoothing out with plastic until the entire pocket is covered. Let dry. 

Once completely dry, add another layer of Mod Podge to seal. Then cut off the straight wire bottom of a wire clothes hanger leaving a one inch portion of curve at the hanger sides for the handle. Attach to the pocket. Use needle nose pliers to curve the wire inside to keep from pulling out. A layer of varnish can also be applied to seal the finish.

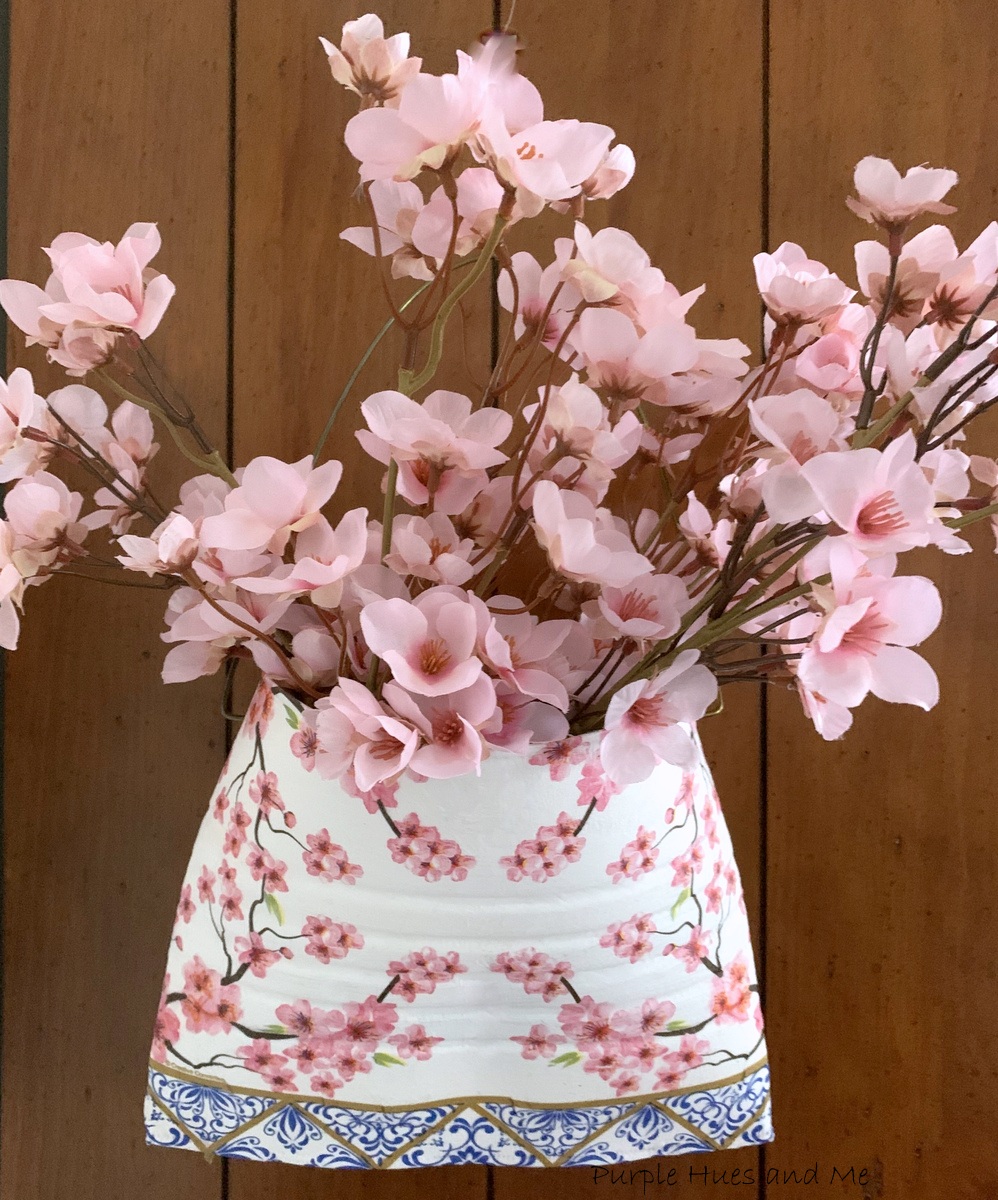
How adorable is this!

Place cherry blossom florals in the pocket to complete the look!

Be sure to check out all of the 'Do It Over Designers' listed below to see their lovely "do overs," too! 

Purple Hues & Me

Birdz of a Feather

Unique Creations by Anita

Interior Frugalista

Sum of Their Stories

Exquisitely Unremarkable

Little Vintage Cottage

Modern on Monticello

Pandora’s Box


Thursday, March 24, 2022

Woven Ribbon Wall Basket


If you love ribbon as much as I do, you especially love creating pretty crafts featuring them! I've been on a basket making kick lately and today, have I got a unique way of making one for the wall! Would you guess it's made basically out of wire clothes hangers, balsam wood and ribbon? Yes, that's right! Wire clothes hangers! It's a pretty upcycle craft - perfect for our monthly Creative Craft Hop hosted by Sara @Birdz of a Feather! If you're coming over from Cecilia @My Thrift Store Addiction, wasn't her Floral Cross Upcycle adorable? 

So let's get started with creating a woven ribbon wall basket!

Supplies:
  • Wire clothes hangers (2)
  • Wire cutters
  • Cardboard
  • Balsam wood strip (1" wide)
  • Satin ribbon (5/8" 10yds)
  • Decorative ribbon (7/8")
  • Hot Glue/glue sticks
  • Fabri-Tac fabric glue
  • Vine covered wire rope
  • Styrofoam

Disclosure I am a participant in the Amazon Services LLC Associates Program, an affiliate advertising program designed to provide a means for us to earn fees by linking to Amazon.com and affiliated sites, this post may contain links. I may receive a very small commission at no cost to you! The affiliate money I earn helps pay my crafting expenses. Thanks so much for your support!


Instructions:
Begin by cutting five, 7" long pieces of wire from clothes hangers.

Keep one piece straight, placing it on the center of  a piece of cardboard. Then slightly curve two near the top - curving one, to the right. The other, curving to the left, then placing them an inch apart from the center wire. Next, slightly curve the remaining ones - one, to the left (from the bottom) and the other, to the right (from the bottom) - placing one inch apart, as shown.

Next, measure the total width of the wire placements, top (9") and bottom (6") and cut the balsam wood strip the measurement of the widths. Apply hot glue to the wire tops and bottoms and attach the wood strips.

To weave the ribbon, originally, I thought a five yard roll of ribbon would be enough to cover the entire area of the wire basket frame. That's the standard amount of ribbon on a roll and I have plenty of those. So I'm showing how I started with a pretty shade of lavender in a soft satin ribbon I had on hand for the first few steps of weaving the ribbon.

First, unroll the ribbon and fold it in half to find the middle - placing the middle of the ribbon on the center of the bottom wires. Then take the end of the ribbon and begin weaving over the first wire and under the second, over and under and over the last wire. Adjust the ribbon to make sure the ends are even and the over, under weave is in the center of the length of the ribbon.

Then take the ribbon end from the left side and take it behind the first wire, over the second and at the same time, under the ribbon that's woven beneath .  .  .

taking the ribbon over the fourth wire and at the same time under the ribbon and around the fifth wire going back behind the fourth, over the third and under the second, over the first. It helps to look at the picture, if you're confused.

Continue repeating the same previous steps for each row, alternating the ribbon going over and under.
I continued weaving the ribbon over and under each row - towards the top and this is when I realized that I didn't have enough ribbon to cover the basket frame. And I didn't have enough of the same type ribbon to add to it, either. 

So I took all of the ribbon out and searched my stash for a roll of ribbon with 10 yards. I had only one 10 yd roll in a spring color. But the ribbon wasn't as soft as the first. It was a bit stiff, but I didn't want to go out and buy more ribbon so I tried it out anyway. 

Picking up the tutorial where I left off, except with another ribbon in the following pictures. You'll notice the ribbon doesn't lay as nice as the first one, but that's ok. The weave will be a little wonky!
Continue weaving over and under, alternating ribbon. Gently pull the woven ribbon at the sides to tighten the weave and .  .  .
continue on to the top.
After reaching the top, carefully weave the ends of the ribbon to the back, hiding the ends and gluing in place. 
Then cover the top and bottom wood pieces with fabric glue and .  . 
smooth out the wider decorative ribbon on top of the glue. Let dry. Cover the back side with cardboard cut to basket shape and attached with hot glue.  

 To make the handle, measure how high and round you want the handle placed on the basket then begin twisting vine covered wire together .  .  .
several times until satisfied with .  .  .
the thickness and shape.
Attach handle to basket using end wires and hot glue. Add a small block of styrofoam between the cardboard and basket to attach faux flowers.

How adorable and cute is this!

You're gonna love checking out this months' Creative Craft Blog Hop featuring lots of wonderful craft ideas and inspirations! I hope you enjoyed my tutorial on making a Woven Ribbon Wall Basket! Up next is Donna @Modern on Monticello sharing her adorable garden signs! Then be sure to stop by all of the fun and awesome projects listed below for this hop!


Floral Cross Upcycle - Cecila @My Thrift Store Addiction

Woven Ribbon Wall Basket - Gail @Purple Hues and Me

Adorable Garden Signs - Donna @Modern on Monticello

Burlap Cross Wreath - Niki @Life as a Leo Wife

Easy Easter Basket Tags - Tammy @Patina and Paint

Sweetest Change to a Bird Cage - Terrie @Decorate and More With Tip

Acrylic Pour Painting - Sara @Birdz of a Feather

Floral Ice Cream Cones - Jenna @Patina and Paint


Monday, March 21, 2022

24 Easter Crafts You'll Love To Make


Easter is just around the corner - so you still have time to get ready for that special time! Here are some of the coolest Easter crafts that I've made throughout the years! Twenty-four of the most adorable and easy to follow tutorials! I hope you aren't overwhelmed in deciding which ones you'd like to make! Pin the ones you like and save for later! Just click on the title and it will take you to the tutorial. Happy Easter Crafting!

Decoupage Paper Mache Bunny


Checkered Plaid Egg with Flowers

Burlap Easter Bunny Bag


I hope you enjoyed my collection of Easter crafts to create - and are inspired to make a few Easter season!

Thanks for stopping by

and take a little time to enjoy,

Happy Easter Crafting!