Showing posts with label Bows. Show all posts

Tuesday, February 28, 2017

How To Make a Tulle Dress Bow Holder


Hi everybody! Did you know March is National Craft Month?  For me, every month is national craft month, but today, in anticipation of this wonderful event, I'm over on Bowdabrablog.com celebrating and sharing with you how to make an adorable bow holder!  This is something every girlie girl needs for her growing collection of hair bows and accessories and .  .  . it looks great, and also makes for a lovely gift, too!  So head on over to get the full tutorial


Thanks for stopping by


and take a little time to enjoy -

Happy Crafting!


Monday, October 17, 2016

Bowdabra Fall Wall Hanging


Looking for something different to style your office or home that shouts FALL?  Why not create this lovely wall hangingfilled with pretty Bowdabra bows!


I'm over on Bowdabrablog showing you how to make this awesome fall wall hanging.   Head on over and check out my easy to follow tutorial!


Have Fun  


and


Keep Crafting! 


Tuesday, September 6, 2016

Batiful Halloween Decorations


Thinking about Halloween?  This is Gail @Purple Hues and Me and I'm on Bowdabrablog today showing you how to make "flying" bat decorations using your Bowdabra!  Head on over and check it out! They are super easy to make and will be a hit at any Halloween celebration.  And the best part - they are absolutely BATIFUL!


Enjoy, Have Fun  
and
Keep Crafting with your Bowdabra!

Monday, August 1, 2016

Bow Ribbon Clock - Back to School Time


Hi everybody!  It's Gail @Purple Hues and Me and I'm over on Bowdabrablog showing you how to make this oh so cute bow ribbon clock! 

Do you realize it's that time of year to start getting ready for back to school.  What better way to start off the new school year by being on time!  Why not make an adorable bow ribbon clock so your kids will have no excuse to be late! Have fun putting one together using Bowdabra bows!  So hurry on over and get all the details in my step by step tutorial

It's the perfect creative addition in any little girl's room!


Monday, June 13, 2016

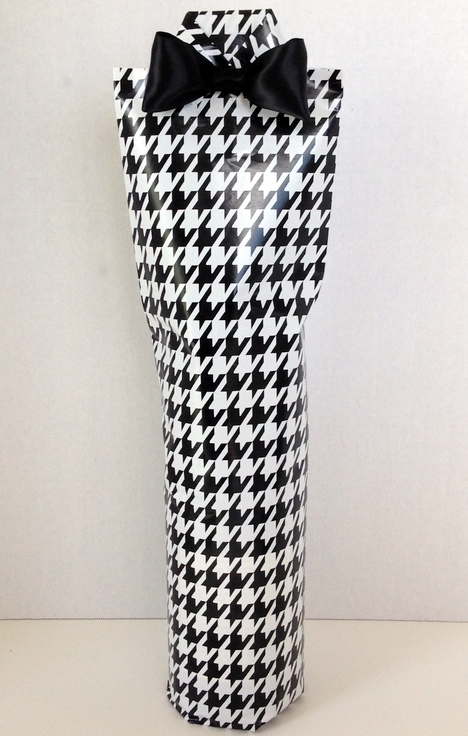
Father's Day Bow Tie Gift Wrapped Wine Bottle


Does your Dad love a good bottle of wine?  Then he'll certainly get a kick out of receiving this adorable Father's Day wrapped package!  It's a fun and festive way to decorate wine bottles with wrapping paper and an awesome Bowdabra Bow Tie.  This post first appeared on Bowdabrablog where I'm part of the design team.

Here's how to make! 

Gather the following materials:
Wrapping Paper
Ribbon
Double Sided Tape/Hot glue
Scissors
Wine Bottle
Mini Bowdabra and Ruler
Bowdabra Wire/Wand

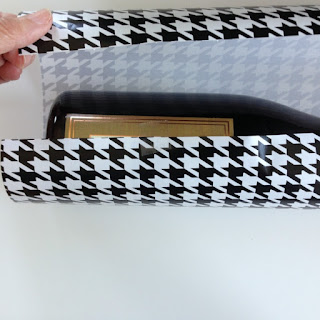
Begin by cutting the wrapping paper large enough to wrap around the wine bottle, leaving a few inches on the bottom to close and on top to fold down into a collar.

Apply double sided tape along the edge of the wrapping paper and then wrapping the paper around bottle to seal.


Fold in the bottom paper, applying double sided tape to center.


Crease and smooth outside edges the length of the bottle neck.


Make a  1/2" fold at the top .  .  .

and fold over again.

Next, just at the edge of the fold, make a 1/2" horizontal cut from the outside edge on the right and another on the left through the paper and not the folded portion.


Make a vertical fold on both left and right sides into a "V" for the collar.


Unfold the collar and place a strip of ribbon on the fold line and fold over again with ribbon - as if tying a bow.


Crossover the ribbon tails just under the collar .  .  .


and secure with a dab of double sided tape.
Cut off excess ribbon close to collar.


To make the Bowdabra Bow Tie:

Cut a 12" piece of Bowdabra bow wire and fold in half.  You will have a loop at one end and two loose pieces at the other end. Place folded wire into the Mini Bowdabra.

Cut a 7" piece of ribbon, crease end and insert into the Mini Bowdabra.


Crease the other end of ribbon and loop above the tower and insert into the Mini Bowdabra.


Each end is gathered and centered in the Mini Bowdabra.


Using the bow tool and ruler as a guide, position the loops evenly.
Pinch the side of the ribbon and press center down into the Mini Bowdabra.


Scrunch down ribbon with the Mini Bowdabra wand.


While the bow is still in the Mini Bowdabra, thread the two loose ends of the Mini Bowdabra bow wire through the loop at the other end, pulling the wire tightly.


Gently pull the bow out, separating the two loose ends around to the back, tying in a knot.  Cut off excess wire.


To finish the bow, cut a small piece of finishing ribbon 2" long.


Run double sided tape along the wire and attach the finishing ribbon, starting and ending at the back, heat sealing ends.  Fluff bow.


Adhere Bowdabra bow tie to center of wrapping paper collar with glue.


A super cute, fun and festive Father's Day gift wrapped bottle of wine!


Take a little time to enjoy
and
Happy Crafting!


Saturday, December 5, 2015

Ribbon Flower Decoration


I hold "Let's Get Crafty" sessions in my community clubhouse each month.  For this month's get together we made pretty ribbon flower and bow decorations. I am on the design team for Bowdabra but had never shown the ladies how I use my Bowdabra to make bows. So instead of just making bows, I thought I would show them how to add a handmade decorative flower to a bow that can be used the same way as a regular bow, only it's so much prettier!

ACMoore offered 10yds of ribbon for one dollar during its' Black Friday sales so I picked up enough ribbon for everyone to have a roll each. 

This project was so easy using just a few items. 
Materials needed:
Wired Ribbon - 2 1/2" wide
Fabri-tac fabric glue
Scissors
Triangular shape pattern (7 1/2"x2 1/2")
Bowdabra, wire, and wand

Begin by laying the pattern on the ribbon and cutting out about 8 triangular shapes.  It was easy to just match the slanted lines once cut and then cutout - no wasted ribbon.


Add glue to the underside of ribbon edge.


Bring ends together into a point, overlapping and sealing edges into a cone shape.


Place dabs of Fabri-tac glue on top and bottom sides and press two cones together, matching seams and lines.
 
 
Continue gluing on the cone shapes to form a circle. Lay the cones down on a flat surface as you are gluing so that the cones are level and even.


Looks sorta like a ribbon pointsettia .  .  .

 
and even looks good on the underside, too.


Add a decorative trim in the center for a finished look.


To make the bow, fold a 24" piece of bow wire in half and place in the Bowdabra. Decide how big you want your loops and fold the ribbon into a loop and press into the Bowdabra.  Twist and fold the ribbon so that the right sides are showing.


Continue twisting and folding the ribbon back and forth, until you have created as many loops as you want. I made four loops on each side.
 

Scrunch down the ribbon with the wand.
 
 
While the bow is still in, push the two loose ends of the bow wire through the loop at the other end and pull the wire tightly. Remove the bow out of the Bowdabra and tie the ends to the back. Shape and fluff the bow.

 
Glue on the decorative flower to the top of the bow.
 
Pretty!
 
Imagine this on top of a beautifully wrapped present!


We had a fun time putting the flower bow decorations together.  We joked about adding faux flowers to the center and using it as a bouquet.  The ladies were so excited when they finished that I forgot to take more pictures - especially of their finished flower bows!


Take a little time to enjoy

and

Happy Holiday Crafting!