Showing posts with label Paper Crafts. Show all posts

Friday, February 1, 2019

Heart Shaped Paper Box DIY


You all know I love making crafts but sometimes I don't have a clue as to what to make next! But by joining an awesome Bring On The Crafts group, it allows me to create something based on a monthly theme! And that happens to be so cool to me! 

February's theme is PAPER!. It can be any craft of our choosing as long as we use some type of paper to make it. That could be anything from decoupage to scrapbooking to cardmaking to origami. It's our choice!

Do you perhaps need a last minute box or container for that special romantic occasion that's coming up soon? Something to put those special items in? Be it jewelry, candy or any sentimental what-not!  Here's an easy way to make an adorable heart shaped box out of paper - using either clear acetate, or good old fashion cardstock!  You certainly can't go wrong making one of these! And it's definitely awesome to know how! 

 You won't believe how quick it is to make, either!  Just copy and paste the template - adjusting the size in WORD, print and cut-out!

Here, I'm using clear acetate sheet paper.


Then, by merely folding along a few lines - just glue together one side in place! 
And finally, attach a pretty ribbon for an adorable look!  

Oh, and did I mention you can add your own design or words to the template? I used Picmonkey to add my flower graphic!


And of course you can always use reliable cardstock for your favorites!
I am a participant in the Amazon Services LLC Associates Program, an affiliate advertising program designed to provide a means for sites to earn advertising fees by advertising and linking to Amazon.com
Join in on the fun, too!

Bring on the Crafts 700 x 550

Bring on the Crafts — A Craft & DIY Blog Hop
On the first Friday of each month, a group of DIY and crafty bloggers join forces. Together with hosts Marie from The Inspiration Vault and Habiba from Craftify My Love, they bring you the #BringontheCrafts blog hop. Each blogger creates a fun craft or DIY project to share that follows a monthly materials theme. February's theme is Paper! Each blogger chooses their own craft to make as long as they love it and it uses paper in the project.

Our February Co-hosts

Heather @ Glitter on a Dime

Join in on the fun! If you'd like to participate next month, you can request to join our Bring on the Crafts Facebook Group
Next month's theme is Mod Podge!
Not a blogger, but a creative mind none the less!? Don't worry, Share your awesome creations in our Craft Cult Facebook Group. This is also a great place to ask craft & DIY related questions and find inspiration for your next project.

Now let's see all of those amazing Craft and DIY Projects.


 Inlinkz Link Party

Sunday, April 22, 2018

Make an Upcycle Magazine Paper Basket for Earth Day


This is a re-post of a tutorial I did a couple of years ago on how to make a basket using magazine paper for Earth Day that's celebrated on April 22nd! I love recycling items from around the house to make craft items all year long! This basket is one of my favorite pieces and I love how it is still in great shape and still pretty to look at!

There are so many crafts that you can make to celebrate Earth Day.  It's a great time to look around your home and see what you've collected to repurpose into something new. 

I keep a decorative container filled with magazines in my bedroom. I love looking at them over and over to get inspiration and sometimes use in recycle/upcycle projects.  I remember seeing a basket  made of coiled magazine strips shaped into open squares that looked so different and unique.  I filed that image away intending one day to create something like it.

It has taken awhile to finally put the basket together.  I actually started it last year, got discouraged, and put it away. A craft group that I belong to decided to do a blog hop on earth day crafts and I knew the magazine basket would be perfect for the event.

You really don't need a lot of supplies to make this adorable basket :

Magazine pages
Small square container
White glue
Wood skewer
Scissors
Hot glue gun
Mod podge
Cardboard

Begin by making the magazine tubes that will be shaped into squares.  Since this is an Earth Day project, I cut out only green & blue pattern magazine pages - green for grass, blue for sky. Cute, eh!  Fold the page in half lengthwise, and then fold in half again. Cut along the folds into four even strips. 
Take a skewer stick and place it on the corner edge of the magazine at an angle.
Then take the end tip of the page over the skewer and start rolling the paper on the stick until you get near the end. You might have to lift the paper up to tighten the roll by twirling the stick.  It takes a bit of practice to make tight tubes. 

Add white glue to the triangular edge and roll to the end. Flatten the finished tube. 
You will need to make lots and lots of tubes for this basket.

Next, take a small square container (I used an empty salt shaker) and wrap a tube around it a few times. Connect additional tubes, if needed, by adding a little white glue on end and inserting into opening of wrapped tube. 
 Seal end with hot glue.
You will need 54 magazine paper squares to assemble this basket.


To assemble, connect the squares in groups of three for each side. Apply hot glue along the connecting edges and press together. Then cut smaller strips of rods and wrap around the connecting sides and hot glue in place.  

For the shorter two sides, three rows of three squares were glued together and wrapped.

For the longer sides, and bottom, four rows of three squares were glued together, wrapped. 

All corners were connected in the same manner to form the basket.

Next, cardboard was measured and cut-out slightly smaller than the bottom of the basket, mod podge on both sides with magazine paper, and inserted inside the basket to prevent contents from falling out.


And finally, five magazine tubes were woven together to make the handle. You can see a full tutorial on how to weave here.  The ends of the handle were wrapped around the center square, hot glued together and secured with a piece of magazine tube and hot glue.


The basket can be sealed with mod podge or gorilla wood glue that dries clear.


This handcrafted upcycled magazine basket is perfect for showing off a huge array of items, one of which are beautiful spring flowers.


Thanks for stopping by,
                                                                           

Monday, June 13, 2016

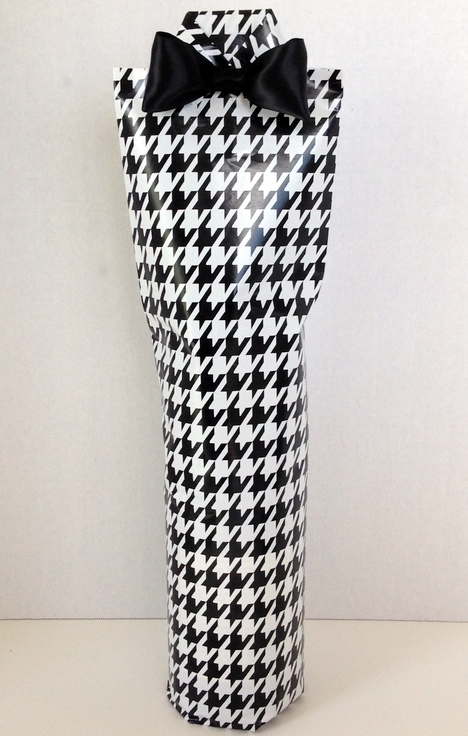
Father's Day Bow Tie Gift Wrapped Wine Bottle


Does your Dad love a good bottle of wine?  Then he'll certainly get a kick out of receiving this adorable Father's Day wrapped package!  It's a fun and festive way to decorate wine bottles with wrapping paper and an awesome Bowdabra Bow Tie.  This post first appeared on Bowdabrablog where I'm part of the design team.

Here's how to make! 

Gather the following materials:
Wrapping Paper
Ribbon
Double Sided Tape/Hot glue
Scissors
Wine Bottle
Mini Bowdabra and Ruler
Bowdabra Wire/Wand

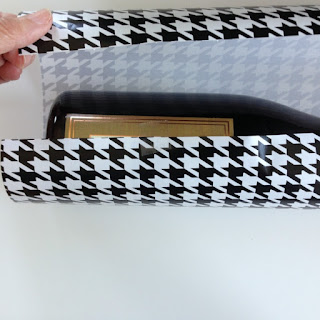
Begin by cutting the wrapping paper large enough to wrap around the wine bottle, leaving a few inches on the bottom to close and on top to fold down into a collar.

Apply double sided tape along the edge of the wrapping paper and then wrapping the paper around bottle to seal.


Fold in the bottom paper, applying double sided tape to center.


Crease and smooth outside edges the length of the bottle neck.


Make a  1/2" fold at the top .  .  .

and fold over again.

Next, just at the edge of the fold, make a 1/2" horizontal cut from the outside edge on the right and another on the left through the paper and not the folded portion.


Make a vertical fold on both left and right sides into a "V" for the collar.


Unfold the collar and place a strip of ribbon on the fold line and fold over again with ribbon - as if tying a bow.


Crossover the ribbon tails just under the collar .  .  .


and secure with a dab of double sided tape.
Cut off excess ribbon close to collar.


To make the Bowdabra Bow Tie:

Cut a 12" piece of Bowdabra bow wire and fold in half.  You will have a loop at one end and two loose pieces at the other end. Place folded wire into the Mini Bowdabra.

Cut a 7" piece of ribbon, crease end and insert into the Mini Bowdabra.


Crease the other end of ribbon and loop above the tower and insert into the Mini Bowdabra.


Each end is gathered and centered in the Mini Bowdabra.


Using the bow tool and ruler as a guide, position the loops evenly.
Pinch the side of the ribbon and press center down into the Mini Bowdabra.


Scrunch down ribbon with the Mini Bowdabra wand.


While the bow is still in the Mini Bowdabra, thread the two loose ends of the Mini Bowdabra bow wire through the loop at the other end, pulling the wire tightly.


Gently pull the bow out, separating the two loose ends around to the back, tying in a knot.  Cut off excess wire.


To finish the bow, cut a small piece of finishing ribbon 2" long.


Run double sided tape along the wire and attach the finishing ribbon, starting and ending at the back, heat sealing ends.  Fluff bow.


Adhere Bowdabra bow tie to center of wrapping paper collar with glue.


A super cute, fun and festive Father's Day gift wrapped bottle of wine!


Take a little time to enjoy
and
Happy Crafting!