Showing posts with label monthly challenge blog hop. Show all posts

Monday, April 10, 2023

Spring Fling Decoupage Watering Can

Welcome to our Monthly Blog Hop Challenge! The theme for this month is Spring Crafts/Projects! After basically being cooped up during the winter months, we all certainly welcome Spring and its' new beginnings! There is so much to be done during this time! So I'm looking through my stash to see what I can make since I vowed to use what I have in crafting this new year! I came across a watering can that I got on clearance from Hobby Lobby some time ago. Updating a watering can by creating a colorful spring look using decoupage and DT Spring Fling paper napkins is the perfect project for this challenge! A watering can is so easy to spruce up for spring! Decoupaging watering cans are quite popular. Most are painted first and then decoupaged. But I like the metal finish of a watering can and decided to leave it as is to decoupage!

But first, we need to gather the supplies to work with! 

Materials:

  • Watering Can
  • Paper napkins
  • Matte Mod Podge
  • Brush
  • Water brush pen
  • Tweezers (optional)
  • Plastic ziplock bag
  • Sanding block 
  • Outdoor Mod Podge (to seal)

The watering can must be clean and grease free! After thoroughly washing and drying the can, use an alcohol soaked cloth to wipe down to remove any residual dirt and grime. I found a pack of napkins at the Dollar Tree appropriately labeled Spring Fling - which I take to mean "an event held in spring" - and not the romantic kind, lol! I love that there are purple flowers included in the napkin design!

After opening the napkin and laying it on my work surface, I used a brush pen filled with water to outline the portion of the napkin I will use. I love how the brush pen works! Instead of dipping a regular brush in water, you simply add water to the barrel of the pen and squeeze it to wet the brush!
Then tear the water outlined portion of the napkin out and separate the plain layers from the printed one.
Any straight edges were feathered out using the tip of tweezers or your fingernail.
Next, lay the napkin design down (right side up) on the outside of the can for fit. 
Apply a layer of Matte Mod Podge onto the can surface. 
Place the napkin design on top of the MP, smoothing out from the center to edges using a sheet of plastic from a ziplock bag. Apply additional MP using a soft brush to smooth out wrinkles after using the plastic, and not before. Sometimes the napkin will lift up if you apply MP on top before using the plastic.
See, nice and smooth! 

As you move around the can, continue to apply the mod podge and .  .  .
napkins in sections and .  .  .
using the plastic to remove wrinkles.
Once dry, use a sanding block to remove excess napkin on top and bottom edges.
I elected not to add napkins to the spout and handle. I love the exposed look of metal.
Since the watering can may come in contact with water and or outside, once dry, apply Outdoor Mod Podge to seal.
I love how the shiny finish on the metal watering can comes through the decoupaged napkin!
 The perfect addition to your Spring decor!
Which can be used as a vase or decorative watering can!
For this project, I've joined a group of bloggers to bring you a themed blog hop challenge on the 2nd Monday of the month, hosted by Beverly @Across the Blvd. This month, it's all about Spring Crafts!


Be sure to check out all the awesome bloggers and their projects listed below:

Beverly | Across the Blvd | Spring Napkins Made with Cricut

Gail | Purple Hues and Me | Spring Fling Decoupage Watering Can

Marci | Stone Cottage Adventures | Tropical Cosmetic Bag

Allyson | Southern Sunflowers Spring Door Hanger Dollar Tree DIY Idea

Niki | Life as as LEO Wife | Dollar Tree Spring Floral Arrangement

T'onna | Sew Crafty Crochet | Lilac Crochet Neckerchief


Monday, December 12, 2022

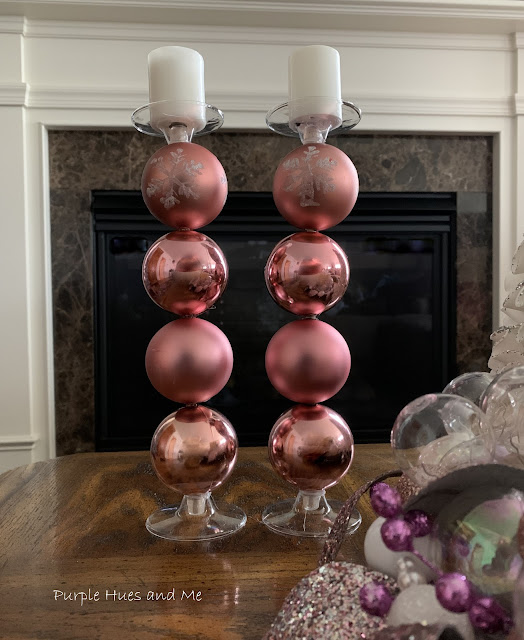
DT Ornament Candle Holders DIY


I love shopping at the Dollar Tree as most of us do! You can find some amazing things there for a $1.25, especially during the holidays! I like to pick up a variety of Christmas ornaments from the Dollar Tree! There are so many projects you can do with ornaments besides hanging them on a tree. One project is making candle holders out of ornaments! And who doesn't love candleholders! They're not just for the holidays, either! They can easily transition into winter decor! Imagine a warm, inviting glow - chasing the chill in the air away!  A project perfect for this month's Winter Crafts, Projects Blog Hop Challenge!

Monday, October 10, 2022

Halloween Pumpkin Witch


Believe it or not, I am one of those crafters who really doesn't decorate for Halloween. And I have a legitimate excuse, too - I have no grandkids or young people in my life and I live in a 55+ community where no treat or trickers come!  But I do belong to a monthly blog hop where this month's theme is Halloween Crafts!

I was looking around my stash wondering what I could make for this challenge. Lo and behold I had a paper mache pumpkin with a texture that reminded me of a witch! 

So I decided to decorate this pumpkin to resemble a witch - the iconic mistress of Halloween - the wicked witch with her tall pointy hat, crooked nose, and toothy grin! How cool would it be and a fun decorating idea to combine the two! 

Monday, May 9, 2022

Dollar Store Butterfly Door Hanger DIY


What better way to welcome spring and summer than with a gorgeous butterfly door or wall hanger! You've seen them already made - but have you wondered how to actually make the butterfly? Well, today I'm going to show you how! Made from scratch using dollar store items, you will be surprise how easy it is to make one! 

This whimsical wall hanger has a rope outline in a butterfly shape made out of poster foam board with a burlap fabric covering - all from the dollar store! And the best part, you can dress it up with pretty florals and bows, too! And then, this butterfly hanger can be placed on your door or wall as a decorative accent - making a great statement to welcome family and friends to your home! 

Monday, April 11, 2022

Plaster Cloth Egg Vase DIY


Hello Springtime! As a favorite pastime of mine, I'm always looking around sites and other places for craft inspirations - one of them being HGTV Handmade on YouTube. This particular video features the Crafty Lumberjacks making an adorable Easter Egg Display using plaster bandages. 

I was quite intrigued with the plaster bandages craft, so afterwards I did a search for the Crafty Lumberjacks' blog site. For a couple of links I got a 404 codes but finally found their blog featuring them making their Easter egg vases on The Chew, a tv show I use to watch, no less! I read the post and looked at the comments - low and behold, I had left a comment - back in 2019! But I don't remember anything about seeing this technique before! Usually, I will write a craft or technique down in my project book if I'm interested in it. But not this time. 

Monday, February 14, 2022

Foamiran Pansies On Wire Frame


It's always fun shopping my craft room. Sometimes I come across items I've forgotten about or had no idea what I would do with them. Like this wire frame. I don't remember where I got it or what I had planned on doing with it. It must have been a great price especially since it's not quite my style, either. We crafters can never pass up a great price! Lol!

However, the wire frame makes for a great creative base with its' shabby chic character. And offers a uniquely shaped piece for home decorating projects, too!

Anyway, besides the wire frame, I found a few sheets of foamiran I had gotten sometime ago to make flowers. You know I love making flowers out of foam sheets - as seen here, here, here and here to point out a few, lol! So I decided to dress up this wire frame with pansies - a flower I've always wanted to make in foam! 

Pansies are a winter flower! They look so cheerful and most importantly for me, can be found in a lovely array of purple hues, too! So let's get started on how to make foamiran pansies to decorate the wire frame which I'm leaving in its' natural finish.

Materials:

  • Thin sheets of foam - 1mm or less
  • Cardstock pansy petal template
  • Scissors
  • Oil Pastels
  • Iron/skewer stick
  • Silicone textured mold (optional),ball stylus
  • Sponge/paper towels
  • Hot glue gun/glue sticks
  • Acrylic paint - yellow/black
  • Narrow tip paint brushes
  • Small balls (center stamen/stigma)


First, I looked online for free pansy templates. There were lots with drawings of the different parts of a pansy, but I wanted to use a simple petal that I could combine five separate pieces to create a single pansy. Nothing intricate. So I made a pansy petal - roughly a triangle with rounded corners .  .  .

and measured it on a folded sheet of foamiran for size. And cut off the folded piece and folded it as many times as the petal shape would allow. Then cut out the petals .  .  .
and placed them in stacks of five to make a pansy.
Next, place a petal on a iron for a few seconds to soften and curl the edges, using a bamboo stick to hold in place and remove. 
Then quickly placed petal on a silicone mold, pressing down to imprint texture and veins. If you don't have a mold, an easier method uses a small ball stylus to add texture and veins by stroking along the inside of the foam petals.
Use oil pastels and a damp sponge or paper towel to color petals and .  .  .
shading with different colors, as desired.
Then gently shape petals by twisting and squeezing and lightly pulling foam into scalloped edges, as if tearing. 
Begin assembling pansy first with two petals, gluing tip to tip, left, right and  .  .  .
and in the center. Then add the two remaining in back, left .  . .
and right.
Next glue on a small ball for center stigma/stamen. I used a faux pearl and .  .  .

 painted it yellow and .  .  .
 

around the middle of the flower.
Let the yellow paint dry and then paint on black lines radiating from the center -
for a completed pansy look!
 And time to make lots more!
Placing them along the frame
adding more and more
until satisfied with the look!
Time to add a few green leaves by cutting out leaf shapes .  .  . 
which have mild serrated edges warmed with an iron and twisted into shape and glued in place.

I'm loving how this looks!
I found a poem online by Amelia Brown that is quite appropriate for this time of year.  I created a portion of it and placed on a handmade cardstock scroll glued onto cardboard and cut out .  .  .
and placed on the wire frame for a awesome look!
It certainly was fun shopping my craft room and finding items to make these lovely pansies on a wire frame. Just in time for this month's Challenge Blog Hop!  Where I've joined a group of creative bloggers to bring you a themed monthly challenge blog hop on the 2nd Monday of each month, hosted by Beverly @Across the Blvd! This month, it’s our Craft Room DeStash Challenge Blog Hop. And for this challenge we're to create a project using only items currently found in our craft stash!