Showing posts with label Thrift Store Upcycle. Show all posts

Saturday, January 25, 2025

Decorative Metal Buffet Stand


Welcome to our first "Do It Over Designers" Blog Hop for 2025! In case you haven't heard, the "Do It Over Designers" is a group of creative bloggers who love to recycle/upcycle/ DIY, hosted by  Anne @The Apple Street Cottage. It happens the 4th Saturday of every other month and it's all about taking something old and/or unused and 'doing it over' into something new. Thanks Anne for hosting this wonderful blog hop!

OMG! I couldn't believe I came across this vintage looking stand at my local Goodwill for $4! It had layers of dust on the metal finish but otherwise in good shape! And a little bit of soap and water took care of that! I did go online to see if there was anything out there similar, but I couldn't find one.


I guess you're wondering why this stand is so special! Well, you've heard the saying, "a  coat of paint does wonders?" It's one of the most transformative but simple way to update something! And, just take a look at the cool design of the stand in the next couple of pictures!


Imagine it painted in one of my favorite colors! A purple hue, lol! Since it's been so cold (in the single digits) and snowy here, I had to hand paint this beauty using a sponge brush and DecoArt Metallic Acrylic paint in Berry! Otherwise, I would have spray painted it!


Here's the finished look:
Are you wondering what I'm going to do with this stand! It's perfect to hold one of my old Corning Ware Vision Cranberry Casserole and Lid container! Did you know this Corning Ware style was made back in the early nineties?  How cool is this!
And it's a perfect fit!

Plus, this chic metal stand provides an attractive way to present a variety of foods. You can add a plate or bowl to display just about any type of dish! Especially if you want to highlight a favorite recipe and present it higher than the level of the table!
I love the design and color of this decorative plate and displaying it on my newly finished stand is just so fabulous!


Now, thanks to this lovely 'do over' stand, I can serve some of my dishes with a decorative flair - a lovely way to showcase special dishes or treats! Isn't it amazing what a little bit of paint can do! 

Be sure to visit all of this month's creative projects by the  "Do It Over Designers"  listed below:

Modern on Monticello

Pandora’s Box

Purple Hues & Me

Southern Sunflowers

Unique Creations by Anita

Sum of Their Stories

Birdz of a Feather

Tea and Forget-Me-Nots

Vintage Style Gal

The Apple Street Cottage

Exquisitely Unremarkable

Little Vintage Cottage


Saturday, September 23, 2023

Transform a Tissue Box Cover


I sneeze all the time. I don't know what sets me off, but I have Kleenex tissue boxes all over the house just in case I have to sneeze. Once I get started, I can sneeze several times before it stops. It doesn't matter where I am - the bedroom, greatroom  or kitchen. If I could put a tissue box in the shower, I would, lol!

I must say that I am very particular about how the store bought tissue boxes are decorated. I can't buy just any design color! I'm always on the lookout for ones decorated with a bit of purple or more and sometimes that's hard to find. So I have to "settle" for whatever is out there. I've always said to myself, I need to make my own tissue box covers, but I never did - until now!  

I was in a Goodwill and saw a plain old gray tissue box cover. It was tagged at $3 and thought, now is the time - so I bought it along with a couple of other items I might upcycle in the future. 

When I got home, I looked online at Michaels and found an unfinished wood tissue box cover for $6.99.  Hobby Lobby didn't have any, so three dollars was quite the bargain - just in time for this month's 'Do It Over' Designers Blog Hop!

The "Do It Over Designers" is a group of creative bloggers who love to recycle/upcycle/ DIY, hosted by Anne @The Apple Street Cottage. It happens the 4th Saturday of every other month and it's all about taking something old and/or unused and 'doing it over' into something new. Anything from fabric, old dishes, and decor, to dressers and hutches. Items found in closets, cabinets, barns, garages, yard sales, thrift stores, you name it! 


You won't believe how easy it was to transform the thrift store tissue box cover!

Supplies Used:
  • Wood tissue box cover
  • Tape measure or ruler.
  • Laser printed design/scissors
  • White acrylic paint/sponge brush
  • Matte Mod Podge/paint brush
  • Parchment paper
  • Clear plastic bag (Ziplock) 
  • Craft knife
  • Mod Podge Spray Acrylic Sealer

Let's begin by making sure the wood surface of the tissue box is clean and free of any dirt, grime or oils.  It's best to use a damp cloth to do this. You don't want to soak the wood with water or cleaning solution. They might cause the wood to swell. Once the surface is cleaned and dry, use a tape measure or ruler to measure the tissue box cover. I measured it at 5.5" on all five (top included) sides. Then I looked online for a purple print design that I liked which I copied onto WORD using the 5.5" measurements and printed it out using my laser printer.

Once the first design sheet was printed, I cut it out to see how it would look on the tissue box cover. Perfect! Then printed out four more copies to cut out. I planned to put this tissue box cover in my kitchen, especially since my kitchen cabinets are white.

The next step is to place a sheet of parchment down on your work surface and paint the box with a couple coats of white acrylic paint, letting it dry between coats.

Once the acrylic paint is thoroughly dry, using a paint brush, begin applying a generous layer of Matte Mod Podge (for a flat finish) on the surface of the tissue box - one side at a time. 

Gently lay one of the square sheets down on one side of the tissue box cover, starting in one corner and moving toward the opposite corner, down and over until that side is covered with the design sheet. Repeat for the other three sides matching the flower design.
Use plastic food wrap to smooth out the paper and prevent wrinkles. Let dry.

Once all four sides are completely dry, begin adding Mod Podge over the design - 
on all four sides.
Let dry completely or overnight.
I love how the corners and edges of the tissue box cover are showing the painted white edges of the tissue box cover - especially since my kitchen cabinets are white.
For the top, apply a generous layer of Mod Podge and lay the final design sheet on top.  
Smoothing out, as before. Pay close attention to smoothing the paper down and around the opening - making sure it's sealed down.
Once the top design sheet is completely dry, begin cutting out the opening using a craft knife.
How cool does this look!
And finally, take the tissue box cover outside to apply Mod Podge Spray Acrylic Sealer to protect the finish.

Hope you enjoyed my decoupage transformation!

Be sure to visit all of this month's creative Projects by the 

"Do It Over Designers" listed below:


Saturday, July 22, 2023

DIY Candleholders from Thriftstore Glassware


Welcome to this month's "Do It Over" DesignersIn case you didn't know, the "Do It Over Designers" is a group of talented bloggers who love to recycle/upcycle/ DIY, hosted by Anne @The Apple Street Cottage. It happens the 4th Saturday of every other month and it's all about taking something old and/or unused and 'doing it over' into something new. Anything from fabric, old dishes, and decor, to dressers and hutches. Items found in closets, cabinets, barns, garages, yard sales, thrift stores, you name it! 

Disclosure I am a participant in the Amazon Services LLC Associates Program, an affiliate advertising program designed to provide a means for us to earn fees by linking to Amazon.com and affiliated sites, this post may contain links. I may receive a very small commission at no cost to you! The affiliate money I earn helps pay my crafting expenses. Thanks so much for your support!

Usually there is no theme and we're on our own to choose whatever we want to "do over!" But once again after the success of May's "Do Over," Anne decided to switch it up again for July and asked us to do over anything glass

For 2023, I made a resolution to use what I had in my stash to create my craft projects! But after looking around my home, I couldn't find any type of glass I wanted to mess up, I mean use, to make something out of. So one day after shopping at the grocery store, I ventured into the Goodwill store which was right next door to look around to see what I could find. I hadn't been in a thrift store since before the pandemic started and boy did I find some goodies! 

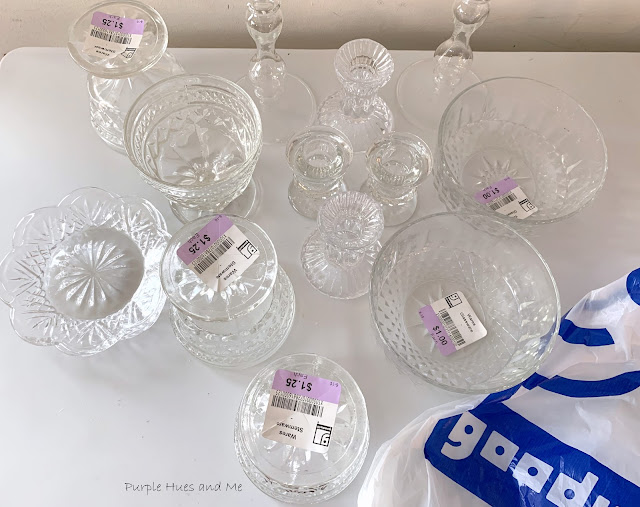
Check out this haul! 
Can you imagine all the different ways you can combine these adorable pieces of glassware such as candy bowls, canape plates and small candleholders, etc. into unique and one of a kind candleholders! Perfect for gift giving, housewarmings, and many other occasions, including weddings!

You won't believe how easy it is to assemble the recycled glassware using a permanent glass adhesive!

Let's begin with thoroughly washing and cleaning each glassware piece. Let dry completely.

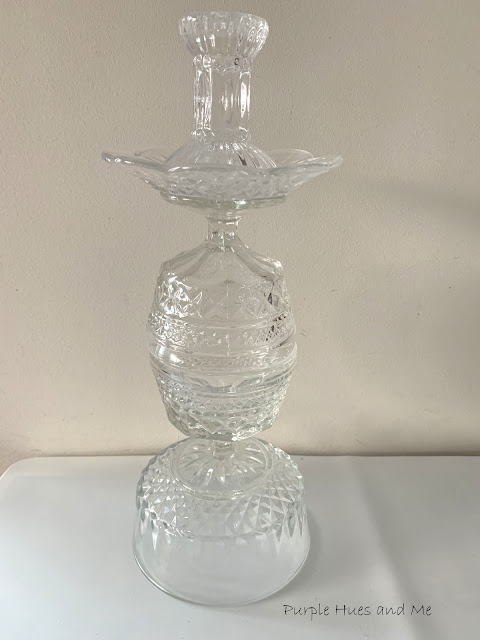
Group similar items together and play around with grouping the pieces to create a candleholder style you like. After playing around with different shapes, I settled with the following design.  Starting with an upside down bowl on the bottom. Then placing an upright sherbet dish on top. Next came another sherbet dish, only this time it's upside down. On top of the base of the sherbet dish, a canape dish is placed. And finally a small candleholder is placed on top of the canape dish. 

I'm loving this look and I hope you are, too! I'll share once it's all glued together to show you how unique this candleholder is!
First, the foot of the sherbet dish is glued to the center of the upside down bowl.  I started out using RapidFuse Adhesive which is an all purpose adhesive that "sets in 30 seconds" to glue the pieces together. 
Even though RapidFuse Adhesive is a quick drying glue, I used a wooden cutting board and a heavy glass vase to add weight to hold the pieces down while the glue dries. It's also a great way to see if the items glued together is level.

Next, applied glue to the rim of the sherbet glass and .  .  .

placed an upside down sherbet glass on top, rim to rim.

Again placing the wood board and heavy vase on top to apply pressure and to secure the pieces while drying.


For the next piece, a canape dish, I switched to Starbond Adhesive. It states that it's an instant adhesive and I like the way it flows out of the bottle, more so than RapidFuse Adhesive I applied Starbond Adhesive around the rim of the bottom of the sherbet dish.                          

And placed the canape dish on top.

Once again placed the weights on top to secure the items together while drying.
And finally, placed adhesive around the base rim of a small candleholder and .  .  .
placed in the center of the canape dish. Then placed the usual weights on top while the adhesive dries.
Looks pretty cool, doesn't it!
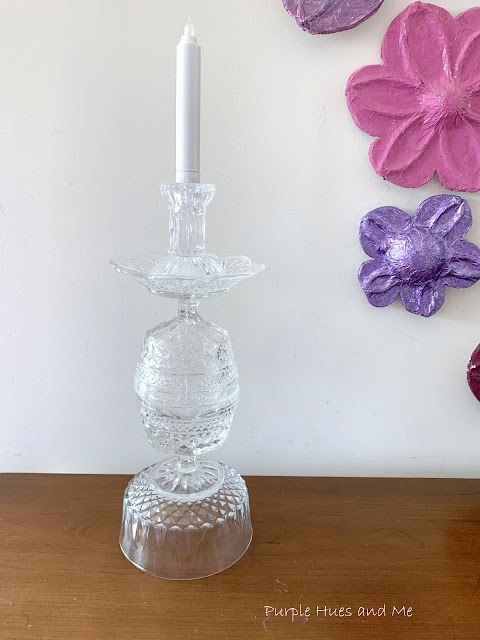
And with a taper candle!

Remember I said I would share with you how unique the candleholder is?
Well, how about this:

You can use a large pillar candle by turning the candleholder upside down!
It's a dual purpose candleholder!!!!!

I had enough glassware pieces to make two candleholders!
I'm loving the ornate look!

And as an added treat, I picked up this bowl at the Goodwill the same day, too!

I hope you are inspired to make one, two or three candleholders, lol! It was a lot of fun! 

Be sure to visit all of this month's creative Glass Projects by the 
"Do It Over Designers" listed below: