Showing posts with label Fall Decor. Show all posts

Tuesday, October 23, 2018

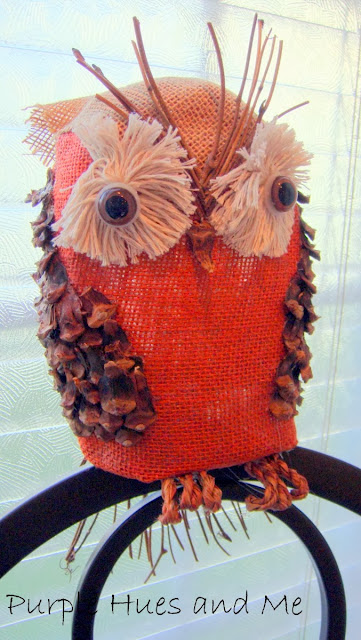
Upcycle a Soap Bottle Into An Owl

Have I got a fun project to share with you from a few years ago! Handcrafted owls continue to be very popular and I still love making them! I plan on making a few for Christmas and was revisiting some of the ones I made a number of years ago. For this owl, I was inspired from one I saw at World Market which is no longer available.  I love recycling bottles and  thought this would be a fun project to do featuring an owl made out of a recycled liquid soap bottle. 

To make, you will need:

  • Liquid soap bottle - empty and clean
  • Burlap
  • Aileen's Extra Tacky Glue
  • Cotton twine
  • Pinecone scales and twigs
  • Floral twine wrapped wire


1.  Using an empty liquid soap bottle (shaped somewhat like an owl), I removed the labels and cut off the screw top with a hot knife. I used the large refill size but the smaller size is the same shape.

2.  Glued burlap onto the bottle with Aileen's Extra Tacky Glue.

3.  For the eyes I used cotton twine from the dollar store and made them like I did here.

4.  To cover the hole in the top of the bottle I cut out a square piece of burlap and glued it on with the pointed edge between the eyes. Then glue twigs into the shape of a "v" between and above the eyes.

5.  Make sure the pointed edge of the burlap is centered before gluing on the back and  gently creased the two edges that are to the left and right of the owl's head.

6.  Use a glue gun to add pinecone scales to the sides of the owl.

7.   Overlap the pinecone scales from the bottom to the top sides. 

8.  Add twigs (for tail) to the back bottom of the owl.  I used more scales here to cover the top of the twigs. If you want, you can completely cover any remaining areas of the owl with twigs or with any natural fibersThe options are endless.

9.  Use three pieces of floral twine wrapped wire glued together to make each of the owl's feet.

 10.  Add a large pinecone scale between the lower portion of the eyes for the beak.


And it's done!  Quite simple and easy to make!  


Now, for my inspiration:

                                     Theirs                                                 Mine

An adorable owl perched on a leaf filled grapevine hung with jute twine! 


This precious owl vine swag can be hung on the wall or tied to a front door.  What a great fall accessory and a wonderful way to greet friends and family for the holidays.

Take a little time to enjoy!


Monday, October 16, 2017

How to Make a Floral Wire Pumpkin Centerpiece

Are you on the search for unusual Fall and Halloween decorations to create?  Here's an inexpensive way to make a decorative pumpkin shape centerpiece!  It's so easy using twisted paper stem wire!  You can make this adorable centerpiece for just a few dollars for the stem wires and you probably already have the rest of what's needed on hand. But the best part is the many ways you can decorate it for Fall or Halloween are almost unlimited!

Let's begin by gathering the following materials:
  • Paper Stem Wire - 2pkgs
  • Cardboard
  • Hot glue
  • Scissors
  • Bowl
  • Clips
  • Parchment paper
  • Acrylic Paint/brush
  • Brown paper bag
  • Embellishments
Then cut out four - 1 inch disks from cardboard.
 Next, hot glue the stem wires onto a disk, first in the 3, 6, 9, & 12 o'clock positions and then .  .  .
 glue on two more stems in between each one, spaced evenly.
Once the glue has dried, spread additional glue over the center stem ends on the disk and top with another disk applying pressure and let dry.


Next, center a large round bowl on top to curve the stem wires up and over. Hot glue a couple of stem wire ends (12, 6 position) to another disk, holding in place in the center with a piece of parchment paper over it and clips until dry.

Remove the bowl and continue gluing the ends of the stem wires to the disk following the clock positions, 3 & 9, then in between the others using parchment paper and clips to secure until the hot glue dries.

 Once all the stem ends are glued in place and dry, add hot glue over them and place the last disk on top, securing with clips until completely dry.

Press center down to shape of pumpkin. Adjust and smooth out stem wires for additional shaping. Then, paint and let dry.

 Next, cut out a section of a brown paper bag to make the stem.
Dampen with water and squeeze into a ball.

Open paper, folding lengthwise, and adding white glue along the folds.

Twist and shape paper into a stem - with one end narrow and bottom end wider, cutting off excess, as needed. Let dry.
Cut slits into stem bottom to cover and glue on to top disk.


Have fun decorating! 

I added fall leaves and a faux candle in the center that's on an automatic timer to come on at night and off at daylight, for a cool effect.


Thanks for stopping by

and take a little time to enjoy,
Happy Fall Crafting!

Monday, August 22, 2016

DIY Faux Ornamental Cabbage

With September just around the corner, my thoughts are on creating fall décor. If you're a regular reader, you might have discovered how I love making things out of foam sheets!  The material is so versatile and is easily manipulated with a little bit of heat, texture and color into wonderful inexpensive projects.

Ornamental cabbage is a favorite of mine for fall.  Its' intense shades of purple and green makes a colorful and lasting addition to any decorative arrangement.

See how easy this ornamental cabbage was to make using foam sheets.


Materials:
 White foam sheets
Leaf templates
Scissors
Acrylic paint - purple and green
Sponge brushes
Hot griddle or iron
Hot glue gun
Skewer stick or large tooth pick
Round objects (measuring spoons or small balls)
Soft sponge
Foil
Terra cotta pot/styrofoam/rocks


Make leaf templates in four or five different sizes, from 4 inches to  1/2 inches. Trace on foam sheets and cut out using a ruffle or wavy line effect.  You'll need about thirty petals - five to six in each size.
Lay the petals on a medium heat griddle or iron for a few seconds until the middle fluffs up and curls.

Place foam petals on soft foam and press centers with round objects.


 Curl and manipulate edges with fingers for a wavy, ripple effect.


Paint petals and edges with acrylic paints, beginning with the smaller petals,  in purple and then adding green and purple in variations .  .  .

using small sponges or foam brushes.


To assemble the cabbage, squeeze a small sheet of foil into a ball .  .  .


and hot glue on the small purple petals, covering the foil.

Then, begin gluing on the remaining petals, from small to large, in a clockwise flow, overlapping the layers.


 And finally, add hot glue in bottom of a terra cotta pot and insert foam and filler rocks.


I put paint on the bottom edge of the pot that was suppose to mimic moss .  .  .

and inserted a small wood skewer in the bottom of the faux cabbage and into the foam in the pot, securing with hot glue.


 I'm on my way .  .  . slowly easing into the season, getting ready for fall!

How about you?


Take a little time to enjoy
and
Happy Fall Crafting!


Friday, October 2, 2015

Fall Burlap Hydrangea Flowers Wreath

I was inspired to make this wreath after I saw one on Birch Lane pictured below.

Birch Lane Source
I had everything I needed to make my version. And that consisted of different shades of burlap fabric, mod podge to make the burlap stiff, grapevine for the wreath base, a large flower punch, scissors, hot glue, and puffy paint.


To begin, I had pieces of grapevines left over from other projects and I wrapped them into a circle.

Next, I applied mod podge to several different colors of burlap that I had left over, too, and let dry for a few hours.


Then, I began the task of punching out the flowers.  Since my hand was still sore, it was easier for me to sit in a chair in my garage and punch out the flowers using my feet.  It took me about a total of two hours to punch out all of the flowers used and it was great exercise - something I really need!

 The punch was a EK large flower pattern, and I had to apply a lot of pressure to cut out the burlap flowers evenly.

I used an old measuring spoon from powder plant food and my thumb to shape the stiff burlap flowers since I didn't have any embossing tools.


Next, I cut out pale green burlap leaves using a hydrangea leaf pattern I found online.


And glued them on around the grapevine wreath.


Then I began gluing on the flowers. 


Once all the flowers were glued on, I added dots of puffy paint to the center of the flowers.


  You can hardly see the first set of leaves, so I added more for a fuller look.


The Birch Lane wreath is listed for $85.00.  It did not get good reviews.  One person said it was a waste of money and the other person said it was not as pictured.  I think my wreath looks adorable and it was virtually free since I used leftover materials from other projects.


Take a little time to enjoy

and
Happy Crafting!