Welcome Y'all! It's that time again for our Creative Craft Hop hosted by Sara @Birdz of a Feather! I don't know if you're like me, but I'm always on the lookout for craft project inspirations! While I was in Target some time ago, I came upon a utensil holder that was made out of seagrass, I think. I loved how it looked so I took pictures of it - just like I usually do when I'm inspired. Unfortunately, it is no longer available at Target, but here is a picture of it:
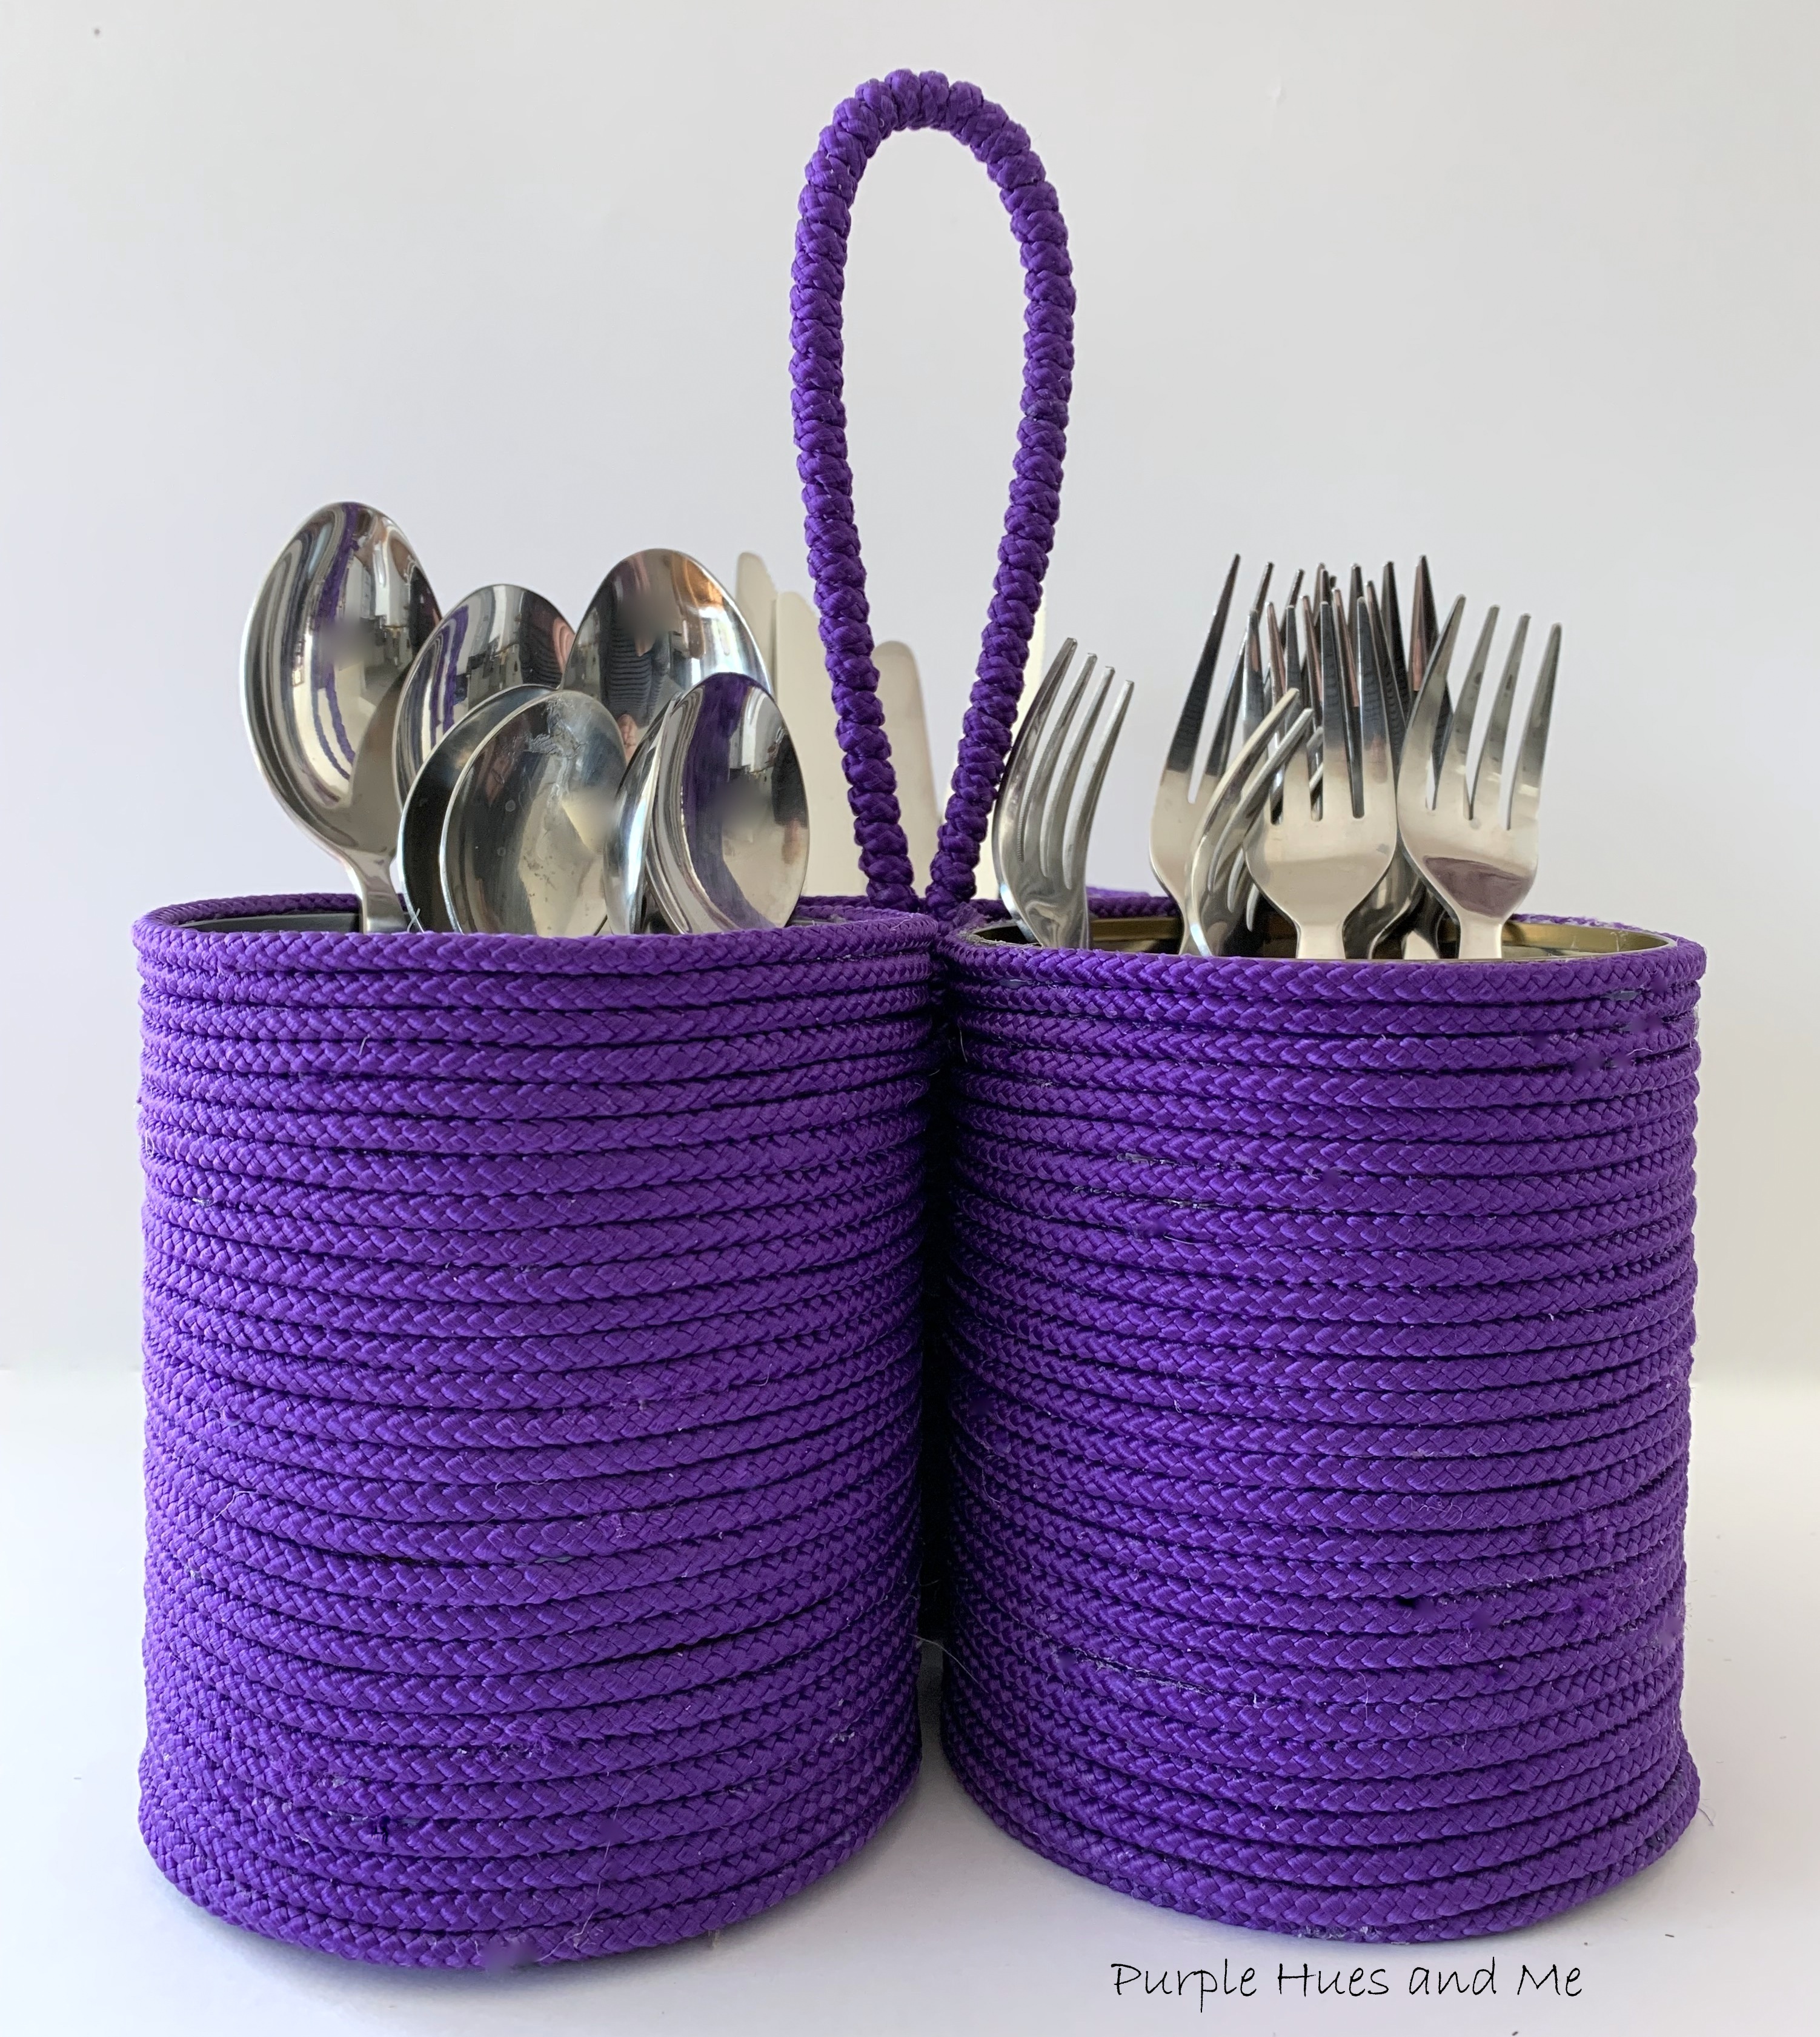
And that is where I got the idea to make a flatware caddy of my own! Since I collect tin cans and other recyclables for my projects, it was a no brainer to use tin cans to make a caddy - one with three sections or cans, sized for spoons, forks and knives! Cheerful and charming - especially done in purple, lol - this Cord Wrapped Tin Can Flatware Caddy adds a playful element to get-togethers and gatherings. A group of three hand wrapped upcycled tin cans in poly cord that's perfect for entertaining and a whole lot more!
Materials Needed:
- Tin cans - 3 (27oz.)
- Poly Cord
- Quick dry multi purpose glue (Starbond) or hot glue
- Parchment paper
- Ruler
- Drill
- Screws
- Phillips screwdriver (short handle)/rachet
- Wire clothes hanger
- Wire cutter
Let's begin with clean, dry tin cans. I'm using vegetable cans that are a great size at 27 ounces!
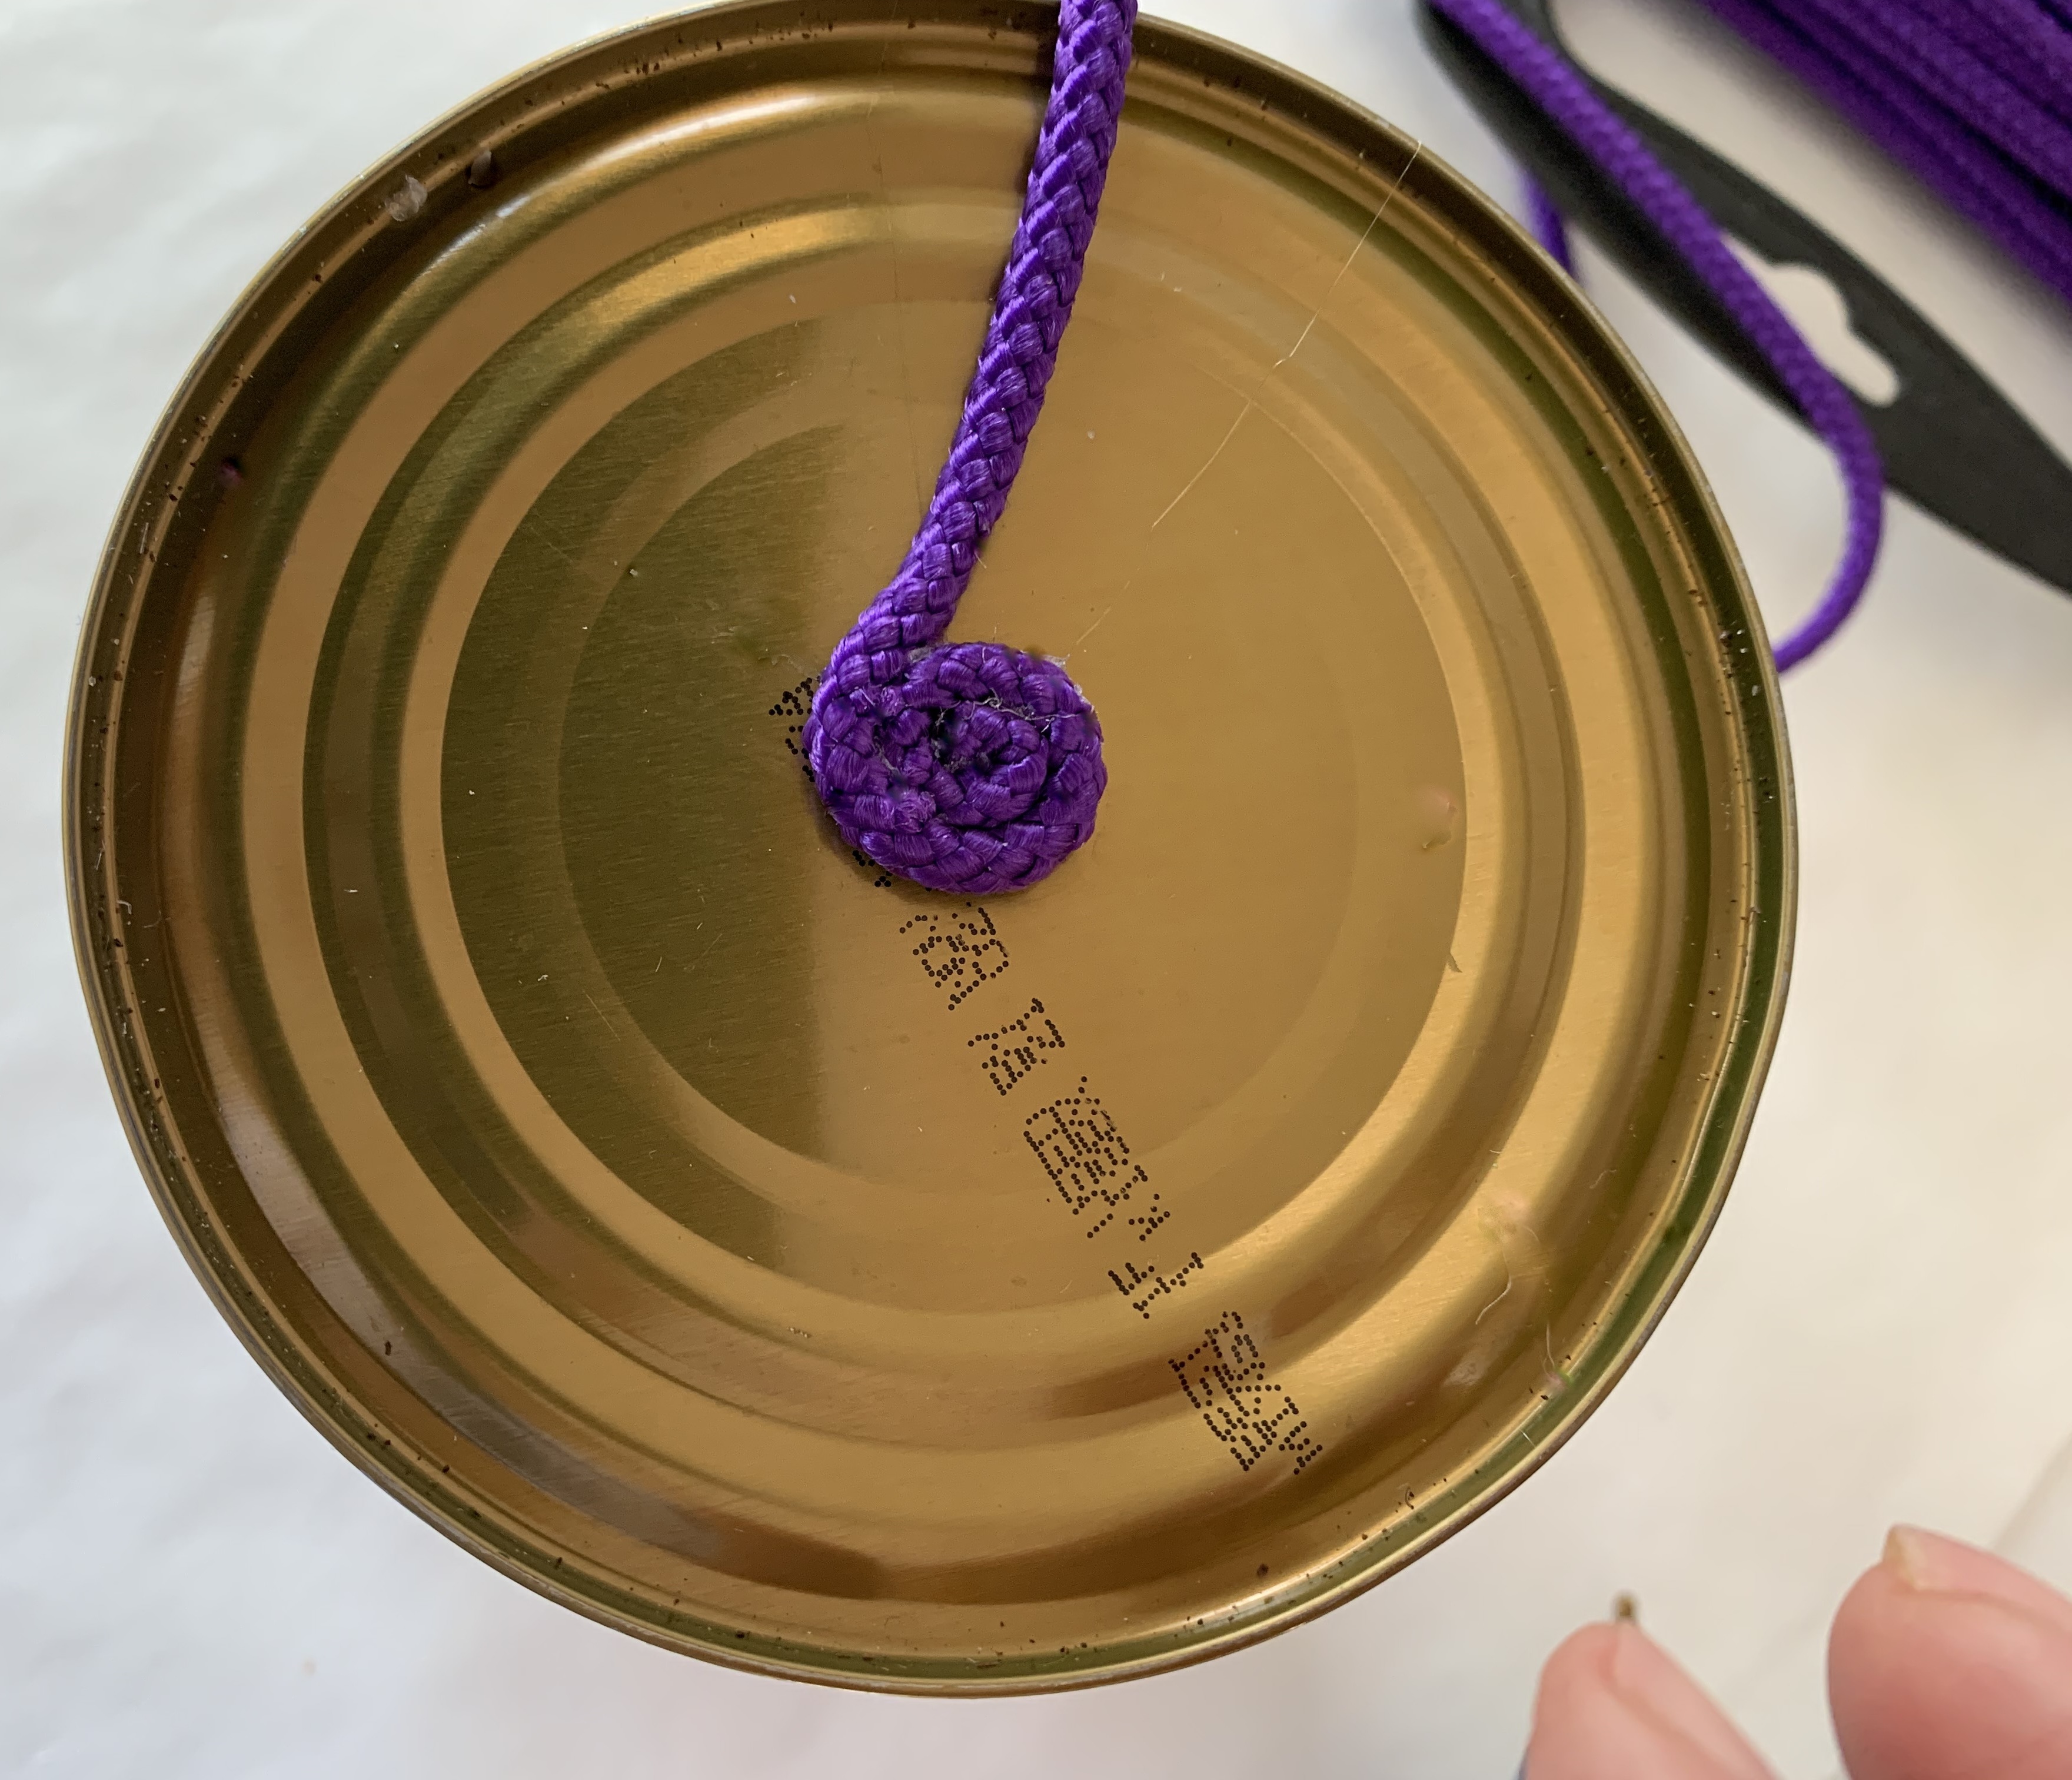
Plus, I'm using leftover purple cord from a previous project making this caddy basically cost free! I also like to spread a sheet of parchment paper over my work surface to catch any glue that may fall off. Begin by adding a dab of hot glue to the end of the cord and . . .
coiling it into a circle while adding a bit of glue along the cord as you coil.
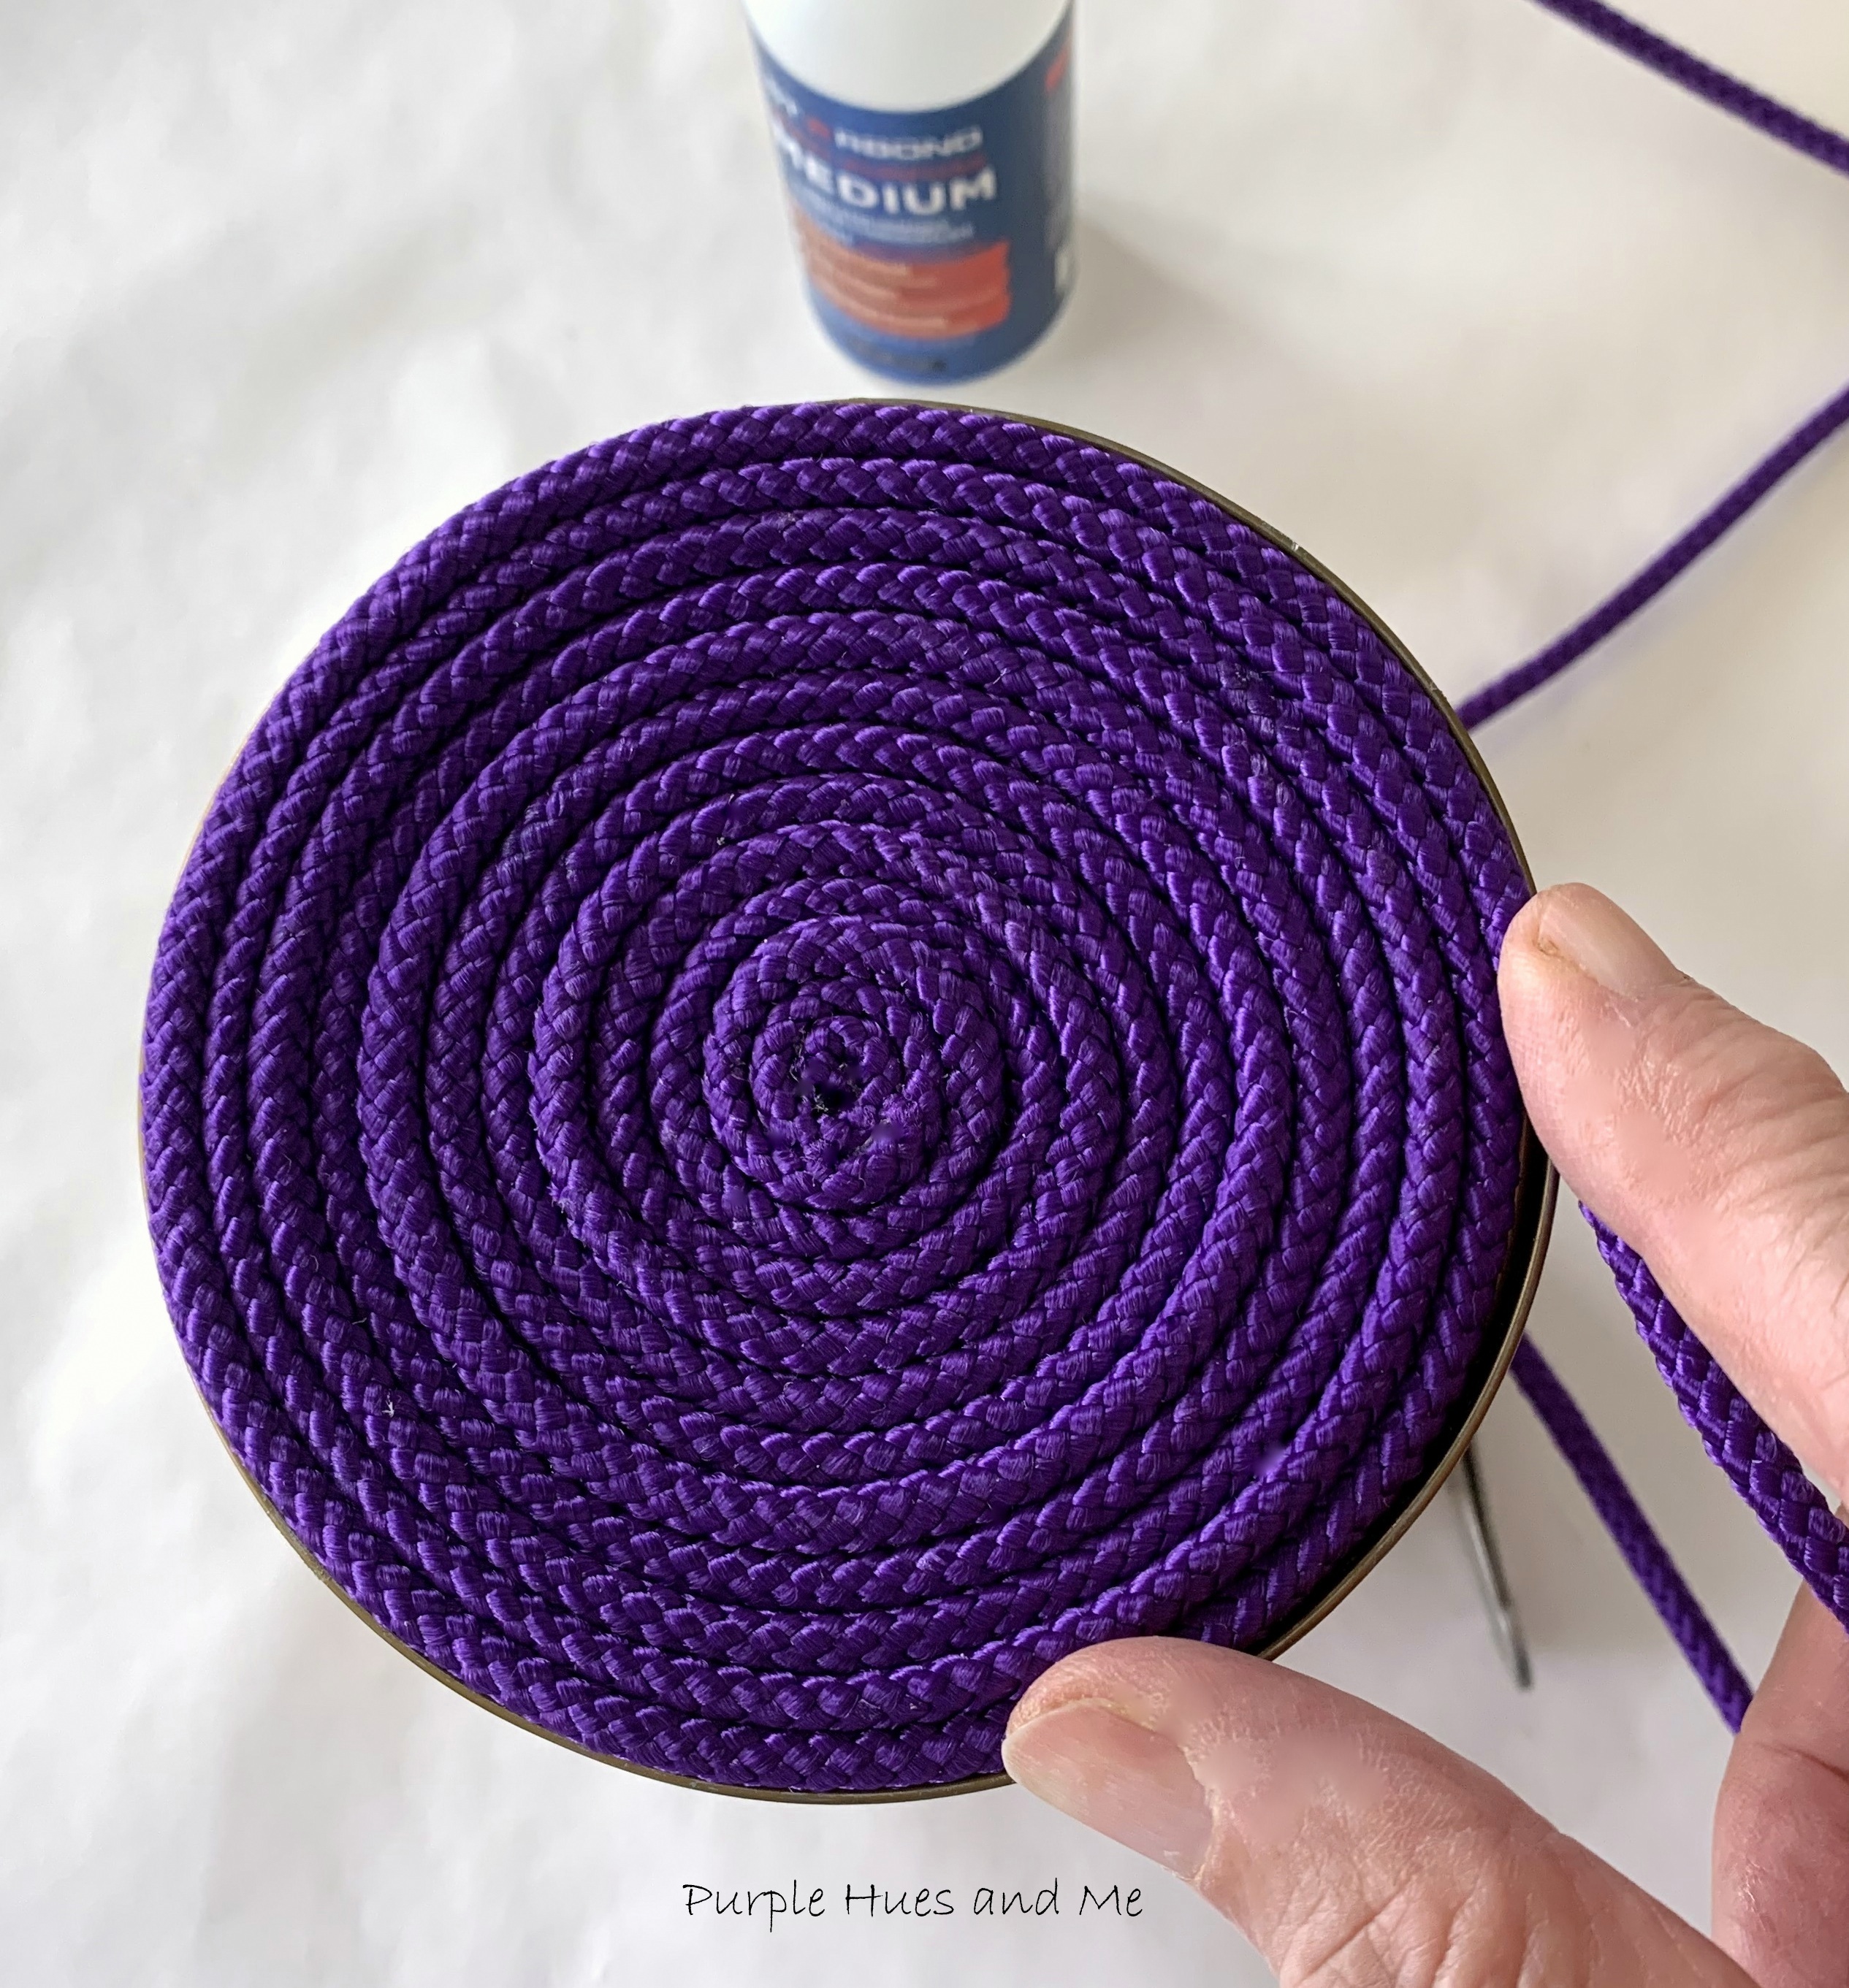
Then add a dab of hot glue to the center of the bottom portion of the tin can and continue coiling the poly cord around the can.
At first, I didn't want hot glue to show on the purple cord so I used a high performing super glue called Starbond which dried clear to attach the poly cord.
Continue coiling the poly cord until the bottom is completely covered . . .
and then moving up the sides of the can.I switched to using hot glue since I was running out of Starbond. Continue adding hot glue to wrap the can with poly cord . . .
going round and round until the can is completely covered.Then wrap the other two cans the same as the first.To secure the three cans together, use a drill to create holes near the top of the three cans aligning the holes on the cans with a ruler to match up the holes. Use a short handle Phillips screwdriver or rachet to tighten the screws and attach the cans together. Dab a bit of Starbond glue on the screws to hold in place and let dry.To make the handle, cut off the straight bottom wire of a clothes hanger . . .using a wire cutter.Fold the wire in half, leaving a loop at the top and twisting the wire at the bottom to close.Wrap the loop with cord beginning at the bottom and . . .moving up along the loop and . . .back down to wrap around the bottom again.Then apply glue around the wrapped bottom cord and insert into center of cans. Hold cans together for a couple of minutes until glue dries.
This practical upcycled caddy adds a casual warmth and welcome to the table for both inside and outside entertaining. And as an added plus, the caddy can be used to house all sorts of things like pens and pencils, office supplies and even bottles of wine! It's really a multi- purpose handcrafted item that can be use all year long!
Once again, welcome to our monthly Creative Craft Hop! I hope you liked how I made my cord wrapped flatware caddy! Up next, is Carol @ Bluesky at Home sharing how to make pretty vinyl planters! Be sure to stop by each and everyone in our creative group listed below to check out their exciting and inspiring project! And don't forget to pin, too!


.png)


Fabulous! Your projects are always so much better than the inspiration Gail! Three sections is much more practical when you have a huge crowd. And you can never go wrong with a bold colour like purple; it sets the party mood :)
ReplyDeleteGail, this is wonderfully creative and I love the color!
ReplyDeleteThis is so impressive. I could use this in my craft room! I am pinning to make one myself. Thanks for an easy step by step instructions Gail!
ReplyDeleteThis is fabulous Gail, so perfect for buffet dining or for a craft desk! I love the way you started at the center of the bottom of the cans and just wrapped your way up! The way you screwed the cans together and then added the handle is brilliant! I’ve never used Starbond glue, does it dry quickly like hot glue? I always make sure a mess with my hot glue gun, I hate all those strings it leaves. I just might have to give this a go, thanks Gail!
ReplyDeleteJenna
Love this Target hack. This is a great DIY project, Gail. It’s pretty and practical. Great instructions.
ReplyDeleteWonderful project Gail, yours is even larger. You have great imagination and skills.
ReplyDeleteTan práctico como bonito y original.
ReplyDeleteBESOS
I love that you take picture of things in stores for future projects, Gail. I do the same thing! Yours is much better than the original!
ReplyDeleteLove the pop of color used and so creative to use for outdoor parties.
ReplyDeleteVisited you via Handmade Monday #324
If not already part of SSPS, this is a personal invite to hop over and come and share your posts with us at Senior Salon Pit Stop, every Monday to Saturday.
See one of my entries: Raw Vegan Raffaello Balls and then navigate to the bottom of my page for the Senior Salon Pit Stop linkup, we hope to virtually meet you there.
Your caddy looks awesome especially in your signature color! You're ingenuity always surpasses me. Thinking of using the hanger the way you did and how to attach the cans....just goes right over my head. Poof, there it goes.
ReplyDeleteThis is so clever, a fab upcycle and such a lovely vibrant colour too.
ReplyDeleteWow! beautiful project
ReplyDeleteNice blog and I like it. Biometric Door Access System in Dubai
ReplyDeleteA perpetual game and scheme is chalked for the future items. The regions of the best travel insurance are ensured for the target. Implication is held for the offers for the terms and toiled items for the fur items.
ReplyDeleteI am really impressed with your creative ideas. This creative idea is amazing. I really like this. I will share this idea with my family. Keep it up. Now its time to avail Kabou taxi cab services in Southfield Mi for more information.
ReplyDeleteI m interested and great blog.. I m so interested to see the article..
ReplyDeleteley de bancarrota cerca de mí
I am interested to read this blog. Its very informative and creative. Thanks for sharing a wonderful information. Traffic Lawyer Shenandoah VA
ReplyDeleteThe most informative article!Virginia Reckless Driving AttorneyKeep sharing the post.
ReplyDelete
ReplyDeleteI recently purchased the Cord Wrapped Tin Can Flatware Caddy and it's a charming addition to my dining setup. The rustic design with cord wrapping gives it a unique and artistic touch. However, the tin can's edges could be smoother for safer handling. The caddy easily holds utensils for a small gathering, but might be too compact for larger events. Overall, it's a quaint and functional piece that adds character to my table arrangement.
Abogado de accidentes
This DIY project involves creating a cord-wrapped tin can flatware caddy using tin cans, craft cord or twine, hot glue gun and glue sticks, scissors, and optional decorative elements. The process involves cleaning the cans, removing any labels, and applying hot glue to the bottom edge. The cord is then wrapped around the can, working upwards, and secured with hot glue. The process continues until the top, where the cord is cut and secured with hot glue.
ReplyDeleteThe cans are then arranged in a row or cluster, forming the flatware caddy. Decorative elements like ribbon, artificial flowers, or labels can be added to personalize the caddy. Once the caddy is assembled and decorated, flatware can be inserted into the individual cans, allowing for easy access to utensils.
The cord-wrapped tin can flatware caddy can be displayed on a dining table or stored on a kitchen counter for easy access. This project is customizable, allowing you to choose cord colors and decorative elements that suit your style and preferences. It's a great way to upcycle tin cans and add a handmade touch to your home decor.abogados de accidentes
Great article, I am very excited to read this thank you for sharing more interested post. Virginia reckless driving speed
ReplyDeleteWow, I absolutely love this Cord Wrapped Tin Can Flatware Caddy! The combination of rustic charm and practicality is just perfect. It's such a clever way to repurpose tin cans and add a unique touch to any dining table or outdoor gathering.
ReplyDeleteI can already picture this caddy as a centerpiece, neatly organizing all the cutlery and adding a touch of whimsy to the overall look. The cord wrapping details add texture and create a cozy vibe that is just so inviting.
Not only does this caddy look stunning, but it's also incredibly functional. It makes it so easy to transport utensils from the kitchen to the dining area or even to a picnic. I can see myself using this for backyard barbecues, summer parties, and even for everyday meals.
Overall, I think the Cord Wrapped Tin Can Flatware Caddy is a brilliant DIY idea that I can't wait to try. It's a budget-friendly and eco-friendly solution that will undoubtedly spark conversations and impress guests. Well done!
motorcycle accident virginia
Create a cord-wrapped tin can flatware caddy to add a charming touch to your dining table or kitchen decor. Clean and dry tin cans to remove labels or residue, and use various sizes depending on the number of utensils you plan to store. Measure and cut lengths of rope or cord to wrap around each tin can, leaving extra length at the beginning and end to secure the ends later. Apply a small dot of glue at the top edge of the tin can, press the end of the rope into the glue, and hold it in place until it sets. Wrap the rope tightly around the tin can, applying a thin line of hot glue along the way. Trim any excess rope, leaving a small tail, and secure the end of the rope to the bottom edge of the tin can. Repeat the wrapping process for each tin can. Arrange the tin cans in a row or cluster to form the flatware caddy, stack them on a tray or plate for added stability. Personalize the design with decorative elements like ribbons, bows, or charms. Fill the tin cans with flatware, utensils, or other kitchen accessories, and display your handmade cord-wrapped tin can flatware caddy on your table or countertop.fatal semi truck accident today
ReplyDeleteFacing divorce due to abandonment in New York State? New York State Divorce Abandonment Our experienced attorneys offer compassionate support and strategic guidance to protect your rights and navigate the legal process effectively."
ReplyDeleteThe Cord Wrapped Tin Can Flatware Caddy offers a clever and eco-friendly solution for organizing flatware at gatherings and events. Crafted from repurposed tin cans and wrapped in cord, this DIY project adds a rustic and charming touch to any table setting. Its versatility allows for customization with various colors and patterns of cord, creating a unique caddy to suit any decor theme. With its simple yet effective design, this caddy is both functional and aesthetically pleasing. Overall, it's a creative and sustainable way to elevate your dining experience while reducing waste. abogado dui new kent virginiatario
ReplyDeleteThis DIY project by Gail showcases the versatility of tin cans as a functional and stylish centerpiece for gatherings. The step-by-step instructions are clear and detailed, making it accessible to all skill levels. The caddy can be customized to suit different occasions or personal preferences, showcasing creativity while reducing waste. Gail's use of poly cord adds a pop of color and a durable finish, making it a versatile addition to any home or event setup. The project also highlights the importance of eco-conscious crafting and the beauty of upcycling. semi trucks accidents
ReplyDelete"Absolutely love the rustic charm of this cord-wrapped tin can flatware caddy! It's both functional and stylish, adding a unique touch to any dining setting. Perfect for organizing utensils while adding a cozy, handmade feel to your table. A must-have for any farmhouse or eclectic decor lover!"
ReplyDeleteReckless Driving In New Jersey
This DIY project involves creating a cord-wrapped tin can flatware caddy, which can add rustic charm to your dining table or kitchen. The materials needed include clean and dried tin cans, jute cord or twine, hot glue gun and glue sticks, scissors, and flatware. To prepare the cans, wash them thoroughly with soap and water, remove any labels or stickers, and let them dry completely. Measure the circumference of the can and cut a length of jute cord or twine slightly longer than the can's circumference. Apply hot glue to the bottom edge of the can, press the end of the jute cord onto it, and wrap the cord tightly around the can. Trim any excess cord with scissors. Secure the end of the cord by applying a final bead of hot glue. Repeat this process for as many tin cans as needed, using cans of different sizes for variety. Arrange the cans in a row or cluster to form the flatware caddy, either nestling them together or spaced apart. Fill each tin can with flatware such as forks, knives, and spoons. Display and enjoy your cord-wrapped tin can flatware caddy, which can be personalized with ribbon, beads, or decorative charms. Enjoy this charming and functional centerpiece on your dining table or kitchen counter.abogado de familia español
ReplyDeleteCreate a cord-wrapped tin can flatware caddy to add rustic elegance to your dining table or kitchen. Materials include clean tin cans, twine or rope, hot glue gun and glue sticks, scissors, and optional decorative elements. Clean and dry the cans, then secure the twine or rope to the top edge of one can with hot glue. Wrap the twine tightly around the can, working downwards, and secure it with hot glue every few wraps. Trim any excess twine and secure the end with a final dab of hot glue. Repeat this process for each can. Stack the cans together to form the caddy, applying a thin line of hot glue to the bottom edge. Decorate the caddy with ribbon, lace, or decorative charms using hot glue. Fill each compartment with flatware, napkins, or other dining essentials. Your cord-wrapped tin can flatware caddy is ready to use, and you can customize it to match your personal style and preferences. Place it on your dining table or kitchen counter for a functional and stylish storage solution.volquete accidente
ReplyDeleteFurthermore, that is where I got the plan to make my very own silverware caddy! Since I gather metal jars and other recyclables for my undertakings, it was an easy decision to utilize metal jars to make a caddy - one with three segments or jars, measured for spoons, forks and blades!
ReplyDeleteLively and beguiling - particularly finished in purple, haha - this String Wrapped Metal Might Silverware at any point Caddy adds a perky component to social gatherings and get-togethers. A gathering of three hand wrapped upcycled metal jars in poly line that is ideally suited for engaging and significantly more! Charlottesville Apoyo Conyugal Abogado
Thanks for posting such a good blog. we got more information about this site. divorce and custody lawyers near me
ReplyDeleteWe are best legal team in Northern Virginia as much as you would expected. virginia traffic lawyer
ReplyDeleteIf you have any legal issue, please don't hesitate to contact us. DUI Abogado Camden | Camden DUI Abogado
ReplyDeleteWow, the Cord Wrapped Tin Can Flatware Caddy is such a creative and eco-friendly idea! I love how versatile it is, perfect for organizing utensils or even used as a small potted plant holder. The rustic vibe it brings to the table is simply charming and adds a lovely touch to any kitchen or dining space. Plus, the cord wrapping adds a nice pop of color and texture, making it a real standout piece. It's great to see upcycling at its best, turning simple materials into something functional and stylish. I would definitely love to try making one for my home! Great job on this DIY project!
ReplyDeletecps lawyers near me
Really fantastic post. That's great, and the content is fascinating and unique. Keep share more post. Abogado de Divorcio Arlington | Arlington Abogado de Divorcio
ReplyDeleteBeautiful content. Great work! abogado de divorcio en nueva jersey
ReplyDeleteIn New York State and facing a divorce for abandonment? Our skilled lawyers provide empathetic assistance and tactical direction to safeguard your rights and successfully handle the judicial system.
ReplyDeleteProstitution Charges In Virginia
Very important and wonderful post here.Keep sharing these type of blogs."Learn about Loudoun County Criminal Court, including court processes, case types, and legal resources. Get insights on navigating the system and understanding your rights in criminal cases." Loudoun County Criminal Court
ReplyDeleteDIY charm: With a straightforward craft project, the "Cord Wrapped Tin Can Flatware Caddy" blog provides a unique and simple way to personalize your eating area.
DeleteBoth practical and fashionable: This blog offers detailed directions for creating a useful yet fashionable flatware caddy that is ideal for charmingly arranging cutlery.
Professional legal defense: A knowledgeable criminal defense lawyer in Rockville will make sure your rights are upheld at every stage of the court case.
Committed to your case: A Rockville criminal defense lawyer with a wealth of expertise puts in endless effort to get the best result for your criminal charges. Rockville criminal defense attorney
provides the quality service of customized fiber connections in the case of large businesses and government entities.
ReplyDelete"With a basic tin can and some string wrapping, you can make a chic and useful flatware caddy. "Perfect for creatively arranging your kitchen!"
ReplyDeleteMake a pretty flatware caddy out of a tin can with this simple do-it-yourself project. Incorporate a rustic element into your eating area.
"Child custody decisions in Virginia can be greatly impacted by domestic abuse. Discover how the legal system and child protection are given top priority by the courts.
Having problems with child custody because of domestic abuse? Our skilled lawyers can help you navigate the procedure and defend your rights. How Domestic Violence Affects Child Custody in Virginia
This comment has been removed by the author.
ReplyDeleteThis comment has been removed by the author.
ReplyDeleteThis comment has been removed by the author.
ReplyDeleteIf you're thinking about upgrading your cleaning tools, a Floor Scrubber Dryer can really make a difference. We at Smile Tech offer reliable machines that save time and effort for any type of floor. Need help choosing the right one? Feel free to get in touch with our team!
ReplyDeleteThis comment has been removed by the author.
ReplyDeleteFor startups, content marketing in Chennai is one of the most affordable growth strategies.
ReplyDeleteMBBS in Georgia is becoming an excellent option for students who want to pursue medical education abroad at an affordable cost. Georgian universities provide modern medical facilities, experienced faculty, and globally recognized degrees that help students build a successful career in the healthcare field.
ReplyDeleteGood post! MBBS in Georgia opens great opportunities for students aiming for an international career.
ReplyDeleteTurn heads and own the spotlight with our Dumb and Dumber suits at Arsenal Jackets where iconic comedy meets bold fashion. Inspired by the unforgettable style of Dumb and Dumber, these vibrant tuxedos deliver a perfect mix of humour, charm, and standout elegance. Designed for those who love to be different, each suit features premium tailoring, striking colours, and a comfortable fit that makes every moment memorable. Whether it’s a costume party, wedding, or special event, this look guarantees instant attention. Unique, playful, and impossible to ignore your statement outfit starts here.
ReplyDeleteThis comment has been removed by the author.
ReplyDeleteflame resistant coveralls support workplace safety standards while maintaining comfort and flexibility for daily tasks.
ReplyDeleteOberon appears well suited for industrial workplaces where employee safety and reliable performance are important priorities. Comfortable protective clothing can help workers remain focused throughout challenging workdays
ReplyDelete