For this "Do Over" project I'm going to upcycle a Lysol Wipes container into an adorable textured flowers vase using caulk. It's a fun way to add texture, depth and dimension to outlined or sketched flowers! And you won't believe how easy it is to add character, and interest to those types of flowers giving off a three dimensional appearance.
Welcome to our "Do It Over Designers" Blog Hop! In case you haven't heard, the "Do It Over Designers" is a group of creative bloggers who love to recycle/upcycle/ DIY, hosted by Anne @The Apple Street Cottage. It happens the 4th Saturday of every other month and it's all about taking something old and/or unused and 'doing it over' into something new. Thanks Anne for hosting this wonderful blog hop!
So let's get started by gathering the . . .
Supplies:
- Lysol Wipes container (empty)
- Box cutter knife
- Flower image
- Pen marker
- Caulk tubes (Dollar Tree)
- Scissors
- Tools to create texture - (palette knife, spoons, small handles, brushes, etc.)
- Paint/Sealant
- Paint brush
As an Amazon Associate, and partner with other brands, I earn from qualifying purchases. This post may contain affiliate links, meaning I receive commissions for purchases made through those links at no cost to you.
How to:
First, use a box cutter knife to remove the top of an empty Lysol container.
Then make sure the container is clean inside and out - removing the label and glue residue from the outside and rinsing out the inside. Since I can't draw a lick, I found a flower image online and . . .
sized it in two different shapes to draw all over the plastic container.
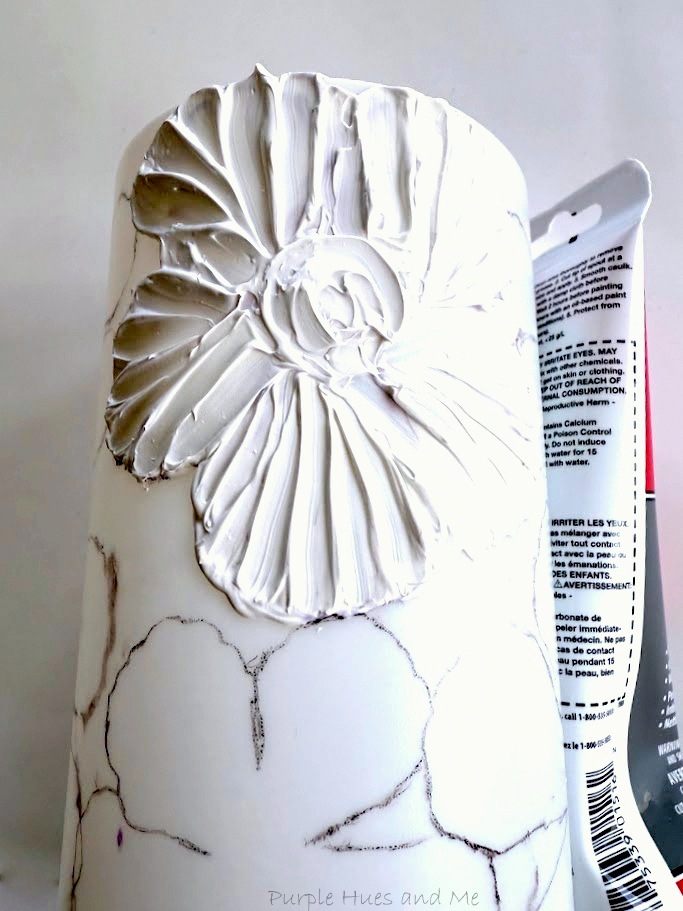
I have to say that I found it difficult to outline the flowers on the plastic. I tried a pencil and a regular pen but those didn't work. And the magic markers I have had very thick tips which I didn't want to use, so I ended up using a rollerball pen. I was able to draw fine lines but it was prone to smudging, as you can see.
And instead of mixing paste into a piping bag to use like most textured flowers are made from - I'm using caulk tubes from the Dollar Tree to outline, sculpt and fill-in the flower petals - creating a unique floral design using different types of tools.
It's truly a very inexpensive and easy way to add three-dimensional detail to craft projects!
Once happy with the design, wait for the caulk to dry - from a few hours to overnight.
Then have fun adding color (paint) to finish the flowers! Paint can also be used as a sealant for the caulk, too! I'm using paint I had on hand called Light Plum which is an outdoor gloss acrylic paint by FolkArt.
I didn't realize the paint was a gloss finish until after it dried. And that turned out to be great for a glossy look!
I love how the gloss paint enhances the lines and shape of the caulk!
Continue painting all of the caulk flowers . . .
until they're all painted!
Once the paint is dry, the pen smudges can be cleaned up with a damp paper towel or wipe.Then have fun adding flowers of your choice into this unique
textured floral design vase.
I hope you enjoyed how I created my textured flowers vase! But don't stop here or forget that this is a blog hop!
Be sure to visit all of this month's creative projects by the "Do It Over Designers" listed below:


Well, that wipes container sure got an upgrade! Your vase is beautiful and using caulk as a texture medium is brilliant. You never cease to amaze me, Gail!
ReplyDeleteThanks so much, Ann! It was a fun project!
DeleteWow Gail - the colour and texture are just stunning! You are the master of making something out of practically nothing!
ReplyDeleteMany thanks, Sara! I have lots of bags full of "trash" that I needed to work on. This project was one of them!
DeleteGail, I love this idea. After I got sick, I began placing bleach wipes at every sink, and I would decoupage the containers so they were less commercial and blah looking. But this idea? Genius! Now I want to get started right away on trying this idea out. They will make the bathrooms so much cuter too, and when the wipes are gone, I will have a beautiful vase. What a wonderful idea!
ReplyDeleteThanks a bunch, Cara! I know you will come up with lots of creative and wonderful ways to upcycle the wipes containers.
DeleteVery clever idea and I love the color choice - these would also make cute gift containers!
ReplyDeleteThanks a million, Patti! I love getting suggestions and ideas from you! They are always the best!!!
DeleteClever idea, at first glance these look like a material decoration. Seem like this would be a good way to decorate the front door of a house, or a yard gate.
ReplyDeleteVery pretty project Gail love the chosen color and the cost saving container idea.
ReplyDeleteThanks a bunch, Linda! I appreciate your lovely comments!
DeleteGreat job on this project Gail, I love the unique flowers, I never would have known it was caulking!
ReplyDeleteFor someone who claims they can't draw a lick you do manage extremely creative and beautiful projects! I love this idea and will most definitely be trying a version on this theme at some point, it has so much potential! I'm eyeing up some empty containers right now and wondering about their potential to be beautified with caulk!
ReplyDeleteWow! What a fun way to use caulking. Those 3D flowers looks so great and I love the color.
ReplyDeleteGorgeous and creative.
ReplyDeleteCool
ReplyDeleteVery suitable for display in the living room.
ReplyDeleteThis was a pretty enjoyable read. I always like finding posts that share useful ideas without making them confusing. I’ve also been using this mouse test whenever I want to check if all my mouse buttons are working the way they should.
ReplyDelete