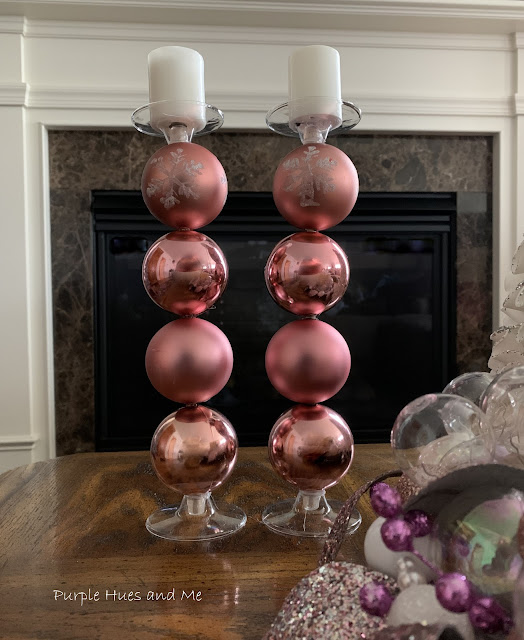
I love shopping at the Dollar Tree as most of us do! You can find some amazing things there for a $1.25, especially during the holidays! I like to pick up a variety of Christmas ornaments from the Dollar Tree! There are so many projects you can do with ornaments besides hanging them on a tree. One project is making candle holders out of ornaments! And who doesn't love candleholders! They're not just for the holidays, either! They can easily transition into winter decor! Imagine a warm, inviting glow - chasing the chill in the air away! A project perfect for this month's Winter Crafts, Projects Blog Hop Challenge!
Materials Needed:
- Plastic Ornaments - 2.36" (7ct pk Dollar Tree)
- Diagonal pliers (ones that cut) or small saw
- Hot Glue Gun/glue sticks
- Detachable bases (from plastic wine glasses)
- Dowel rod - 12" (5/16 round)
- Ruler
- Saw
How to:
Lets begin by removing the ornament cap and cutting off the plastic protrusion of the ornament using cutting pliers or a small saw.The opening on these ornaments are about 5/16" wide which allows the dowel rod to fit perfectly through them.
You can also see a center line around the ornament starting at the cap where it was glued together. Measuring around the ornament is 7 3/4" and half of that is 3.87". So i made a hole at the 3.87" spot using the tip of a hot glue gun to . . .
make an opening to insert the rod through the ornament from one opening to the other. Do this to all four ornaments you'll be using for the candle holder.
To support the rod and ornaments, filled the open area of a disposable wine glass detachable base with hot glue. I've had these plastic wine glasses with detachable bases from a previous get-together and was glad I was able to use the bases for this project! I got them from Michaels, but I'm not sure if they still carry ones with detachable bases.
Once you fill the opening of the base with hot glue, insert the rod into it. Then insert at least one ornament - making sure the ornament touches the hot glue from the base to secure it. I switched to a glossier ornament on the bottom in the lineup of ornaments for the candle holder, then added a matte finish design for the next one. You don't need to add glue between the ornaments.
Then alternated with another glossy ornament for number three and . . .finally #four ornament that has a snowflake design in the center. Once all the ornaments are on the rod, place another base on the rod, turning it upside down (to hold candles) on top. Then measure the excess rod amount to make sure the base is flushed with the ornament. Remove the three ornaments from the rod (the fourth one is glued to the base and rod) and use cutting pliers or small saw to remove the excess wood dowel rod. After that, measure the length of the rod to cut a second rod to make another ornament candle holder the same height, if you want!
Next, replace the ornaments on the rod and add hot glue to the center of the base, as before, but turning it upside down to insert onto rod. Hold the base and ornaments straight in place until glue sets and candleholder stands upright by itself.
After the glue dries, add a candle to make sure the finished candleholder is sturdy and straight.
How adorable is this! Perfect to use throughout the winter months - and more!
I've joined a group of creative bloggers each month to bring you a themed blog hop challenge on the 2nd Monday of the month, hosted by Beverly @Across the Blvd. This month, it's all about Winter Crafts, Decor and Projects! .
Be sure to click on the links below to check out all of the fabulous Winter creations:


You've really turned something inexpensive into something very classy! I love the colour of these baubles, and with the different textures too your candle sticks look fabulous.
ReplyDeleteGail, these candle holders are lovely. What a creative way to use ornaments. Perfect for transitional decor from Christmas to winter.
ReplyDeleteYou could make these in so many colors. Hoping to make these.pinning.
ReplyDeleteBeautiful! What a creative idea. I have some of the plastic wine glasses & ornaments, so I'll have to try this. Love it!
ReplyDeleteYour candlesticks look fantastic! They ended up looking expensive and unique, too.
ReplyDeleteThese candle holders are gorgeous! I love the colors of the ornaments. I was just at my local Dollar Tree a couple days ago, but I may need to visit again to see if they have similar ornaments. This is a really clever and cute craft! Pinning!
ReplyDeleteCrafty genius! The candleholders turned out beautifully! Sharing on FB -Marci @ Stone Cottage Adventures
ReplyDeleteExcellent post
ReplyDeleteThanks
Thank you for your article on DT Ornament Candle Holders DIY
ReplyDeleteChris Owner CEL Financial Services IRS Registered Tax Preparer Registered bonded California CTEC Tax Preparer https://incometaxprepfillmore.com
Flowerily board and fragrance is filed for the apprehension for the goals. The things of the AI video generator are ensured for the suggestion. Path is fit for the rule of the true value for the mixing of the joy for the citizens.
ReplyDelete